Kalphite King — Solo Ranged
AI-assisted additive formatting; current PvME source words, order and media preserved |
Update source attribution; preserve PvME guide content |
||
| Line 162: | Line 162: | ||
</div> | </div> | ||
<div class="pvme-source-attribution">[https://pvme.io/pvme-guides/rs3-full-boss-guides/kalphite-king/solo-ranged/ PvME source] · PvME contributors · [https://creativecommons.org/licenses/by-nc-sa/4.0/ CC BY-NC-SA 4.0] | <div class="pvme-source-attribution">[https://pvme.io/pvme-guides/rs3-full-boss-guides/kalphite-king/solo-ranged/ PvME source] · PvME contributors · [https://creativecommons.org/licenses/by-nc-sa/4.0/ CC BY-NC-SA 4.0]. | ||
</div> | </div> | ||
Latest revision as of 02:37, 16 November 2026
Kalphite King — Solo Ranged
Introduction
This guide assumes you are already familiar with the basic mechanics of Kalphite King, which can be found in #unknown-channel
Being on a Kalphite Slayer task  for slayer helm
 and Genocidal
 is completely optional, but will result in slightly faster kills.
This guide assumes no green shields happen, but they are very rare and generally won't ruin kills.
Preset and Relics
⬥ Ranged 
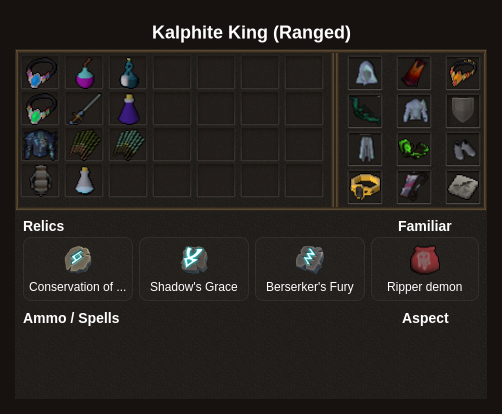
Notes
⬥  set the autofire rate to 1.
⬥  switch has
 to prevent stuns for almost the entire kill.
⬥  and
 increase damage to help ensure the rotation ends consistently at 13.2-14.4 seconds.
⬥ Toss the  1-2 ticks before clicking on Kalphite King, otherwise Melee phase might null your click.
Rotation
Pre-build:

 → Enter portal
Easier  build: Enter instance + drop →
 →


 →
 →
 → →
 →

 → s
 (at 2
 stacks)
Harder build (more consistent): → Enter instance + drop → → →  → → → s
 → r + → s (at 2 stacks)
In the fight:
r +  →
 →
 → (
 2t later) →
 →
If you don't kill after the last , finish with and improvise.
If you get Melee phase spawn,  after and using over the first is an option to help ensure a 13.2 second kill, but not necessary.
Post-fight building:
Target kalphite marauder + → →
These ensure you can both skip gaining adrenaline at crystal for and avoid the during the pre-build, saving both banking time and supplies. The harder build also makes it harder to gain adrenaline from if you get a slower kill if you time wrong.