Zamorak, Lord of Chaos
imported>PvME corpus import Attributed pinned PvME snapshot 074a9438f79d10fba75735791be0030734db8b5e; CC BY-NC-SA 4.0 |
Update source attribution; preserve PvME guide content |
||
| (2 intermediate revisions by the same user not shown) | |||
| Line 1: | Line 1: | ||
__NOTOC__ | |||
<div class="pvme-exact-guide"> | |||
<h1 id="zamorak-lord-of-chaos" class="pvme-source-title"><nowiki>Zamorak, Lord of Chaos</nowiki></h1> | |||
<nowiki> | |||
</nowiki> | |||
<p class="pvme-source-line"><pvme-image src="https://img.pvme.io/images/E9HmNuzAe2.png" alt="" title="" kind="media" /></p> | |||
<nowiki> | |||
</nowiki> | |||
< | <div class="pvme-source-section"> | ||
<h2 id="introduction"><ins><nowiki>Introduction</nowiki></ins></h2> | |||
<nowiki> | <nowiki> | ||
</nowiki>< | </nowiki> | ||
<p class="pvme-source-line pvme-source-spacer"><nowiki></nowiki></p> | |||
<nowiki> | <nowiki> | ||
</nowiki><p><nowiki> | </nowiki> | ||
<p class="pvme-source-line"><nowiki>Zamorak, Lord of Chaos is the fifth and final instalment in the Elder God Wars dungeon. This guide will primarily focus on the final boss encounter. For help clearing the dungeon, refer to </nowiki><span><nowiki>#unknown-channel</nowiki></span><nowiki>. If you would like a more simple version of the guide for your first few kills, refer to </nowiki><span><nowiki>#unknown-channel</nowiki></span><nowiki>.</nowiki></p> | |||
<nowiki> | <nowiki> | ||
</nowiki><p><nowiki> | </nowiki> | ||
<p class="pvme-source-line pvme-source-spacer"><nowiki></nowiki></p> | |||
<nowiki> | <nowiki> | ||
</nowiki>< | </nowiki> | ||
</div> | |||
<div class="pvme-source-section" data-gear="true"> | |||
<h2 id="presets-and-relics"><ins><nowiki>Presets and Relics</nowiki></ins></h2> | |||
<nowiki> | <nowiki> | ||
</nowiki>< | </nowiki> | ||
<p class="pvme-source-line"><nowiki>⬥ </nowiki>[https://presets.pvme.io/?id=dc2b2947-f705-4bdd-a557-27783697454e <nowiki>Hybrid</nowiki>]<pvme-image src="https://pvme.io/preset-maker-storage/embeds/images/b4b34f517be08984baad9bfd1a1482ec8b8b2e195fce4ba409ce1249fd1c3b63.webp" alt="Zamorak Magic/Melee Main" kind="addition" /></p> | |||
<nowiki> | <nowiki> | ||
</nowiki><p><nowiki>⬥ </nowiki>[https://presets.pvme.io/?id= | </nowiki> | ||
<p class="pvme-source-line"><nowiki>⬥ </nowiki>[https://presets.pvme.io/?id=3da02410-dd19-42de-87b7-ea3ead262b81 <nowiki>Melee</nowiki>]<pvme-image src="https://pvme.io/preset-maker-storage/embeds/images/c5b99d02b85cb4d78481f1d86e20585678d5515784c4604f23bfcc9a56e4c9f5.webp" alt="Zamorak Melee Main" kind="addition" /></p> | |||
<nowiki> | <nowiki> | ||
</nowiki><p><nowiki>⬥ </nowiki>[https://presets.pvme.io/?id= | </nowiki> | ||
<p class="pvme-source-line"><nowiki>⬥ </nowiki>[https://presets.pvme.io/?id=6958cd6e-91eb-4a07-ad9b-789e7bdcc42d <nowiki>Necromancy</nowiki>]<pvme-image src="https://pvme.io/preset-maker-storage/embeds/images/eeadb175d74f30319cede520773e372798e2466c0fc77d460c69be153efa9632.webp" alt="Zamorak Necromancy Main" kind="addition" /></p> | |||
<nowiki> | <nowiki> | ||
</nowiki><p><nowiki>⬥ </nowiki>[https://presets.pvme.io/?id= | </nowiki> | ||
<p class="pvme-source-line"><nowiki>⬥ </nowiki>[https://presets.pvme.io/?id=b0545387-32d0-4d6f-815b-04416fe0c04b <nowiki>Ranged</nowiki>]<pvme-image src="https://pvme.io/preset-maker-storage/embeds/images/7a906ea044d7c91d7f13bd960a06ce6b645745937f660669c29b97f552bc328d.webp" alt="Zamorak Ranged Main" kind="addition" /></p> | |||
<nowiki> | <nowiki> | ||
</nowiki><p><nowiki>⬥ </nowiki>[https://presets.pvme.io/?id= | </nowiki> | ||
<p class="pvme-source-line"><nowiki>⬥ </nowiki>[https://presets.pvme.io/?id=9c8ce868-3e1f-4b76-8b4a-da0b8fb174ac <nowiki>Magic</nowiki>]</p> | |||
<nowiki> | <nowiki> | ||
</nowiki><p | </nowiki> | ||
<nowiki> | <p class="pvme-source-line"><nowiki> | ||
</nowiki>< | </nowiki><pvme-image src="https://firebasestorage.googleapis.com/v0/b/preset-images/o/images%2F9c8ce868-3e1f-4b76-8b4a-da0b8fb174ac.png?alt=media" alt="" title="" kind="media" /></p> | ||
<nowiki> | <nowiki> | ||
</nowiki><div><nowiki> | </nowiki> | ||
<div><nowiki> | |||
</nowiki><div><nowiki> | </nowiki><div><nowiki> | ||
</nowiki><div><nowiki> | </nowiki><div><nowiki> | ||
| Line 38: | Line 58: | ||
</nowiki><div><nowiki> | </nowiki><div><nowiki> | ||
</nowiki><div></div> | </nowiki><div style="background-color: rgb(0, 153, 255)"></div><nowiki> | ||
<nowiki> | |||
</nowiki><div><nowiki> | </nowiki><div><nowiki> | ||
</nowiki><div><nowiki> | </nowiki><div><nowiki> | ||
| Line 47: | Line 66: | ||
</nowiki><div><div><div><u><nowiki>Checklist and Unlocks</nowiki></u><nowiki> | </nowiki><div><div><div><u><nowiki>Checklist and Unlocks</nowiki></u><nowiki> | ||
</nowiki></div> | </nowiki></div><div class="pvme-source-preserve-lines"><nowiki>⬥ </nowiki><pvme-image src="https://cdn.discordapp.com/emojis/1153772938252787793.png?v=1" alt="igneouskalmej" title="igneouskalmej" kind="icon" /><nowiki> </nowiki><pvme-image src="https://cdn.discordapp.com/emojis/902209626404171786.png?v=1" alt="igneouskalxil" title="igneouskalxil" kind="icon" /><nowiki> </nowiki><pvme-image src="https://cdn.discordapp.com/emojis/902209626404192316.png?v=1" alt="igneouskalket" title="igneouskalket" kind="icon" /><nowiki> </nowiki><pvme-image src="https://cdn.discordapp.com/emojis/1139200072438005851.png?v=1" alt="igneouskalmor" title="igneouskalmor" kind="icon" /><nowiki> Zuk cape for your chosen style | ||
<div | ⬥ </nowiki><pvme-image src="https://cdn.discordapp.com/emojis/535614336207552523.png?v=1" alt="disrupt" title="disrupt" kind="icon" /><nowiki> Disruption Shield unlocked | ||
⬥ </nowiki> | ⬥ </nowiki><pvme-image src="https://cdn.discordapp.com/emojis/994189299681607800.png?v=1" alt="infernalpuzzlebox" title="infernalpuzzlebox" kind="icon" /><nowiki> Toolbelt Infernal Puzzle Box unlocked. | ||
⬥ </nowiki> | ⬥ </nowiki><pvme-image src="https://cdn.discordapp.com/emojis/513201065877831680.png?v=1" alt="rov" title="rov" kind="icon" /><nowiki> Passive Ring of Vigour unlocked | ||
⬥ </nowiki> | ⬥ </nowiki><pvme-image src="https://cdn.discordapp.com/emojis/1137809209782698024.png?v=1" alt="darkness" title="darkness" kind="icon" /><nowiki> </nowiki><pvme-image src="https://cdn.discordapp.com/emojis/1357545000577011782.png?v=1" alt="temporalanomaly" title="temporalanomaly" kind="icon" /><nowiki> Darkness/Temporal Anomaly active | ||
⬥ </nowiki> | ⬥ </nowiki><pvme-image src="https://cdn.discordapp.com/emojis/689530593796423724.png?v=1" alt="thermalflask" title="thermalflask" kind="icon" /><nowiki> Thermal spa HP boost active | ||
⬥ </nowiki> | </nowiki></div></div></div><nowiki> | ||
</nowiki></div> | </nowiki></div><nowiki> | ||
</div> | |||
</div> | |||
<nowiki> | |||
</nowiki></div> | |||
<nowiki> | |||
</nowiki></div> | </nowiki></div><nowiki> | ||
<nowiki> | |||
</nowiki></div> | </nowiki></div></div></div></div></div></div></div></div></div></div></div></div> | ||
</div> | |||
</div> | |||
</div> | |||
</div> | |||
</div> | |||
</div> | |||
</div> | |||
</div> | |||
</div> | |||
</div> | |||
</div> | |||
<nowiki> | <nowiki> | ||
</nowiki><p><nowiki></nowiki></p> | </nowiki> | ||
<p class="pvme-source-line pvme-source-spacer"><nowiki></nowiki></p> | |||
<nowiki> | <nowiki> | ||
</nowiki><h3 id="recommended-upgrades"><nowiki>Recommended Upgrades</nowiki></h3> | </nowiki> | ||
<div class="pvme-source-mechanic"> | |||
<h3 id="recommended-upgrades"><nowiki>Recommended Upgrades</nowiki></h3> | |||
<nowiki> | <nowiki> | ||
</nowiki><p><nowiki>These items should be part of your preset if available and will aid in being able to follow the rotations and strategies in our Zamorak guides</nowiki></p> | </nowiki> | ||
<p class="pvme-source-line"><nowiki>These items should be part of your preset if available and will aid in being able to follow the rotations and strategies in our Zamorak guides</nowiki></p> | |||
<nowiki> | <nowiki> | ||
</nowiki><p><nowiki></nowiki></p> | </nowiki> | ||
<p class="pvme-source-line pvme-source-spacer"><nowiki></nowiki></p> | |||
<nowiki> | <nowiki> | ||
</nowiki><p><nowiki>⬥ </nowiki> | </nowiki> | ||
<p class="pvme-source-line"><nowiki>⬥ </nowiki><pvme-image src="https://cdn.discordapp.com/emojis/1096130867279171706.png?v=1" alt="melee" title="melee" kind="icon" /><nowiki> </nowiki><strong><nowiki>Melee</nowiki></strong></p> | |||
<nowiki> | <nowiki> | ||
</nowiki><p><nowiki> • </nowiki> | </nowiki> | ||
<p class="pvme-source-line pvme-source-detail"><nowiki> • </nowiki><pvme-image src="https://cdn.discordapp.com/emojis/903244090953588787.png?v=1" alt="ezk" title="ezk" kind="icon" /><nowiki> Ek-ZekKil and </nowiki><pvme-image src="https://cdn.discordapp.com/emojis/883134308146098227.png?v=1" alt="lengmh" title="lengmh" kind="icon" /><nowiki> Leng swords or highest available tier of dual wields</nowiki></p> | |||
<nowiki> | <nowiki> | ||
</nowiki><p><nowiki> • </nowiki> | </nowiki> | ||
<p class="pvme-source-line pvme-source-detail"><nowiki> • </nowiki><pvme-image src="https://cdn.discordapp.com/emojis/780401412839833601.png?v=1" alt="eofred" title="eofred" kind="icon" /><nowiki> EoF with </nowiki><pvme-image src="https://cdn.discordapp.com/emojis/779048041088024606.png?v=1" alt="dragonclaw" title="dragonclaw" kind="icon" /><nowiki> Dragon claws or </nowiki><pvme-image src="https://cdn.discordapp.com/emojis/1448697873603498045.png?v=1" alt="varanussmercy" title="varanussmercy" kind="icon" /><nowiki> Varanus's Mercy</nowiki></p> | |||
<nowiki> | <nowiki> | ||
</nowiki><p><nowiki> • </nowiki> | </nowiki> | ||
<p class="pvme-source-line pvme-source-detail"><nowiki> • </nowiki><pvme-image src="https://cdn.discordapp.com/emojis/994189295592161291.png?v=1" alt="vestmentsofhavoctop" title="vestmentsofhavoctop" kind="icon" /><nowiki> Vestments of havoc equipment</nowiki></p> | |||
<nowiki> | <nowiki> | ||
</nowiki><p><nowiki></nowiki></p> | </nowiki> | ||
<p class="pvme-source-line pvme-source-spacer"><nowiki></nowiki></p> | |||
<nowiki> | <nowiki> | ||
</nowiki><p><nowiki>⬥ </nowiki> | </nowiki> | ||
<p class="pvme-source-line"><nowiki>⬥ </nowiki><pvme-image src="https://cdn.discordapp.com/emojis/580168050121113623.png?v=1" alt="range" title="range" kind="icon" /><nowiki> </nowiki><strong><nowiki>Ranged</nowiki></strong></p> | |||
<nowiki> | <nowiki> | ||
</nowiki><p><nowiki> • </nowiki> | </nowiki> | ||
<p class="pvme-source-line pvme-source-detail"><nowiki> • </nowiki><pvme-image src="https://cdn.discordapp.com/emojis/994189289623662702.png?v=1" alt="bolg" title="bolg" kind="icon" /><nowiki> Bow of the Last Guardian, </nowiki><pvme-image src="https://cdn.discordapp.com/emojis/626466665848242186.png?v=1" alt="sgb" title="sgb" kind="icon" /><nowiki> Seren godbow, or </nowiki><pvme-image src="https://cdn.discordapp.com/emojis/1446178203608809472.png?v=1" alt="gloomfirebow" title="gloomfirebow" kind="icon" /><nowiki> Gloomfire bow</nowiki></p> | |||
<nowiki> | <nowiki> | ||
</nowiki><p><nowiki> • </nowiki> | </nowiki> | ||
<p class="pvme-source-line pvme-source-detail"><nowiki> • </nowiki><pvme-image src="https://cdn.discordapp.com/emojis/902209626450296892.png?v=1" alt="pernixsquiver" title="pernixsquiver" kind="icon" /><nowiki> Quiver with </nowiki><pvme-image src="https://cdn.discordapp.com/emojis/971025696958853180.png?v=1" alt="fularrow" title="fularrow" kind="icon" /><nowiki> </nowiki><pvme-image src="https://cdn.discordapp.com/emojis/971025697046925362.png?v=1" alt="wenarrow" title="wenarrow" kind="icon" /><nowiki> Ful/Wen arrows and </nowiki><pvme-image src="https://cdn.discordapp.com/emojis/900758234527301642.png?v=1" alt="deathsporearrows" title="deathsporearrows" kind="icon" /><nowiki> Deathspore arrows</nowiki></p> | |||
<nowiki> | <nowiki> | ||
</nowiki><p><nowiki> • </nowiki> | </nowiki> | ||
<p class="pvme-source-line pvme-source-detail"><nowiki> • </nowiki><pvme-image src="https://cdn.discordapp.com/emojis/780401412727242773.png?v=1" alt="eofgreen" title="eofgreen" kind="icon" /><nowiki> EoF with </nowiki><pvme-image src="https://cdn.discordapp.com/emojis/1446178203608809472.png?v=1" alt="gloomfirebow" title="gloomfirebow" kind="icon" /><nowiki> Gloomfire bow, </nowiki><pvme-image src="https://cdn.discordapp.com/emojis/626466665848242186.png?v=1" alt="sgb" title="sgb" kind="icon" /><nowiki> Seren godbow, </nowiki><pvme-image src="https://cdn.discordapp.com/emojis/615618531937222657.png?v=1" alt="ecb" title="ecb" kind="icon" /><nowiki> Eldritch crossbow, and </nowiki><pvme-image src="https://cdn.discordapp.com/emojis/643848618553507843.png?v=1" alt="dbow" title="dbow" kind="icon" /><nowiki> Dark bow</nowiki></p> | |||
<nowiki> | <nowiki> | ||
</nowiki><p><nowiki></nowiki></p> | </nowiki> | ||
<p class="pvme-source-line pvme-source-spacer"><nowiki></nowiki></p> | |||
<nowiki> | <nowiki> | ||
</nowiki><p><nowiki>⬥ </nowiki> | </nowiki> | ||
<p class="pvme-source-line"><nowiki>⬥ </nowiki><pvme-image src="https://cdn.discordapp.com/emojis/689504724159823906.png?v=1" alt="magic" title="magic" kind="icon" /><nowiki> </nowiki><strong><nowiki>Magic</nowiki></strong></p> | |||
<nowiki> | <nowiki> | ||
</nowiki><p><nowiki> • </nowiki> | </nowiki> | ||
<p class="pvme-source-line pvme-source-detail"><nowiki> • </nowiki><pvme-image src="https://cdn.discordapp.com/emojis/869284271595069451.png?v=1" alt="soa" title="soa" kind="icon" /><nowiki> Fractured Staff of Armadyl and </nowiki><pvme-image src="https://cdn.discordapp.com/emojis/568262896375824385.png?v=1" alt="grim" title="grim" kind="icon" /><nowiki> Erethdor's grimoire</nowiki></p> | |||
<nowiki> | <nowiki> | ||
</nowiki><p><nowiki> • </nowiki> | </nowiki> | ||
<p class="pvme-source-line pvme-source-detail"><nowiki> • </nowiki><pvme-image src="https://cdn.discordapp.com/emojis/780401412936040478.png?v=1" alt="eofpurple" title="eofpurple" kind="icon" /><nowiki> with Legatus's Emberstaff </nowiki><pvme-image src="https://cdn.discordapp.com/emojis/1451134746280329357.png?v=1" alt="legatusemberstaff" title="legatusemberstaff" kind="icon" /><nowiki>, or </nowiki><pvme-image src="https://cdn.discordapp.com/emojis/1215929543068618752.png?v=1" alt="ibansstaff" title="ibansstaff" kind="icon" /><nowiki> Iban's staff</nowiki></p> | |||
<nowiki> | <nowiki> | ||
</nowiki><p><nowiki> • </nowiki> | </nowiki> | ||
<p class="pvme-source-line pvme-source-detail"><nowiki> • </nowiki><pvme-image src="https://cdn.discordapp.com/emojis/1400500746377625790.png?v=1" alt="tumekenrobetop" title="tumekenrobetop" kind="icon" /><nowiki> Tumeken's resplendence equipment</nowiki></p> | |||
<nowiki> | <nowiki> | ||
</nowiki><p><nowiki> • </nowiki> | </nowiki> | ||
<p class="pvme-source-line pvme-source-detail"><nowiki> • </nowiki><pvme-image src="https://cdn.discordapp.com/emojis/856635090783567902.png?v=1" alt="incitefear" title="incitefear" kind="icon" /><nowiki> </nowiki><pvme-image src="https://cdn.discordapp.com/emojis/856635090745950258.png?v=1" alt="exsanguinate" title="exsanguinate" kind="icon" /><nowiki> </nowiki><pvme-image src="https://cdn.discordapp.com/emojis/856635090453135382.png?v=1" alt="animatedead" title="animatedead" kind="icon" /><nowiki> City of Senntisten spells unlocked</nowiki></p> | |||
<nowiki> | <nowiki> | ||
</nowiki><p><nowiki></nowiki></p> | </nowiki> | ||
<p class="pvme-source-line pvme-source-spacer"><nowiki></nowiki></p> | |||
<nowiki> | <nowiki> | ||
</nowiki><p><nowiki>⬥ </nowiki> | </nowiki> | ||
<p class="pvme-source-line"><nowiki>⬥ </nowiki><pvme-image src="https://cdn.discordapp.com/emojis/1148995625896120460.png?v=1" alt="necromancy" title="necromancy" kind="icon" /><nowiki> </nowiki><strong><nowiki>Necromancy</nowiki></strong></p> | |||
<nowiki> | <nowiki> | ||
</nowiki><p><nowiki> • </nowiki> | </nowiki> | ||
<p class="pvme-source-line pvme-source-detail"><nowiki> • </nowiki><pvme-image src="https://cdn.discordapp.com/emojis/1138809234922934282.png?v=1" alt="omniguard" title="omniguard" kind="icon" /><nowiki> </nowiki><pvme-image src="https://cdn.discordapp.com/emojis/1138809230573441064.png?v=1" alt="soulboundlantern" title="soulboundlantern" kind="icon" /><nowiki> Rasial weapons or highest available tier of necromancy weapons</nowiki></p> | |||
<nowiki> | <nowiki> | ||
</nowiki><p><nowiki> • </nowiki> | </nowiki> | ||
<p class="pvme-source-line pvme-source-detail"><nowiki> • </nowiki><pvme-image src="https://cdn.discordapp.com/emojis/780401412915855380.png?v=1" alt="eofblack" title="eofblack" kind="icon" /><nowiki> EoF with </nowiki><pvme-image src="https://cdn.discordapp.com/emojis/1138809243143766118.png?v=1" alt="deathguard90" title="deathguard90" kind="icon" /><nowiki> Death guard</nowiki></p> | |||
<nowiki> | <nowiki> | ||
</nowiki><p><nowiki> • </nowiki> | </nowiki> | ||
<p class="pvme-source-line pvme-source-detail"><nowiki> • </nowiki><pvme-image src="https://cdn.discordapp.com/emojis/1206664820682657822.png?v=1" alt="firstnecrorobetop" title="firstnecrorobetop" kind="icon" /><nowiki> First Necromancer equipment</nowiki></p> | |||
<nowiki> | <nowiki> | ||
</nowiki><p><nowiki></nowiki></p> | </nowiki> | ||
<p class="pvme-source-line pvme-source-spacer"><nowiki></nowiki></p> | |||
<nowiki> | <nowiki> | ||
</nowiki><p><em><nowiki>Note: The quest Twilight of the Gods will grant 10% reduced damage taken against Zamorak</nowiki></em></p> | </nowiki> | ||
<p class="pvme-source-line"><em><nowiki>Note: The quest Twilight of the Gods will grant 10% reduced damage taken against Zamorak</nowiki></em></p> | |||
<nowiki> | <nowiki> | ||
</nowiki><h2 id="fight-overview"><ins><nowiki>Fight Overview</nowiki></ins></h2> | </nowiki> | ||
</div> | |||
</div> | |||
<div class="pvme-source-section"> | |||
<h2 id="fight-overview"><ins><nowiki>Fight Overview</nowiki></ins></h2> | |||
<nowiki> | <nowiki> | ||
</nowiki><p><nowiki>Zamorak has 6 phases that are progressed by depleting his health bar and charging the 6 edicts, or pads, located around the arena. During each phase he will cycle through 3 health bar colours, each with their own effects that dictate the progression of the fight:</nowiki></p> | </nowiki> | ||
<p class="pvme-source-line"><nowiki>Zamorak has 6 phases that are progressed by depleting his health bar and charging the 6 edicts, or pads, located around the arena. During each phase he will cycle through 3 health bar colours, each with their own effects that dictate the progression of the fight:</nowiki></p> | |||
<nowiki> | <nowiki> | ||
</nowiki><p> | </nowiki> | ||
<p class="pvme-source-line"><pvme-image src="https://img.pvme.io/images/XvTHsFcxSC.png" alt="" title="" kind="media" /><nowiki> | |||
⬥ </nowiki><strong><nowiki>Grey HP:</nowiki></strong><nowiki> The health bar Zamorak starts with and regains between each phase</nowiki></p> | ⬥ </nowiki><strong><nowiki>Grey HP:</nowiki></strong><nowiki> The health bar Zamorak starts with and regains between each phase</nowiki></p> | ||
<nowiki> | <nowiki> | ||
</nowiki><p><nowiki> • Zamorak will have accelerated 4-tick attack speed and deal 50% more damage, but </nowiki><strong><nowiki>won't use special attacks</nowiki></strong></p> | </nowiki> | ||
<p class="pvme-source-line pvme-source-detail"><nowiki> • Zamorak will have accelerated 4-tick attack speed and deal 50% more damage, but </nowiki><strong><nowiki>won't use special attacks</nowiki></strong></p> | |||
<nowiki> | <nowiki> | ||
</nowiki><p><nowiki> • Cannot be fully depleted through damage and will constantly regenerate itself at an increasing rate</nowiki></p> | </nowiki> | ||
<p class="pvme-source-line pvme-source-detail"><nowiki> • Cannot be fully depleted through damage and will constantly regenerate itself at an increasing rate</nowiki></p> | |||
<nowiki> | <nowiki> | ||
</nowiki><p><nowiki> • Starts at a soft cap that can regenerate itself up to a hard cap of double the starting value</nowiki></p> | </nowiki> | ||
<p class="pvme-source-line pvme-source-detail"><nowiki> • Starts at a soft cap that can regenerate itself up to a hard cap of double the starting value</nowiki></p> | |||
<nowiki> | <nowiki> | ||
</nowiki><p><nowiki> ⬩ The soft cap will increase with uninterrupted healing at the current cap</nowiki></p> | </nowiki> | ||
<p class="pvme-source-line pvme-source-detail"><nowiki> ⬩ The soft cap will increase with uninterrupted healing at the current cap</nowiki></p> | |||
<nowiki> | <nowiki> | ||
</nowiki><p><nowiki> ⬩ A healing tick can only restore </nowiki><ins><nowiki>up to</nowiki></ins><nowiki> the cap if </nowiki><strong><nowiki>current grey HP</nowiki></strong><nowiki> is lower than it</nowiki></p> | </nowiki> | ||
<p class="pvme-source-line pvme-source-detail"><nowiki> ⬩ A healing tick can only restore </nowiki><ins><nowiki>up to</nowiki></ins><nowiki> the cap if </nowiki><strong><nowiki>current grey HP</nowiki></strong><nowiki> is lower than it</nowiki></p> | |||
<nowiki> | <nowiki> | ||
</nowiki><p><nowiki> ⬩ Damage is calculated before healing on the same tick, even a tiny amount of damage can prevent the cap from increasing</nowiki></p> | </nowiki> | ||
<p class="pvme-source-line pvme-source-detail"><nowiki> ⬩ Damage is calculated before healing on the same tick, even a tiny amount of damage can prevent the cap from increasing</nowiki></p> | |||
<nowiki> | <nowiki> | ||
</nowiki><p><nowiki> ⬩ DoT effects like </nowiki> | </nowiki> | ||
<p class="pvme-source-line pvme-source-detail"><nowiki> ⬩ DoT effects like </nowiki><pvme-image src="https://cdn.discordapp.com/emojis/1478063107908702482.png?v=1" alt="combust" title="combust" kind="icon" /><nowiki> / </nowiki><pvme-image src="https://cdn.discordapp.com/emojis/1478062910113714297.png?v=1" alt="dismember" title="dismember" kind="icon" /><nowiki> / </nowiki><pvme-image src="https://cdn.discordapp.com/emojis/1159433682403201044.png?v=1" alt="bloat" title="bloat" kind="icon" /><nowiki> are very effective at preventing the soft cap from increasing</nowiki></p> | |||
<nowiki> | <nowiki> | ||
</nowiki><p><nowiki> • At 900% enrage, the regeneration increase will </nowiki><strong><nowiki>carry over between grey HP phases</nowiki></strong></p> | </nowiki> | ||
<p class="pvme-source-line pvme-source-detail"><nowiki> • At 900% enrage, the regeneration increase will </nowiki><strong><nowiki>carry over between grey HP phases</nowiki></strong></p> | |||
<nowiki> | <nowiki> | ||
</nowiki><p><nowiki> • Upon activating a pad, all remaining </nowiki><strong><nowiki>grey HP</nowiki></strong><nowiki> will be converted into </nowiki><strong><nowiki>red HP</nowiki></strong></p> | </nowiki> | ||
<p class="pvme-source-line pvme-source-detail"><nowiki> • Upon activating a pad, all remaining </nowiki><strong><nowiki>grey HP</nowiki></strong><nowiki> will be converted into </nowiki><strong><nowiki>red HP</nowiki></strong></p> | |||
<nowiki> | <nowiki> | ||
</nowiki><p><nowiki> • An </nowiki><strong><nowiki>increased grey HP soft cap</nowiki></strong><nowiki>, or hard cap, never carries over between </nowiki><strong><nowiki>grey HP</nowiki></strong><nowiki> phases and always resets to the initial soft cap</nowiki></p> | </nowiki> | ||
<p class="pvme-source-line pvme-source-detail"><nowiki> • An </nowiki><strong><nowiki>increased grey HP soft cap</nowiki></strong><nowiki>, or hard cap, never carries over between </nowiki><strong><nowiki>grey HP</nowiki></strong><nowiki> phases and always resets to the initial soft cap</nowiki></p> | |||
<nowiki> | <nowiki> | ||
</nowiki><p> | </nowiki> | ||
<p class="pvme-source-line"><pvme-image src="https://img.pvme.io/images/TZEQHE85wb.png" alt="" title="" kind="media" /><nowiki> | |||
⬥ </nowiki><strong><nowiki>Red HP:</nowiki></strong><nowiki> The health bar Zamorak gains upon the player activating a pad</nowiki></p> | ⬥ </nowiki><strong><nowiki>Red HP:</nowiki></strong><nowiki> The health bar Zamorak gains upon the player activating a pad</nowiki></p> | ||
<nowiki> | <nowiki> | ||
</nowiki><p><nowiki> • Zamorak will have accelerated 4-tick attack speed and deal 50% more damage, and </nowiki><strong><nowiki>will do his next special attack every 11 auto attacks</nowiki></strong></p> | </nowiki> | ||
<p class="pvme-source-line pvme-source-detail"><nowiki> • Zamorak will have accelerated 4-tick attack speed and deal 50% more damage, and </nowiki><strong><nowiki>will do his next special attack every 11 auto attacks</nowiki></strong></p> | |||
<nowiki> | <nowiki> | ||
</nowiki><p><nowiki> ⬩ The </nowiki><strong><nowiki>first mechanic in red HP</nowiki></strong><nowiki> will carry over attacks from the previous </nowiki><strong><nowiki>green HP</nowiki></strong><nowiki> phase, see the </nowiki><ins><strong><nowiki>Special Attack Order</nowiki></strong></ins><nowiki> section for more information</nowiki></p> | </nowiki> | ||
<p class="pvme-source-line pvme-source-detail"><nowiki> ⬩ The </nowiki><strong><nowiki>first mechanic in red HP</nowiki></strong><nowiki> will carry over attacks from the previous </nowiki><strong><nowiki>green HP</nowiki></strong><nowiki> phase, see the </nowiki><ins><strong><nowiki>Special Attack Order</nowiki></strong></ins><nowiki> section for more information</nowiki></p> | |||
<nowiki> | <nowiki> | ||
</nowiki><p><nowiki> • Must be depleted by dealing damage and will be followed by </nowiki><strong><nowiki>green HP</nowiki></strong></p> | </nowiki> | ||
<p class="pvme-source-line pvme-source-detail"><nowiki> • Must be depleted by dealing damage and will be followed by </nowiki><strong><nowiki>green HP</nowiki></strong></p> | |||
<nowiki> | <nowiki> | ||
</nowiki><p> | </nowiki> | ||
<p class="pvme-source-line"><pvme-image src="https://img.pvme.io/images/GRgpCe9WAg.png" alt="" title="" kind="media" /><nowiki> | |||
⬥ </nowiki><strong><nowiki>Green HP:</nowiki></strong><nowiki> Zamorak's </nowiki><strong><nowiki>main health bar</nowiki></strong><nowiki>, and is split into 6 sections representing each phase</nowiki></p> | ⬥ </nowiki><strong><nowiki>Green HP:</nowiki></strong><nowiki> Zamorak's </nowiki><strong><nowiki>main health bar</nowiki></strong><nowiki>, and is split into 6 sections representing each phase</nowiki></p> | ||
<nowiki> | <nowiki> | ||
</nowiki><p><nowiki> • Zamorak will have 5-tick attack rate and deal normal damage, and </nowiki><strong><nowiki>will do his next special attack every 5 auto attacks</nowiki></strong></p> | </nowiki> | ||
<p class="pvme-source-line pvme-source-detail"><nowiki> • Zamorak will have 5-tick attack rate and deal normal damage, and </nowiki><strong><nowiki>will do his next special attack every 5 auto attacks</nowiki></strong></p> | |||
<nowiki> | <nowiki> | ||
</nowiki><p><nowiki> ⬩ The </nowiki><strong><nowiki>first mechanic in green HP</nowiki></strong><nowiki> on each phase will happen after </nowiki><strong><nowiki>1 auto attack</nowiki></strong></p> | </nowiki> | ||
<p class="pvme-source-line pvme-source-detail"><nowiki> ⬩ The </nowiki><strong><nowiki>first mechanic in green HP</nowiki></strong><nowiki> on each phase will happen after </nowiki><strong><nowiki>1 auto attack</nowiki></strong></p> | |||
<nowiki> | <nowiki> | ||
</nowiki><p><nowiki> • Upon depletion of each section, Zamorak will </nowiki><strong><nowiki>regain Grey HP and start the </nowiki><em><nowiki>Channelers</nowiki></em><nowiki> mechanic</nowiki></strong></p> | </nowiki> | ||
<p class="pvme-source-line pvme-source-detail"><nowiki> • Upon depletion of each section, Zamorak will </nowiki><strong><nowiki>regain Grey HP and start the </nowiki><em><nowiki>Channelers</nowiki></em><nowiki> mechanic</nowiki></strong></p> | |||
<nowiki> | <nowiki> | ||
</nowiki><p><nowiki></nowiki></p> | </nowiki> | ||
<p class="pvme-source-line pvme-source-spacer"><nowiki></nowiki></p> | |||
<nowiki> | <nowiki> | ||
</nowiki><p><nowiki>Overall, the progression of the first 6 phases can be summarised as:</nowiki></p> | </nowiki> | ||
<p class="pvme-source-line"><nowiki>Overall, the progression of the first 6 phases can be summarised as:</nowiki></p> | |||
<nowiki> | <nowiki> | ||
</nowiki><p><nowiki></nowiki></p> | </nowiki> | ||
<p class="pvme-source-line pvme-source-spacer"><nowiki></nowiki></p> | |||
<nowiki> | <nowiki> | ||
</nowiki><p><strong><nowiki>Grey HP > charge pad > deplete red HP > deplete green HP section > </nowiki><em><nowiki>Channelers</nowiki></em><nowiki> + grey HP > repeat</nowiki></strong></p> | </nowiki> | ||
<p class="pvme-source-line"><strong><nowiki>Grey HP > charge pad > deplete red HP > deplete green HP section > </nowiki><em><nowiki>Channelers</nowiki></em><nowiki> + grey HP > repeat</nowiki></strong></p> | |||
<nowiki> | <nowiki> | ||
</nowiki><p><nowiki></nowiki></p> | </nowiki> | ||
<p class="pvme-source-line pvme-source-spacer"><nowiki></nowiki></p> | |||
<nowiki> | <nowiki> | ||
</nowiki><p><nowiki>⬥ Zamorak's </nowiki><strong><nowiki>green HP</nowiki></strong><nowiki> scales between 300,000 and 1,600,000 </nowiki> | </nowiki> | ||
<p class="pvme-source-line"><nowiki>⬥ Zamorak's </nowiki><strong><nowiki>green HP</nowiki></strong><nowiki> scales between 300,000 and 1,600,000 </nowiki><pvme-image src="https://cdn.discordapp.com/emojis/689509250887712902.png?v=1" alt="constitution" title="constitution" kind="icon" /><nowiki> per player, capping at 1740% enrage</nowiki></p> | |||
<nowiki> | <nowiki> | ||
</nowiki><p><nowiki> • Phases 1-5 each take up 16% of the total </nowiki><strong><nowiki>green HP</nowiki></strong><nowiki> bar, while phase 6 takes up 20%</nowiki></p> | </nowiki> | ||
<p class="pvme-source-line pvme-source-detail"><nowiki> • Phases 1-5 each take up 16% of the total </nowiki><strong><nowiki>green HP</nowiki></strong><nowiki> bar, while phase 6 takes up 20%</nowiki></p> | |||
<nowiki> | <nowiki> | ||
</nowiki><p><nowiki>⬥ At 100%+ enrage, Zamorak will gain an additional 7th phase that will be explained in its own section</nowiki></p> | </nowiki> | ||
<p class="pvme-source-line"><nowiki>⬥ At 100%+ enrage, Zamorak will gain an additional 7th phase that will be explained in its own section</nowiki></p> | |||
<nowiki> | <nowiki> | ||
</nowiki><p><nowiki></nowiki></p> | </nowiki> | ||
<p class="pvme-source-line pvme-source-spacer"><nowiki></nowiki></p> | |||
<nowiki> | <nowiki> | ||
</nowiki><h2 id="special-attacks"><ins><nowiki>Special Attacks</nowiki></ins></h2> | </nowiki> | ||
</div> | |||
<div class="pvme-source-section"> | |||
<h2 id="special-attacks"><ins><nowiki>Special Attacks</nowiki></ins></h2> | |||
<nowiki> | <nowiki> | ||
</nowiki><p><nowiki>⬥ </nowiki><strong><nowiki>Channelers</nowiki></strong></p> | </nowiki> | ||
<p class="pvme-source-line"><nowiki>⬥ </nowiki><strong><nowiki>Channelers</nowiki></strong></p> | |||
<nowiki> | <nowiki> | ||
</nowiki><p><nowiki> • Automatically triggered upon phasing Zamorak from </nowiki><strong><nowiki>green HP</nowiki></strong><nowiki> into </nowiki><strong><nowiki>grey HP</nowiki></strong></p> | </nowiki> | ||
<p class="pvme-source-line pvme-source-detail"><nowiki> • Automatically triggered upon phasing Zamorak from </nowiki><strong><nowiki>green HP</nowiki></strong><nowiki> into </nowiki><strong><nowiki>grey HP</nowiki></strong></p> | |||
<nowiki> | <nowiki> | ||
</nowiki><p><nowiki> • A message will appear saying </nowiki><strong><code><nowiki>Zamorak begins to draw power and energy from something within Infernus.</nowiki></code></strong><nowiki> , this will spawn a Chaos Witch Channeler in Infernus</nowiki></p> | </nowiki> | ||
<p class="pvme-source-line pvme-source-detail"><nowiki> • A message will appear saying </nowiki><strong><code><nowiki>Zamorak begins to draw power and energy from something within Infernus.</nowiki></code></strong><nowiki> , this will spawn a Chaos Witch Channeler in Infernus</nowiki></p> | |||
<nowiki> | <nowiki> | ||
</nowiki><p><nowiki> • Players must enter Infernus with the extra action button </nowiki> | </nowiki> | ||
<p class="pvme-source-line pvme-source-detail"><nowiki> • Players must enter Infernus with the extra action button </nowiki><pvme-image src="https://cdn.discordapp.com/emojis/1073955377537876089.png?v=1" alt="realmmovement" title="realmmovement" kind="icon" /><nowiki> and defeat the witch before being able to charge the next pad</nowiki></p> | |||
<nowiki> | <nowiki> | ||
</nowiki><p><nowiki> • The witch has 33,000 health </nowiki> | </nowiki> | ||
<p class="pvme-source-line pvme-source-detail"><nowiki> • The witch has 33,000 health </nowiki><pvme-image src="https://cdn.discordapp.com/emojis/689509250887712902.png?v=1" alt="constitution" title="constitution" kind="icon" /><nowiki> + 132 </nowiki><pvme-image src="https://cdn.discordapp.com/emojis/689509250887712902.png?v=1" alt="constitution" title="constitution" kind="icon" /><nowiki> for every 10 enrage increase</nowiki></p> | |||
<nowiki> | <nowiki> | ||
</nowiki><p><nowiki> • It is advised to </nowiki> | </nowiki> | ||
<p class="pvme-source-line pvme-source-detail"><nowiki> • It is advised to </nowiki><pvme-image src="https://cdn.discordapp.com/emojis/535541306475151390.png?v=1" alt="anti" title="anti" kind="icon" /><nowiki> / </nowiki><pvme-image src="https://cdn.discordapp.com/emojis/535541258240786434.png?v=1" alt="freedom" title="freedom" kind="icon" /><nowiki> before </nowiki><pvme-image src="https://cdn.discordapp.com/emojis/535533810004262912.png?v=1" alt="surge" title="surge" kind="icon" /><nowiki> towards the witch since it is able to stun</nowiki></p> | |||
<nowiki> | <nowiki> | ||
</nowiki><p><nowiki> • At 500%, Chaos Witch Channeler spawns with 50% adrenaline and their first ability is </nowiki> | </nowiki> | ||
<p class="pvme-source-line pvme-source-detail"><nowiki> • At 500%, Chaos Witch Channeler spawns with 50% adrenaline and their first ability is </nowiki><pvme-image src="https://cdn.discordapp.com/emojis/535533833072672778.png?v=1" alt="asphyx" title="asphyx" kind="icon" /></p> | |||
<nowiki> | <nowiki> | ||
</nowiki><p><nowiki> • At 1000%+, Chaos Witch Channeler spawns with 100% adrenaline and their first ability is </nowiki> | </nowiki> | ||
<p class="pvme-source-line pvme-source-detail"><nowiki> • At 1000%+, Chaos Witch Channeler spawns with 100% adrenaline and their first ability is </nowiki><pvme-image src="https://cdn.discordapp.com/emojis/535533809664262179.png?v=1" alt="omni" title="omni" kind="icon" /></p> | |||
<nowiki> | <nowiki> | ||
</nowiki><p><nowiki></nowiki></p> | </nowiki> | ||
<p class="pvme-source-line pvme-source-spacer"><nowiki></nowiki></p> | |||
<nowiki> | <nowiki> | ||
</nowiki><p><nowiki>⬥ </nowiki><strong><nowiki>Flames of Zamorak</nowiki></strong></p> | </nowiki> | ||
<p class="pvme-source-line"><nowiki>⬥ </nowiki><strong><nowiki>Flames of Zamorak</nowiki></strong></p> | |||
<nowiki> | <nowiki> | ||
</nowiki><p><nowiki> • Zamorak will yell </nowiki><strong><code><nowiki>This world will burn.</nowiki></code></strong><nowiki> and slam into the ground, dealing 2 melee hits and spawning a line of black smoke between himself and a player</nowiki></p> | </nowiki> | ||
<p class="pvme-source-line pvme-source-detail"><nowiki> • Zamorak will yell </nowiki><strong><code><nowiki>This world will burn.</nowiki></code></strong><nowiki> and slam into the ground, dealing 2 melee hits and spawning a line of black smoke between himself and a player</nowiki></p> | |||
<nowiki> | <nowiki> | ||
</nowiki><p><nowiki> • The melee slam deals more damage the closer the player is to Zamorak, and more smoke will be spawned the further the player is</nowiki></p> | </nowiki> | ||
<p class="pvme-source-line pvme-source-detail"><nowiki> • The melee slam deals more damage the closer the player is to Zamorak, and more smoke will be spawned the further the player is</nowiki></p> | |||
<nowiki> | <nowiki> | ||
</nowiki><p><nowiki> • Picking up the smoke by walking over it will start a timer over the player that deals typeless damage at the end</nowiki></p> | </nowiki> | ||
<p class="pvme-source-line pvme-source-detail"><nowiki> • Picking up the smoke by walking over it will start a timer over the player that deals typeless damage at the end</nowiki></p> | |||
<nowiki> | <nowiki> | ||
</nowiki><p><nowiki> ⬩ The damage increases and gains additional </nowiki><strong><nowiki>defence piercing</nowiki></strong><nowiki> the more smoke that is picked up</nowiki></p> | </nowiki> | ||
<p class="pvme-source-line pvme-source-detail"><nowiki> ⬩ The damage increases and gains additional </nowiki><strong><nowiki>defence piercing</nowiki></strong><nowiki> the more smoke that is picked up</nowiki></p> | |||
<nowiki> | <nowiki> | ||
</nowiki><p><nowiki> ⬩ If the smoke is left on the ground, Zamorak will gain stacks reducing his damage taken</nowiki></p> | </nowiki> | ||
<p class="pvme-source-line pvme-source-detail"><nowiki> ⬩ If the smoke is left on the ground, Zamorak will gain stacks reducing his damage taken</nowiki></p> | |||
<nowiki> | <nowiki> | ||
</nowiki><p><nowiki> ⬩ See </nowiki><strong><ins><nowiki>Hex: Twinshot</nowiki></ins></strong><nowiki> further down for additional timing notes</nowiki></p> | </nowiki> | ||
<p class="pvme-source-line pvme-source-detail"><nowiki> ⬩ See </nowiki><strong><ins><nowiki>Hex: Twinshot</nowiki></ins></strong><nowiki> further down for additional timing notes</nowiki></p> | |||
<nowiki> | <nowiki> | ||
</nowiki><p><nowiki> • To deal with this, be close to the boss to ensure that minimum smoke will spawn, </nowiki> | </nowiki> | ||
<p class="pvme-source-line pvme-source-detail"><nowiki> • To deal with this, be close to the boss to ensure that minimum smoke will spawn, </nowiki><pvme-image src="https://cdn.discordapp.com/emojis/544195488447201300.png?v=1" alt="DeflectMelee" title="DeflectMelee" kind="icon" /><nowiki>, use defensives </nowiki><pvme-image src="https://cdn.discordapp.com/emojis/535614336207552523.png?v=1" alt="disrupt" title="disrupt" kind="icon" /><nowiki> </nowiki><pvme-image src="https://cdn.discordapp.com/emojis/513190158728953857.png?v=1" alt="devo" title="devo" kind="icon" /><nowiki> if low HP, and use </nowiki><pvme-image src="https://cdn.discordapp.com/emojis/535541258844635148.png?v=1" alt="res" title="res" kind="icon" /><nowiki> / </nowiki><pvme-image src="https://cdn.discordapp.com/emojis/787904334377648130.png?v=1" alt="divert" title="divert" kind="icon" /><nowiki> on the timed damage</nowiki></p> | |||
<nowiki> | <nowiki> | ||
</nowiki><p><nowiki> • Entering Infernus with the timer running will detonate the damage immediately with </nowiki><strong><nowiki>increased defence piercing</nowiki></strong></p> | </nowiki> | ||
<p class="pvme-source-line pvme-source-detail"><nowiki> • Entering Infernus with the timer running will detonate the damage immediately with </nowiki><strong><nowiki>increased defence piercing</nowiki></strong></p> | |||
<nowiki> | <nowiki> | ||
</nowiki><p><nowiki> • In group, players standing on the northeast side of Zamorak are higher priority to be targeted for the smoke</nowiki></p> | </nowiki> | ||
<p class="pvme-source-line pvme-source-detail"><nowiki> • In group, players standing on the northeast side of Zamorak are higher priority to be targeted for the smoke</nowiki></p> | |||
<nowiki> | <nowiki> | ||
</nowiki><p><nowiki></nowiki></p> | </nowiki> | ||
<p class="pvme-source-line pvme-source-spacer"><nowiki></nowiki></p> | |||
<nowiki> | <nowiki> | ||
</nowiki><p>[https://youtu.be/2YZ5tD-7_1g <nowiki>Flames of Zamorak example</nowiki>]<nowiki> using </nowiki> | </nowiki> | ||
<p class="pvme-source-line">[https://youtu.be/2YZ5tD-7_1g <nowiki>Flames of Zamorak example</nowiki>]<nowiki> using </nowiki><pvme-image src="https://cdn.discordapp.com/emojis/535614336207552523.png?v=1" alt="disrupt" title="disrupt" kind="icon" /><nowiki> + </nowiki><pvme-image src="https://cdn.discordapp.com/emojis/787904334377648130.png?v=1" alt="divert" title="divert" kind="icon" /></p> | |||
<nowiki> | <nowiki> | ||
</nowiki><p><nowiki></nowiki></p> | </nowiki> | ||
<p class="pvme-source-line pvme-source-spacer"><nowiki></nowiki></p> | |||
<nowiki> | |||
</nowiki> | |||
<pvme-embed src="https://www.youtube.com/embed/2YZ5tD-7_1g" title="" allowfullscreen="1" /> | |||
<nowiki> | <nowiki> | ||
</nowiki><p><nowiki>⬥ </nowiki><strong><nowiki>Adrenaline Cage</nowiki></strong></p> | </nowiki> | ||
<p class="pvme-source-line"><nowiki>⬥ </nowiki><strong><nowiki>Adrenaline Cage</nowiki></strong></p> | |||
<nowiki> | <nowiki> | ||
</nowiki><p><nowiki> • Zamorak will say </nowiki><strong><code><nowiki>Chaos, unfettered!</nowiki></code></strong><nowiki> then temporarily drops overhead prayers and spawns a cage on the bases' location to bombard with 5 magic attacks</nowiki></p> | </nowiki> | ||
<p class="pvme-source-line pvme-source-detail"><nowiki> • Zamorak will say </nowiki><strong><code><nowiki>Chaos, unfettered!</nowiki></code></strong><nowiki> then temporarily drops overhead prayers and spawns a cage on the bases' location to bombard with 5 magic attacks</nowiki></p> | |||
<nowiki> | <nowiki> | ||
</nowiki><p><nowiki> • If no player is standing on the cage location, all players will take heavy typeless damage, have their adrenaline drained, and suffer a heavy adrenaline gain debuff</nowiki></p> | </nowiki> | ||
<p class="pvme-source-line pvme-source-detail"><nowiki> • If no player is standing on the cage location, all players will take heavy typeless damage, have their adrenaline drained, and suffer a heavy adrenaline gain debuff</nowiki></p> | |||
<nowiki> | <nowiki> | ||
</nowiki><p><nowiki> • Remain still, </nowiki> | </nowiki> | ||
<p class="pvme-source-line pvme-source-detail"><nowiki> • Remain still, </nowiki><pvme-image src="https://cdn.discordapp.com/emojis/544195487926845462.png?v=1" alt="DeflectMage" title="DeflectMage" kind="icon" /><nowiki> and use </nowiki><pvme-image src="https://cdn.discordapp.com/emojis/513190158728953857.png?v=1" alt="devo" title="devo" kind="icon" /><nowiki> / </nowiki><pvme-image src="https://cdn.discordapp.com/emojis/535541258786177064.png?v=1" alt="reflect" title="reflect" kind="icon" /><nowiki> + </nowiki><pvme-image src="https://cdn.discordapp.com/emojis/654618235097972737.png?v=1" alt="powerburstofvitality" title="powerburstofvitality" kind="icon" /></p> | |||
<nowiki> | <nowiki> | ||
</nowiki><p><nowiki> • At 1500%+ the player taking the hits will have </nowiki> | </nowiki> | ||
<p class="pvme-source-line pvme-source-detail"><nowiki> • At 1500%+ the player taking the hits will have </nowiki><pvme-image src="https://cdn.discordapp.com/emojis/513190158728953857.png?v=1" alt="devo" title="devo" kind="icon" /><nowiki> disabled</nowiki></p> | |||
<nowiki> | <nowiki> | ||
</nowiki><p><nowiki> ⬩ </nowiki> | </nowiki> | ||
<p class="pvme-source-line pvme-source-detail"><nowiki> ⬩ </nowiki><pvme-image src="https://cdn.discordapp.com/emojis/513190158728953857.png?v=1" alt="devo" title="devo" kind="icon" /><nowiki> + </nowiki><pvme-image src="https://cdn.discordapp.com/emojis/543478434509357098.png?v=1" alt="cept" title="cept" kind="icon" /><nowiki> from another player will still work</nowiki></p> | |||
<nowiki> | <nowiki> | ||
</nowiki><p><nowiki></nowiki></p> | </nowiki> | ||
<p class="pvme-source-line pvme-source-spacer"><nowiki></nowiki></p> | |||
<nowiki> | <nowiki> | ||
</nowiki><p><nowiki>⬥ </nowiki><strong><nowiki>Chaos Blast</nowiki></strong></p> | </nowiki> | ||
<p class="pvme-source-line"><nowiki>⬥ </nowiki><strong><nowiki>Chaos Blast</nowiki></strong></p> | |||
<nowiki> | <nowiki> | ||
</nowiki><p><nowiki> • Zamorak will curl up and begin charging his attack shouting </nowiki><strong><code><nowiki>I will tear you asunder!</nowiki></code></strong></p> | </nowiki> | ||
<p class="pvme-source-line pvme-source-detail"><nowiki> • Zamorak will curl up and begin charging his attack shouting </nowiki><strong><code><nowiki>I will tear you asunder!</nowiki></code></strong></p> | |||
<nowiki> | <nowiki> | ||
</nowiki><p><nowiki> • During this time Zamorak may be stunned enough (equal to team size) and will require a damage check right after, which will then force him to release the attack</nowiki></p> | </nowiki> | ||
<p class="pvme-source-line pvme-source-detail"><nowiki> • During this time Zamorak may be stunned enough (equal to team size) and will require a damage check right after, which will then force him to release the attack</nowiki></p> | |||
<nowiki> | <nowiki> | ||
</nowiki><p><nowiki> ⬩ If Zamorak is not stunned the attack will be released after 18 seconds</nowiki></p> | </nowiki> | ||
<p class="pvme-source-line pvme-source-detail"><nowiki> ⬩ If Zamorak is not stunned the attack will be released after 18 seconds</nowiki></p> | |||
<nowiki> | <nowiki> | ||
</nowiki><p><nowiki> • He will yell </nowiki><strong><code><nowiki>Feel the rage of a god.</nowiki></code></strong><nowiki> and send a red projectile that deals damage based on how long he was allowed to charge</nowiki></p> | </nowiki> | ||
<p class="pvme-source-line pvme-source-detail"><nowiki> • He will yell </nowiki><strong><code><nowiki>Feel the rage of a god.</nowiki></code></strong><nowiki> and send a red projectile that deals damage based on how long he was allowed to charge</nowiki></p> | |||
<nowiki> | <nowiki> | ||
</nowiki><p><nowiki> ⬩ The attack has a base </nowiki><strong><nowiki>defence piercing</nowiki></strong><nowiki> of 40%</nowiki></p> | </nowiki> | ||
<p class="pvme-source-line pvme-source-detail"><nowiki> ⬩ The attack has a base </nowiki><strong><nowiki>defence piercing</nowiki></strong><nowiki> of 40%</nowiki></p> | |||
<nowiki> | <nowiki> | ||
</nowiki><p><nowiki> • Use a combination of defensives </nowiki> | </nowiki> | ||
<p class="pvme-source-line pvme-source-detail"><nowiki> • Use a combination of defensives </nowiki><pvme-image src="https://cdn.discordapp.com/emojis/654618235097972737.png?v=1" alt="powerburstofvitality" title="powerburstofvitality" kind="icon" /><nowiki> / </nowiki><pvme-image src="https://cdn.discordapp.com/emojis/535541258844635148.png?v=1" alt="res" title="res" kind="icon" /><nowiki> / </nowiki><pvme-image src="https://cdn.discordapp.com/emojis/535614336207552523.png?v=1" alt="disrupt" title="disrupt" kind="icon" /><nowiki> / </nowiki><pvme-image src="https://cdn.discordapp.com/emojis/535541258786177064.png?v=1" alt="reflect" title="reflect" kind="icon" /><nowiki>, at higher enrages you may opt to simply not stun and </nowiki><pvme-image src="https://cdn.discordapp.com/emojis/535541258538582017.png?v=1" alt="immort" title="immort" kind="icon" /><nowiki> instead</nowiki></p> | |||
<nowiki> | <nowiki> | ||
</nowiki><p><nowiki></nowiki></p> | </nowiki> | ||
<p class="pvme-source-line pvme-source-spacer"><nowiki></nowiki></p> | |||
<nowiki> | <nowiki> | ||
</nowiki><p><nowiki>⬥ </nowiki><strong><nowiki>Infernal Tomb</nowiki></strong></p> | </nowiki> | ||
<p class="pvme-source-line"><nowiki>⬥ </nowiki><strong><nowiki>Infernal Tomb</nowiki></strong></p> | |||
<nowiki> | <nowiki> | ||
</nowiki><p><nowiki> • Zamorak says </nowiki><code><nowiki>Step into the dark... meet your death.</nowiki></code><nowiki>, assigns a rune over each players' head, and transports them to Infernus where chaos demons (amount equal to team size) are marching towards a portal to the main arena</nowiki></p> | </nowiki> | ||
<p class="pvme-source-line pvme-source-detail"><nowiki> • Zamorak says </nowiki><code><nowiki>Step into the dark... meet your death.</nowiki></code><nowiki>, assigns a rune over each players' head, and transports them to Infernus where chaos demons (amount equal to team size) are marching towards a portal to the main arena</nowiki></p> | |||
<nowiki> | <nowiki> | ||
</nowiki><p><nowiki> ⬩ Each Chaos Demon has 15,000 - 70,000 health </nowiki> | </nowiki> | ||
<p class="pvme-source-line pvme-source-detail"><nowiki> ⬩ Each Chaos Demon has 15,000 - 70,000 health </nowiki><pvme-image src="https://cdn.discordapp.com/emojis/689509250887712902.png?v=1" alt="constitution" title="constitution" kind="icon" /><nowiki>, capping at 1470% enrage</nowiki></p> | |||
<nowiki> | <nowiki> | ||
</nowiki><p><nowiki> ⬩ Chaos Demons have an internal Freedom timer of 40 ticks, this decreases to 20 ticks when above 500% enrage</nowiki></p> | </nowiki> | ||
<p class="pvme-source-line pvme-source-detail"><nowiki> ⬩ Chaos Demons have an internal Freedom timer of 40 ticks, this decreases to 20 ticks when above 500% enrage</nowiki></p> | |||
<nowiki> | <nowiki> | ||
</nowiki><p><nowiki> ⬩ Use abilities such as </nowiki> | </nowiki> | ||
<p class="pvme-source-line pvme-source-detail"><nowiki> ⬩ Use abilities such as </nowiki><pvme-image src="https://cdn.discordapp.com/emojis/537340400185245701.png?v=1" alt="icebarrage" title="icebarrage" kind="icon" /><nowiki> / </nowiki><pvme-image src="https://cdn.discordapp.com/emojis/535541306563231790.png?v=1" alt="bindingshot" title="bindingshot" kind="icon" /><nowiki> to keep the demon(s) in place and kill them</nowiki></p> | |||
<nowiki> | <nowiki> | ||
</nowiki><p><nowiki> • Players must go to the same corresponding rune they received overhead to exit Infernus</nowiki></p> | </nowiki> | ||
<p class="pvme-source-line pvme-source-detail"><nowiki> • Players must go to the same corresponding rune they received overhead to exit Infernus</nowiki></p> | |||
<nowiki> | <nowiki> | ||
</nowiki><p><nowiki> ⬩ Going to the wrong rune will deal heavy damage to all players</nowiki></p> | </nowiki> | ||
<p class="pvme-source-line pvme-source-detail"><nowiki> ⬩ Going to the wrong rune will deal heavy damage to all players</nowiki></p> | |||
<nowiki> | <nowiki> | ||
</nowiki><p><nowiki> • As players are sent into Infernus at the beginning of the mechanic, Zamorak will start charging his </nowiki><em><nowiki>Chaos Blast</nowiki></em><nowiki> mechanic, with only the stun portion required to force him to release the attack</nowiki></p> | </nowiki> | ||
<p class="pvme-source-line pvme-source-detail"><nowiki> • As players are sent into Infernus at the beginning of the mechanic, Zamorak will start charging his </nowiki><em><nowiki>Chaos Blast</nowiki></em><nowiki> mechanic, with only the stun portion required to force him to release the attack</nowiki></p> | |||
<nowiki> | <nowiki> | ||
</nowiki><p><nowiki> ⬩ It is highly suggested to pre-stun Zamorak to keep this damage manageable without </nowiki> | </nowiki> | ||
<p class="pvme-source-line pvme-source-detail"><nowiki> ⬩ It is highly suggested to pre-stun Zamorak to keep this damage manageable without </nowiki><pvme-image src="https://cdn.discordapp.com/emojis/535541258538582017.png?v=1" alt="immort" title="immort" kind="icon" /></p> | |||
<nowiki> | <nowiki> | ||
</nowiki><p><nowiki> ⬩ </nowiki>[https://img.pvme.io/images/URj54bk2bF.mp4 <nowiki>Example clip of proper stun timing here. | </nowiki> | ||
<p class="pvme-source-line pvme-source-detail"><nowiki> ⬩ </nowiki>[https://img.pvme.io/images/URj54bk2bF.mp4 <nowiki>Example clip of proper stun timing here.</nowiki>]</p> | |||
<nowiki> | <nowiki> | ||
</nowiki><p><nowiki></nowiki></p> | </nowiki> | ||
<p class="pvme-source-line pvme-source-spacer"><nowiki></nowiki></p> | |||
<nowiki> | |||
</nowiki> | |||
<pvme-video src="https://img.pvme.io/images/URj54bk2bF.mp4" controls="1" loop="1" muted="1" type="video/mp4" /> | |||
<nowiki> | <nowiki> | ||
</nowiki><p><nowiki>⬥ </nowiki><strong><nowiki>Rune of Destruction</nowiki></strong></p> | </nowiki> | ||
<p class="pvme-source-line"><nowiki>⬥ </nowiki><strong><nowiki>Rune of Destruction</nowiki></strong></p> | |||
<nowiki> | <nowiki> | ||
</nowiki><p><nowiki> • Zamorak will say </nowiki><code><nowiki>You're already dead.</nowiki></code><nowiki> and lay a massive red rune around him with a disc-shaped gap</nowiki></p> | </nowiki> | ||
<p class="pvme-source-line pvme-source-detail"><nowiki> • Zamorak will say </nowiki><code><nowiki>You're already dead.</nowiki></code><nowiki> and lay a massive red rune around him with a disc-shaped gap</nowiki></p> | |||
<nowiki> | <nowiki> | ||
</nowiki><p><nowiki> • Black sludge will spawn SSW (South South-West) of the rune and rotate clockwise or counterclockwise sometimes changing direction and stuns those who get hit by it twice</nowiki></p> | </nowiki> | ||
<p class="pvme-source-line pvme-source-detail"><nowiki> • Black sludge will spawn SSW (South South-West) of the rune and rotate clockwise or counterclockwise sometimes changing direction and stuns those who get hit by it twice</nowiki></p> | |||
<nowiki> | <nowiki> | ||
</nowiki><p><nowiki> • The red areas deal constant typeless damage to those standing in it</nowiki></p> | </nowiki> | ||
<p class="pvme-source-line pvme-source-detail"><nowiki> • The red areas deal constant typeless damage to those standing in it</nowiki></p> | |||
<nowiki> | <nowiki> | ||
</nowiki><p><nowiki> • The player cannot teleport to Infernus </nowiki> | </nowiki> | ||
<p class="pvme-source-line pvme-source-detail"><nowiki> • The player cannot teleport to Infernus </nowiki><pvme-image src="https://cdn.discordapp.com/emojis/1073955377537876089.png?v=1" alt="realmmovement" title="realmmovement" kind="icon" /><nowiki> for the duration of the attack</nowiki></p> | |||
<nowiki> | <nowiki> | ||
</nowiki><p><nowiki></nowiki></p> | </nowiki> | ||
<p class="pvme-source-line pvme-source-spacer"><nowiki></nowiki></p> | |||
<nowiki> | <nowiki> | ||
</nowiki><p><nowiki> • The rune can be divided in 12 pineapple pizza slices as showed in the diagram, the black sludge occupies 2 and always moves in steps of 1 slice</nowiki></p> | </nowiki> | ||
<p class="pvme-source-line pvme-source-detail"><nowiki> • The rune can be divided in 12 pineapple pizza slices as showed in the diagram, the black sludge occupies 2 and always moves in steps of 1 slice</nowiki></p> | |||
<nowiki> | <nowiki> | ||
</nowiki><p><nowiki> ⬩ The black sludge will either spawn in 12-11 moving clockwise or in 1-2 moving counterclockwise</nowiki></p> | </nowiki> | ||
<p class="pvme-source-line pvme-source-detail"><nowiki> ⬩ The black sludge will either spawn in 12-11 moving clockwise or in 1-2 moving counterclockwise</nowiki></p> | |||
<nowiki> | <nowiki> | ||
</nowiki><p><nowiki> ⬩ The black sludge will move around the ring, changing position every 2 ticks, 18 times</nowiki></p> | </nowiki> | ||
<p class="pvme-source-line pvme-source-detail"><nowiki> ⬩ The black sludge will move around the ring, changing position every 2 ticks, 18 times</nowiki></p> | |||
<nowiki> | <nowiki> | ||
</nowiki><p><nowiki> ⬩ The black sludge can randomly change the direction it is moving towards up to 2 times</nowiki></p> | </nowiki> | ||
<p class="pvme-source-line pvme-source-detail"><nowiki> ⬩ The black sludge can randomly change the direction it is moving towards up to 2 times</nowiki></p> | |||
<nowiki> | <nowiki> | ||
</nowiki><p> | </nowiki> | ||
<p class="pvme-source-line"><pvme-image src="https://img.pvme.io/images/m1UJDNgR4E.png" alt="" title="" kind="media" /><nowiki> | |||
</nowiki></p> | </nowiki></p> | ||
<nowiki> | <nowiki> | ||
</nowiki><p><nowiki> • Using the image below, you can position yourself in optimal spots depending on the spawn point of the black sludge</nowiki></p> | </nowiki> | ||
<p class="pvme-source-line pvme-source-detail"><nowiki> • Using the image below, you can position yourself in optimal spots depending on the spawn point of the black sludge</nowiki></p> | |||
<nowiki> | <nowiki> | ||
</nowiki><p><nowiki> ⬩ This will buy more time to react to the sludges' movement, allowing you to stay in your damage-boosting ultimates</nowiki></p> | </nowiki> | ||
<p class="pvme-source-line pvme-source-detail"><nowiki> ⬩ This will buy more time to react to the sludges' movement, allowing you to stay in your damage-boosting ultimates</nowiki></p> | |||
<nowiki> | <nowiki> | ||
</nowiki><p><nowiki> ⬩ If you are unsure, starting SSW, or between 12 and 1 in the diagram, will assure that you won't be hit twice and stunned on the first rotation</nowiki></p> | </nowiki> | ||
<p class="pvme-source-line pvme-source-detail"><nowiki> ⬩ If you are unsure, starting SSW, or between 12 and 1 in the diagram, will assure that you won't be hit twice and stunned on the first rotation</nowiki></p> | |||
<nowiki> | <nowiki> | ||
</nowiki><p> | </nowiki> | ||
<p class="pvme-source-line"><pvme-image src="https://img.pvme.io/images/vxsy6VH1YY.png" alt="" title="" kind="media" /></p> | |||
<nowiki> | <nowiki> | ||
</nowiki><h3 id="special-attack-order"><nowiki>Special Attack Order</nowiki></h3> | </nowiki> | ||
<div class="pvme-source-mechanic"> | |||
<h3 id="special-attack-order"><nowiki>Special Attack Order</nowiki></h3> | |||
<nowiki> | <nowiki> | ||
</nowiki><p><nowiki>The following diagram outlines the pattern of special attacks used by </nowiki> | </nowiki> | ||
<p class="pvme-source-line"><nowiki>The following diagram outlines the pattern of special attacks used by </nowiki><pvme-image src="https://cdn.discordapp.com/emojis/994914159969976440.png?v=1" alt="zamorak" title="zamorak" kind="icon" /><nowiki> and how they vary based on when you transition between phases:</nowiki></p> | |||
<nowiki> | <nowiki> | ||
</nowiki><p> | </nowiki> | ||
<p class="pvme-source-line"><pvme-image src="https://img.pvme.io/images/OWvsXcAQax.png" alt="" title="" kind="media" /></p> | |||
<nowiki> | <nowiki> | ||
</nowiki><p><nowiki>⬥ The special attack order updates to a new phase when </nowiki><strong><nowiki>red HP</nowiki></strong><nowiki> is depleted. Special attacks that occur during </nowiki><strong><nowiki>red HP</nowiki></strong><nowiki> will still use the previous attack order from </nowiki><strong><nowiki>green HP</nowiki></strong></p> | </nowiki> | ||
<p class="pvme-source-line"><nowiki>⬥ The special attack order updates to a new phase when </nowiki><strong><nowiki>red HP</nowiki></strong><nowiki> is depleted. Special attacks that occur during </nowiki><strong><nowiki>red HP</nowiki></strong><nowiki> will still use the previous attack order from </nowiki><strong><nowiki>green HP</nowiki></strong></p> | |||
<nowiki> | <nowiki> | ||
</nowiki><p><nowiki>⬥ Zamorak's first special attack in </nowiki><strong><nowiki>red HP will carry over auto attacks from the previous green HP</nowiki></strong><nowiki> phase</nowiki></p> | </nowiki> | ||
<p class="pvme-source-line"><nowiki>⬥ Zamorak's first special attack in </nowiki><strong><nowiki>red HP will carry over auto attacks from the previous green HP</nowiki></strong><nowiki> phase</nowiki></p> | |||
<nowiki> | <nowiki> | ||
</nowiki><p><nowiki> • </nowiki><em><nowiki>E.g. if Zamorak uses Adrenaline Cage in phase 3 followed by 2 autoattacks before phasing into </nowiki></em><em><nowiki>grey HP</nowiki></em><em><nowiki>, after the next pad is charged Zamorak will use 3 autoattacks followed by Chaos Blast, then resume using special attacks in 11-autoattack intervals</nowiki></em></p> | </nowiki> | ||
<p class="pvme-source-line pvme-source-detail"><nowiki> • </nowiki><em><nowiki>E.g. if Zamorak uses Adrenaline Cage in phase 3 followed by 2 autoattacks before phasing into </nowiki></em><em><nowiki>grey HP</nowiki></em><em><nowiki>, after the next pad is charged Zamorak will use 3 autoattacks followed by Chaos Blast, then resume using special attacks in 11-autoattack intervals</nowiki></em></p> | |||
<nowiki> | <nowiki> | ||
</nowiki><p><nowiki> • Phase 1 </nowiki><strong><nowiki>red HP</nowiki></strong><nowiki> doesn't have a previous </nowiki><strong><nowiki>green HP</nowiki></strong><nowiki> so the first special attack will simply happen after 5 autoattacks</nowiki></p> | </nowiki> | ||
<p class="pvme-source-line pvme-source-detail"><nowiki> • Phase 1 </nowiki><strong><nowiki>red HP</nowiki></strong><nowiki> doesn't have a previous </nowiki><strong><nowiki>green HP</nowiki></strong><nowiki> so the first special attack will simply happen after 5 autoattacks</nowiki></p> | |||
<nowiki> | <nowiki> | ||
</nowiki><p><nowiki>⬥ Zamorak's first special attack in </nowiki><strong><nowiki>green HP</nowiki></strong><nowiki> will always happen after 1 autoattack before he resumes using special attacks in 5-autoattack intervals</nowiki></p> | </nowiki> | ||
<p class="pvme-source-line"><nowiki>⬥ Zamorak's first special attack in </nowiki><strong><nowiki>green HP</nowiki></strong><nowiki> will always happen after 1 autoattack before he resumes using special attacks in 5-autoattack intervals</nowiki></p> | |||
<nowiki> | <nowiki> | ||
</nowiki><h3 id="common-orders"><nowiki>Common Orders</nowiki></h3> | </nowiki> | ||
</div> | |||
<div class="pvme-source-mechanic"> | |||
<h3 id="common-orders"><nowiki>Common Orders</nowiki></h3> | |||
<nowiki> | <nowiki> | ||
</nowiki><p><nowiki>The following diagram outlines common special attack orders that players follow for a more consistent fight:</nowiki></p> | </nowiki> | ||
<p class="pvme-source-line"><nowiki>The following diagram outlines common special attack orders that players follow for a more consistent fight:</nowiki></p> | |||
<nowiki> | <nowiki> | ||
</nowiki><p> | </nowiki> | ||
<p class="pvme-source-line"><pvme-image src="https://img.pvme.io/images/tOq1z7NGGX.png" alt="" title="" kind="media" /></p> | |||
<nowiki> | <nowiki> | ||
</nowiki><p><strong>[https://img.pvme.io/images/pc72nOAw4b.png <nowiki>⬥ Order 1 (~9:00 - 12:00 kill times)</nowiki>]</strong></p> | </nowiki> | ||
<p class="pvme-source-line"><strong>[https://img.pvme.io/images/pc72nOAw4b.png <nowiki>⬥ Order 1 (~9:00 - 12:00 kill times)</nowiki>]</strong></p> | |||
<nowiki> | <nowiki> | ||
</nowiki><p><nowiki> • Recommended for:</nowiki></p> | </nowiki> | ||
<p class="pvme-source-line pvme-source-detail"><nowiki> • Recommended for:</nowiki></p> | |||
<nowiki> | <nowiki> | ||
</nowiki><p><nowiki> ⬩ 4000% enrage with </nowiki> | </nowiki> | ||
<p class="pvme-source-line pvme-source-detail"><nowiki> ⬩ 4000% enrage with </nowiki><pvme-image src="https://cdn.discordapp.com/emojis/1148995625896120460.png?v=1" alt="necromancy" title="necromancy" kind="icon" /></p> | |||
<nowiki> | <nowiki> | ||
</nowiki><p><strong>[https://img.pvme.io/images/q7oEfqqdfX.png <nowiki>⬥ Order 2 (~8:00 - 11:00 kill times)</nowiki>]</strong></p> | </nowiki> | ||
<p class="pvme-source-line"><strong>[https://img.pvme.io/images/q7oEfqqdfX.png <nowiki>⬥ Order 2 (~8:00 - 11:00 kill times)</nowiki>]</strong></p> | |||
<nowiki> | <nowiki> | ||
</nowiki><p><nowiki> • Recommended for:</nowiki></p> | </nowiki> | ||
<p class="pvme-source-line pvme-source-detail"><nowiki> • Recommended for:</nowiki></p> | |||
<nowiki> | <nowiki> | ||
</nowiki><p><nowiki> ⬩ 2000% enrage with </nowiki> | </nowiki> | ||
<p class="pvme-source-line pvme-source-detail"><nowiki> ⬩ 2000% enrage with </nowiki><pvme-image src="https://cdn.discordapp.com/emojis/1148995625896120460.png?v=1" alt="necromancy" title="necromancy" kind="icon" /></p> | |||
<nowiki> | <nowiki> | ||
</nowiki><p><strong>[https://img.pvme.io/images/vgh9jnjbkC.png <nowiki>⬥ Order 3 (~7:00 - 10:00 kill times)</nowiki>]</strong></p> | </nowiki> | ||
<p class="pvme-source-line"><strong>[https://img.pvme.io/images/vgh9jnjbkC.png <nowiki>⬥ Order 3 (~7:00 - 10:00 kill times)</nowiki>]</strong></p> | |||
<nowiki> | <nowiki> | ||
</nowiki><p><nowiki> • Recommended for:</nowiki></p> | </nowiki> | ||
<p class="pvme-source-line pvme-source-detail"><nowiki> • Recommended for:</nowiki></p> | |||
<nowiki> | <nowiki> | ||
</nowiki><p><nowiki> ⬩ 2000%+ enrage in non BiS</nowiki></p> | </nowiki> | ||
<p class="pvme-source-line pvme-source-detail"><nowiki> ⬩ 2000%+ enrage in non BiS</nowiki></p> | |||
<nowiki> | <nowiki> | ||
</nowiki><p><strong>[https://img.pvme.io/images/ilNPOrOYlr.png <nowiki>⬥ Order 4 (~5:00 - 7:00 kill times)</nowiki>]</strong></p> | </nowiki> | ||
<p class="pvme-source-line"><strong>[https://img.pvme.io/images/ilNPOrOYlr.png <nowiki>⬥ Order 4 (~5:00 - 7:00 kill times)</nowiki>]</strong></p> | |||
<nowiki> | <nowiki> | ||
</nowiki><p><nowiki> • Recommended for:</nowiki></p> | </nowiki> | ||
<p class="pvme-source-line pvme-source-detail"><nowiki> • Recommended for:</nowiki></p> | |||
<nowiki> | <nowiki> | ||
</nowiki><p><nowiki> ⬩ 4000% enrage</nowiki></p> | </nowiki> | ||
<p class="pvme-source-line pvme-source-detail"><nowiki> ⬩ 4000% enrage</nowiki></p> | |||
<nowiki> | <nowiki> | ||
</nowiki><p><nowiki> ⬩ 2000% enrage with </nowiki> | </nowiki> | ||
<p class="pvme-source-line pvme-source-detail"><nowiki> ⬩ 2000% enrage with </nowiki><pvme-image src="https://cdn.discordapp.com/emojis/689504724159823906.png?v=1" alt="magic" title="magic" kind="icon" /></p> | |||
<nowiki> | <nowiki> | ||
</nowiki><p><strong>[https://img.pvme.io/images/hgmi9hCOcZ.png <nowiki>⬥ Order 5 (~4:00 - 6:00 kill times)</nowiki>]</strong></p> | </nowiki> | ||
<p class="pvme-source-line"><strong>[https://img.pvme.io/images/hgmi9hCOcZ.png <nowiki>⬥ Order 5 (~4:00 - 6:00 kill times)</nowiki>]</strong></p> | |||
<nowiki> | <nowiki> | ||
</nowiki><p><nowiki> • Recommended for:</nowiki></p> | </nowiki> | ||
<p class="pvme-source-line pvme-source-detail"><nowiki> • Recommended for:</nowiki></p> | |||
<nowiki> | <nowiki> | ||
</nowiki><p><nowiki> ⬩ 900%+ enrage in non BiS</nowiki></p> | </nowiki> | ||
<p class="pvme-source-line pvme-source-detail"><nowiki> ⬩ 900%+ enrage in non BiS</nowiki></p> | |||
<nowiki> | <nowiki> | ||
</nowiki><p><strong>[https://img.pvme.io/images/tcLmF8t6vY.png <nowiki>⬥ Order 6 (~3:00 - 5:00 kill times)</nowiki>]</strong></p> | </nowiki> | ||
<p class="pvme-source-line"><strong>[https://img.pvme.io/images/tcLmF8t6vY.png <nowiki>⬥ Order 6 (~3:00 - 5:00 kill times)</nowiki>]</strong></p> | |||
<nowiki> | <nowiki> | ||
</nowiki><p><nowiki> • Recommended for:</nowiki></p> | </nowiki> | ||
<p class="pvme-source-line pvme-source-detail"><nowiki> • Recommended for:</nowiki></p> | |||
<nowiki> | <nowiki> | ||
</nowiki><p><nowiki> ⬩ 2000% enrage</nowiki></p> | </nowiki> | ||
<p class="pvme-source-line pvme-source-detail"><nowiki> ⬩ 2000% enrage</nowiki></p> | |||
<nowiki> | <nowiki> | ||
</nowiki><p><nowiki> ⬩ 500%+ enrage in non BiS</nowiki></p> | </nowiki> | ||
<p class="pvme-source-line pvme-source-detail"><nowiki> ⬩ 500%+ enrage in non BiS</nowiki></p> | |||
<nowiki> | <nowiki> | ||
</nowiki><p><nowiki>⬥ Estimated kill times assume phase 7 is one cycled, two cycling adds roughly 1 minute</nowiki></p> | </nowiki> | ||
<p class="pvme-source-line"><nowiki>⬥ Estimated kill times assume phase 7 is one cycled, two cycling adds roughly 1 minute</nowiki></p> | |||
<nowiki> | <nowiki> | ||
</nowiki><p><nowiki>⬥ Some strategies such as meta </nowiki><strong><nowiki>500% enrage</nowiki></strong><nowiki> assume all mechanics are skipped and are not mentioned</nowiki></p> | </nowiki> | ||
<p class="pvme-source-line"><nowiki>⬥ Some strategies such as meta </nowiki><strong><nowiki>500% enrage</nowiki></strong><nowiki> assume all mechanics are skipped and are not mentioned</nowiki></p> | |||
<nowiki> | <nowiki> | ||
</nowiki><p><nowiki>⬥ Non BiS assumes being in stage 2 of the </nowiki> | </nowiki> | ||
<p class="pvme-source-line"><nowiki>⬥ Non BiS assumes being in stage 2 of the </nowiki><span><nowiki>#upgrade-order</nowiki></span><nowiki>, results may vary</nowiki></p> | |||
<nowiki> | <nowiki> | ||
</nowiki><h2 id="hexes-and-edicts"><ins><nowiki>Hexes and Edicts</nowiki></ins></h2> | </nowiki> | ||
</div> | |||
</div> | |||
<div class="pvme-source-section"> | |||
<h2 id="hexes-and-edicts"><ins><nowiki>Hexes and Edicts</nowiki></ins></h2> | |||
<nowiki> | <nowiki> | ||
</nowiki><p><nowiki>⬥ </nowiki><strong><nowiki>Charge Pads</nowiki></strong></p> | </nowiki> | ||
<p class="pvme-source-line"><nowiki>⬥ </nowiki><strong><nowiki>Charge Pads</nowiki></strong></p> | |||
<nowiki> | <nowiki> | ||
</nowiki><p><nowiki> • The arena has 6 pads that you can stand on to charge.</nowiki></p> | </nowiki> | ||
<p class="pvme-source-line pvme-source-detail"><nowiki> • The arena has 6 pads that you can stand on to charge.</nowiki></p> | |||
<nowiki> | <nowiki> | ||
</nowiki><p><nowiki> • When it is fully charged, Zamorak will stop attacking for a while and your adrenaline bar will be refilled. After this, you will gain an </nowiki><strong><nowiki>Edict</nowiki></strong><nowiki> while Zamorak gains a </nowiki><strong><nowiki>Hex</nowiki></strong><nowiki> depending on the pad charged.</nowiki></p> | </nowiki> | ||
<p class="pvme-source-line pvme-source-detail"><nowiki> • When it is fully charged, Zamorak will stop attacking for a while and your adrenaline bar will be refilled. After this, you will gain an </nowiki><strong><nowiki>Edict</nowiki></strong><nowiki> while Zamorak gains a </nowiki><strong><nowiki>Hex</nowiki></strong><nowiki> depending on the pad charged.</nowiki></p> | |||
<nowiki> | <nowiki> | ||
</nowiki><p><nowiki> • You will become unable to charge pads during the </nowiki><em><nowiki>Channelers</nowiki></em><nowiki> mechanic. To continue charging the next pad, you must enter Infernus </nowiki> | </nowiki> | ||
<p class="pvme-source-line pvme-source-detail"><nowiki> • You will become unable to charge pads during the </nowiki><em><nowiki>Channelers</nowiki></em><nowiki> mechanic. To continue charging the next pad, you must enter Infernus </nowiki><pvme-image src="https://cdn.discordapp.com/emojis/1073955377537876089.png?v=1" alt="realmmovement" title="realmmovement" kind="icon" /><nowiki> and kill the witch present.</nowiki></p> | |||
<nowiki> | <nowiki> | ||
</nowiki><p><nowiki></nowiki></p> | </nowiki> | ||
<p class="pvme-source-line pvme-source-spacer"><nowiki></nowiki></p> | |||
<nowiki> | <nowiki> | ||
</nowiki><p><nowiki>⬥ </nowiki><strong><nowiki>Hexes and Edicts</nowiki></strong></p> | </nowiki> | ||
<p class="pvme-source-line"><nowiki>⬥ </nowiki><strong><nowiki>Hexes and Edicts</nowiki></strong></p> | |||
<nowiki> | <nowiki> | ||
</nowiki><p><nowiki> • Every time a pad is charged, all players and Zamorak will gain a stack of currently active stacking edicts and hexes, respectively</nowiki></p> | </nowiki> | ||
<p class="pvme-source-line pvme-source-detail"><nowiki> • Every time a pad is charged, all players and Zamorak will gain a stack of currently active stacking edicts and hexes, respectively</nowiki></p> | |||
<nowiki> | <nowiki> | ||
</nowiki><p><nowiki> • This makes it such that earlier pad effects become stronger as the fight progresses</nowiki></p> | </nowiki> | ||
<p class="pvme-source-line pvme-source-detail"><nowiki> • This makes it such that earlier pad effects become stronger as the fight progresses</nowiki></p> | |||
<nowiki> | <nowiki> | ||
</nowiki><p><nowiki> ⬩ Note that pads 3 and 5 don't have stacking effects</nowiki></p> | </nowiki> | ||
<p class="pvme-source-line pvme-source-detail"><nowiki> ⬩ Note that pads 3 and 5 don't have stacking effects</nowiki></p> | |||
<nowiki> | <nowiki> | ||
</nowiki><p><nowiki> ⬩ </nowiki><em><nowiki>E.g. if you activate pads 2 → 4 → 1 → 3 → 6 → 5, once 5 is activated rune 2 will have 6 stacks, rune 4 will have 5 stacks, rune 1 will have 4 stacks, and rune 6 will have 2 stacks</nowiki></em></p> | </nowiki> | ||
<p class="pvme-source-line pvme-source-detail pvme-source-sequence"><nowiki> ⬩ </nowiki><em><nowiki>E.g. if you activate pads 2 → 4 → 1 → 3 → 6 → 5, once 5 is activated rune 2 will have 6 stacks, rune 4 will have 5 stacks, rune 1 will have 4 stacks, and rune 6 will have 2 stacks</nowiki></em></p> | |||
<nowiki> | <nowiki> | ||
</nowiki><p> | </nowiki> | ||
<p class="pvme-source-line pvme-source-detail"><pvme-image src="https://img.pvme.io/images/pAOYodBn8H.png" alt="" title="" kind="media" /><nowiki> | |||
• </nowiki><strong><nowiki>During phase 7, all stacking edicts and hexes have their stack amounts reversed</nowiki></strong></p> | • </nowiki><strong><nowiki>During phase 7, all stacking edicts and hexes have their stack amounts reversed</nowiki></strong></p> | ||
<nowiki> | <nowiki> | ||
</nowiki><p><nowiki> ⬩ </nowiki><em><nowiki>E.g. Using the pad order in the above example, phase 7 will act as if the pad order were 5 → 6 → 3 → 1 → 4 → 2</nowiki></em></p> | </nowiki> | ||
<p class="pvme-source-line pvme-source-detail pvme-source-sequence"><nowiki> ⬩ </nowiki><em><nowiki>E.g. Using the pad order in the above example, phase 7 will act as if the pad order were 5 → 6 → 3 → 1 → 4 → 2</nowiki></em></p> | |||
<nowiki> | <nowiki> | ||
</nowiki><p> | </nowiki> | ||
<p class="pvme-source-line"><pvme-image src="https://img.pvme.io/images/tOouJ4IzhG.png" alt="" title="" kind="media" /><nowiki> | |||
⬥ A calculator has been made to gauge the effects of each activated Edict & Hex: </nowiki>[https://runescape.wiki/w/Calculator:Combat/Rune_pads <nowiki>https://runescape.wiki/w/Calculator:Combat/Rune_pads</nowiki>]</p> | ⬥ A calculator has been made to gauge the effects of each activated Edict & Hex: </nowiki>[https://runescape.wiki/w/Calculator:Combat/Rune_pads <nowiki>https://runescape.wiki/w/Calculator:Combat/Rune_pads</nowiki>]</p> | ||
<nowiki> | <nowiki> | ||
</nowiki><p><nowiki></nowiki></p> | </nowiki> | ||
<p class="pvme-source-line pvme-source-spacer"><nowiki></nowiki></p> | |||
<nowiki> | <nowiki> | ||
</nowiki><p> | </nowiki> | ||
<p class="pvme-source-line"><pvme-image src="https://img.pvme.io/images/UOtlSkO.png" alt="" title="" kind="media" /></p> | |||
<nowiki> | <nowiki> | ||
</nowiki><div><nowiki> | </nowiki> | ||
<div><nowiki> | |||
</nowiki><div><nowiki> | </nowiki><div><nowiki> | ||
</nowiki><div><nowiki> | </nowiki><div><nowiki> | ||
| Line 441: | Line 636: | ||
</nowiki><div><nowiki> | </nowiki><div><nowiki> | ||
</nowiki><div></div> | </nowiki><div style="background-color: rgb(0, 153, 255)"></div><nowiki> | ||
<nowiki> | |||
</nowiki><div><nowiki> | </nowiki><div><nowiki> | ||
</nowiki><div><nowiki> | </nowiki><div><nowiki> | ||
</nowiki><div><nowiki> | </nowiki><div><nowiki> | ||
</nowiki><div | </nowiki><div><u><nowiki>Hexes and Edicts</nowiki></u><nowiki> | ||
</nowiki></div> | </nowiki></div><nowiki> | ||
<nowiki> | |||
</nowiki><div><div><div><u><nowiki>Hex: Twinshot, Edict: Anima Flow (Stacking)</nowiki></u><nowiki> </nowiki> | </nowiki><div><div><div><u><nowiki>Hex: Twinshot, Edict: Anima Flow (Stacking)</nowiki></u><nowiki> </nowiki><pvme-image src="https://cdn.discordapp.com/emojis/994206062498549780.png?v=1" alt="twinshotrune" title="twinshotrune" kind="icon" /><nowiki> | ||
</nowiki></div> | </nowiki></div><div class="pvme-source-preserve-lines"><nowiki>⬥ Zamorak's attacks deal a second hit at 10% of the original hit, per stack. | ||
<div | |||
⬥ Player's basic abilities have their adrenaline gain increased by 20% of the original value, per stack. | ⬥ Player's basic abilities have their adrenaline gain increased by 20% of the original value, per stack. | ||
| | ||
</nowiki></div> | </nowiki></div></div><div><div><u><nowiki>Hex: Smite, Edict: Haste (Stacking)</nowiki></u><nowiki> </nowiki><pvme-image src="https://cdn.discordapp.com/emojis/994206048334393385.png?v=1" alt="smiterune" title="smiterune" kind="icon" /><nowiki> | ||
</div> | </nowiki></div><div class="pvme-source-preserve-lines"><nowiki>⬥ If Zamorak's targets are hit below 5% (per stack) of their Constitution level (times 100), they'll be executed instantly. | ||
<div><div><u><nowiki>Hex: Smite, Edict: Haste (Stacking)</nowiki></u><nowiki> </nowiki> | |||
</nowiki></div> | |||
<div | |||
⬥ Your ability cooldowns are reduced by 8% of the original cooldown per stack. | ⬥ Your ability cooldowns are reduced by 8% of the original cooldown per stack. | ||
| | ||
</nowiki></div> | </nowiki></div></div><div><div><u><nowiki>Hex: Coven, Edict: Inner Chaos (Non-Stacking)</nowiki></u><nowiki> </nowiki><pvme-image src="https://cdn.discordapp.com/emojis/994206032773517364.png?v=1" alt="covenrune" title="covenrune" kind="icon" /><nowiki> | ||
</div> | </nowiki></div><div class="pvme-source-preserve-lines"><nowiki>⬥ Zamorak calls forth some of his coven to support him. Lifeweaver will continually heal Zamorak for 1,000 health every few ticks, while Protector applies a buff that reduces the damage he takes by 25%. These enemies will spawn to the far west and east (by the second and fifth runes) respectively, but will not move towards Zamorak until a player is in mini-map range of them. | ||
<div><div><u><nowiki>Hex: Coven, Edict: Inner Chaos (Non-Stacking)</nowiki></u><nowiki> </nowiki> | |||
</nowiki></div> | |||
<div | |||
⬥ When standing near a hexed rune, you deal and take 5% more damage. | ⬥ When standing near a hexed rune, you deal and take 5% more damage. | ||
| | ||
</nowiki></div> | </nowiki></div></div><div><div><u><nowiki>Hex: Disintegrate, Edict: Guardian's Triumph (Stacking)</nowiki></u><nowiki> </nowiki><pvme-image src="https://cdn.discordapp.com/emojis/994206018680668171.png?v=1" alt="disintegraterune" title="disintegraterune" kind="icon" /><nowiki> | ||
</div> | </nowiki></div><div class="pvme-source-preserve-lines"><nowiki>⬥ Zamorak's attacks push 7% of damage through any shielding effects, per stack. | ||
<div><div><u><nowiki>Hex: Disintegrate, Edict: Guardian's Triumph (Stacking)</nowiki></u><nowiki> </nowiki> | |||
</nowiki></div> | |||
<div | |||
⬥ After casting an ultimate ability, your next basic ability consumes Guardian's Triumph, increasing the damage it deals by 20% damage and heals you for 8% of your missing LP per stack. Has a 30s cooldown. | ⬥ After casting an ultimate ability, your next basic ability consumes Guardian's Triumph, increasing the damage it deals by 20% damage and heals you for 8% of your missing LP per stack. Has a 30s cooldown. | ||
| | ||
</nowiki></div> | </nowiki></div></div><div><div><u><nowiki>Hex: Chaos Traps, Edict: Sword of Edicts (Non-Stacking)</nowiki></u><nowiki> </nowiki><pvme-image src="https://cdn.discordapp.com/emojis/994206002658431016.png?v=1" alt="chaostrapsrune" title="chaostrapsrune" kind="icon" /><nowiki> | ||
</div> | </nowiki></div><div class="pvme-source-preserve-lines"><nowiki>⬥ Upon activation, Zamorak spawns traps across the arena that deal spike magic damage as you walk over them. Traps will spawn around the arena and on all runes each time a rune is activated. | ||
<div><div><u><nowiki>Hex: Chaos Traps, Edict: Sword of Edicts (Non-Stacking)</nowiki></u><nowiki> </nowiki> | |||
</nowiki></div> | |||
<div | |||
⬥ Temporarily siphon the dwindling defensive power from the sword, dealing and taking 5% less damage while standing near it. Also protects against the damage, stun and bind when setting off Chaos Traps. Lasts 30 seconds and has a 60 second cooldown. | ⬥ Temporarily siphon the dwindling defensive power from the sword, dealing and taking 5% less damage while standing near it. Also protects against the damage, stun and bind when setting off Chaos Traps. Lasts 30 seconds and has a 60 second cooldown. | ||
| | ||
</nowiki></div> | </nowiki></div></div><div><div><u><nowiki>Hex: Affliction, Edict: Balance of Power (Stacking)</nowiki></u><nowiki> </nowiki><pvme-image src="https://cdn.discordapp.com/emojis/994205987663794206.png?v=1" alt="afflictionrune" title="afflictionrune" kind="icon" /><nowiki> | ||
</div> | </nowiki></div><div class="pvme-source-preserve-lines"><nowiki>⬥ When Zamorak's targets heal, the amount will be reduced by 10% per stack. | ||
<div><div><u><nowiki>Hex: Affliction, Edict: Balance of Power (Stacking)</nowiki></u><nowiki> </nowiki> | |||
</nowiki></div> | |||
<div | |||
⬥ While below 60% lifepoints, outgoing damage is increased by 6% per stack. | ⬥ While below 60% lifepoints, outgoing damage is increased by 6% per stack. | ||
| | ||
</nowiki></div> | </nowiki></div></div></div><nowiki> | ||
</div> | </nowiki></div><nowiki> | ||
</div> | |||
<nowiki> | |||
</nowiki></div> | |||
<nowiki> | |||
</nowiki></div> | </nowiki></div><nowiki> | ||
<nowiki> | |||
</nowiki></div> | </nowiki></div></div></div></div></div></div></div></div></div></div></div></div> | ||
</div> | |||
</div> | |||
</div> | |||
</div> | |||
</div> | |||
</div> | |||
</div> | |||
</div> | |||
</div> | |||
</div> | |||
</div> | |||
<nowiki> | <nowiki> | ||
</nowiki><p><nowiki></nowiki></p> | </nowiki> | ||
<p class="pvme-source-line pvme-source-spacer"><nowiki></nowiki></p> | |||
<nowiki> | <nowiki> | ||
</nowiki><h2 id="hex-twinshot"><ins><nowiki>Hex: Twinshot</nowiki></ins></h2> | </nowiki> | ||
</div> | |||
<div class="pvme-source-section"> | |||
<h2 id="hex-twinshot"><ins><nowiki>Hex: Twinshot</nowiki></ins></h2> | |||
<nowiki> | <nowiki> | ||
</nowiki><p><nowiki>Twinshot </nowiki> | </nowiki> | ||
<p class="pvme-source-line"><nowiki>Twinshot </nowiki><pvme-image src="https://cdn.discordapp.com/emojis/994206062498549780.png?v=1" alt="twinshotrune" title="twinshotrune" kind="icon" /><nowiki> from pad 1 and Disintegrate </nowiki><pvme-image src="https://cdn.discordapp.com/emojis/994206018680668171.png?v=1" alt="disintegraterune" title="disintegraterune" kind="icon" /><nowiki> from pad 4 will result in the largest increases in incoming damage, especially when they are ramped up in later phases</nowiki></p> | |||
<nowiki> | <nowiki> | ||
</nowiki><p><nowiki></nowiki></p> | </nowiki> | ||
<p class="pvme-source-line pvme-source-spacer"><nowiki></nowiki></p> | |||
<nowiki> | <nowiki> | ||
</nowiki><p><nowiki>⬥ </nowiki><strong><nowiki>Twinshot</nowiki></strong><nowiki> </nowiki> | </nowiki> | ||
<p class="pvme-source-line"><nowiki>⬥ </nowiki><strong><nowiki>Twinshot</nowiki></strong><nowiki> </nowiki><pvme-image src="https://cdn.discordapp.com/emojis/994206062498549780.png?v=1" alt="twinshotrune" title="twinshotrune" kind="icon" /><nowiki> deals a </nowiki><strong><nowiki>second hit 1 tick after all of Zamorak's autoattacks</nowiki></strong><nowiki>, equal to 10% of the possible max hit per stack, which allows for less </nowiki><pvme-image src="https://cdn.discordapp.com/emojis/615613924506599497.png?v=1" alt="soulsplit" title="soulsplit" kind="icon" /><nowiki> uptime and creates special hit timings to be wary of once it's active</nowiki></p> | |||
<nowiki> | <nowiki> | ||
</nowiki><p><nowiki> • During </nowiki><strong><nowiki>grey HP</nowiki></strong><nowiki> and </nowiki><strong><nowiki>red HP</nowiki></strong><nowiki>, Zamorak will have an accelerated 4-tick attack rate, meaning </nowiki> | </nowiki> | ||
<p class="pvme-source-line pvme-source-detail"><nowiki> • During </nowiki><strong><nowiki>grey HP</nowiki></strong><nowiki> and </nowiki><strong><nowiki>red HP</nowiki></strong><nowiki>, Zamorak will have an accelerated 4-tick attack rate, meaning </nowiki><pvme-image src="https://cdn.discordapp.com/emojis/544195487926845462.png?v=1" alt="deflectmage" title="deflectmage" kind="icon" /><nowiki> </nowiki><pvme-image src="https://cdn.discordapp.com/emojis/544195488317046812.png?v=1" alt="deflectrange" title="deflectrange" kind="icon" /><nowiki> will have to be active 1/2 of the time with twinshot </nowiki><pvme-image src="https://cdn.discordapp.com/emojis/994206062498549780.png?v=1" alt="twinshotrune" title="twinshotrune" kind="icon" /><nowiki> active</nowiki></p> | |||
<nowiki> | <nowiki> | ||
</nowiki><p><nowiki> • During the </nowiki><em><nowiki>Flames of Zamorak</nowiki></em><nowiki> mechanic, if the black smoke is picked up immediately, the timed damage will occur on the </nowiki><strong><nowiki>same tick as a twinshot hit during grey HP and red HP</nowiki></strong></p> | </nowiki> | ||
<p class="pvme-source-line pvme-source-detail"><nowiki> • During the </nowiki><em><nowiki>Flames of Zamorak</nowiki></em><nowiki> mechanic, if the black smoke is picked up immediately, the timed damage will occur on the </nowiki><strong><nowiki>same tick as a twinshot hit during grey HP and red HP</nowiki></strong></p> | |||
<nowiki> | <nowiki> | ||
</nowiki><p><nowiki> ⬩ This will make it impossible to </nowiki> | </nowiki> | ||
<p class="pvme-source-line pvme-source-detail"><nowiki> ⬩ This will make it impossible to </nowiki><pvme-image src="https://cdn.discordapp.com/emojis/535541258844635148.png?v=1" alt="res" title="res" kind="icon" /><nowiki> / </nowiki><pvme-image src="https://cdn.discordapp.com/emojis/787904334377648130.png?v=1" alt="divert" title="divert" kind="icon" /><nowiki> the timed damage unless </nowiki><pvme-image src="https://cdn.discordapp.com/emojis/513190158728953857.png?v=1" alt="devo" title="devo" kind="icon" /><nowiki> is also used</nowiki></p> | |||
<nowiki> | <nowiki> | ||
</nowiki><p><nowiki> ⬩ Note that entering Infernus </nowiki> | </nowiki> | ||
<p class="pvme-source-line pvme-source-detail"><nowiki> ⬩ Note that entering Infernus </nowiki><pvme-image src="https://cdn.discordapp.com/emojis/1073955377537876089.png?v=1" alt="realmmovement" title="realmmovement" kind="icon" /><nowiki> or phasing Zamorak between </nowiki><strong><nowiki>red HP</nowiki></strong><nowiki>/</nowiki><strong><nowiki>grey HP</nowiki></strong><nowiki> and </nowiki><strong><nowiki>green HP</nowiki></strong><nowiki>, causing his attack speed to change, while the timer is running can cause the damage to line up with an attack regardless of twinshot being active or not</nowiki></p> | |||
<nowiki> | <nowiki> | ||
</nowiki><p><nowiki></nowiki></p> | </nowiki> | ||
<p class="pvme-source-line pvme-source-spacer"><nowiki></nowiki></p> | |||
<nowiki> | <nowiki> | ||
</nowiki><h2 id="hex-disintegrate"><ins><nowiki>Hex: Disintegrate</nowiki></ins></h2> | </nowiki> | ||
</div> | |||
<div class="pvme-source-section"> | |||
<h2 id="hex-disintegrate"><ins><nowiki>Hex: Disintegrate</nowiki></ins></h2> | |||
<nowiki> | <nowiki> | ||
</nowiki><p><nowiki>⬥ </nowiki><strong><nowiki>Disintegrate</nowiki></strong><nowiki> </nowiki> | </nowiki> | ||
<p class="pvme-source-line"><nowiki>⬥ </nowiki><strong><nowiki>Disintegrate</nowiki></strong><nowiki> </nowiki><pvme-image src="https://cdn.discordapp.com/emojis/994206018680668171.png?v=1" alt="disintegraterune" title="disintegraterune" kind="icon" /><nowiki> from pad 4 grants Zamorak </nowiki><strong><nowiki>7% defence piercing per stack on his attacks</nowiki></strong><nowiki>, stacking with existing defence piercing values such as </nowiki><em><nowiki>Chaos Blast</nowiki></em><nowiki>: 40% and </nowiki><em><nowiki>Flames of Zamorak</nowiki></em><nowiki> Smoke damage: 1% per stack</nowiki></p> | |||
<nowiki> | <nowiki> | ||
</nowiki><p><nowiki> • This only affects the following defensives:</nowiki></p> | </nowiki> | ||
<p class="pvme-source-line pvme-source-detail"><nowiki> • This only affects the following defensives:</nowiki></p> | |||
<nowiki> | <nowiki> | ||
</nowiki><p><nowiki> ⬩ Disruption shield </nowiki> | </nowiki> | ||
<p class="pvme-source-line pvme-source-detail"><nowiki> ⬩ Disruption shield </nowiki><pvme-image src="https://cdn.discordapp.com/emojis/535614336207552523.png?v=1" alt="disrupt" title="disrupt" kind="icon" /></p> | |||
<nowiki> | <nowiki> | ||
</nowiki><p><nowiki> ⬩ Barricade </nowiki> | </nowiki> | ||
<p class="pvme-source-line pvme-source-detail"><nowiki> ⬩ Barricade </nowiki><pvme-image src="https://cdn.discordapp.com/emojis/535541306353778689.png?v=1" alt="cade" title="cade" kind="icon" /></p> | |||
<nowiki> | <nowiki> | ||
</nowiki><p><nowiki> ⬩ Resonance </nowiki> | </nowiki> | ||
<p class="pvme-source-line pvme-source-detail"><nowiki> ⬩ Resonance </nowiki><pvme-image src="https://cdn.discordapp.com/emojis/535541258844635148.png?v=1" alt="res" title="res" kind="icon" /></p> | |||
<nowiki> | <nowiki> | ||
</nowiki><p><nowiki> ⬩ Divert </nowiki> | </nowiki> | ||
<p class="pvme-source-line pvme-source-detail"><nowiki> ⬩ Divert </nowiki><pvme-image src="https://cdn.discordapp.com/emojis/787904334377648130.png?v=1" alt="divert" title="divert" kind="icon" /></p> | |||
<nowiki> | <nowiki> | ||
</nowiki><p><nowiki> ⬩ Reflect </nowiki> | </nowiki> | ||
<p class="pvme-source-line pvme-source-detail"><nowiki> ⬩ Reflect </nowiki><pvme-image src="https://cdn.discordapp.com/emojis/535541258786177064.png?v=1" alt="reflect" title="reflect" kind="icon" /></p> | |||
<nowiki> | <nowiki> | ||
</nowiki><p><nowiki> ⬩ Debilitate </nowiki> | </nowiki> | ||
<p class="pvme-source-line pvme-source-detail"><nowiki> ⬩ Debilitate </nowiki><pvme-image src="https://cdn.discordapp.com/emojis/535541278264393729.png?v=1" alt="debil" title="debil" kind="icon" /></p> | |||
<nowiki> | <nowiki> | ||
</nowiki><p><nowiki> ⬩ Shield dome </nowiki> | </nowiki> | ||
<p class="pvme-source-line pvme-source-detail"><nowiki> ⬩ Shield dome </nowiki><pvme-image src="https://cdn.discordapp.com/emojis/537341954392850442.png?v=1" alt="shielddome" title="shielddome" kind="icon" /></p> | |||
<nowiki> | <nowiki> | ||
</nowiki><p><nowiki> • The % damage taken through a defensive affected by disintegrate is calculated as follows</nowiki></p> | </nowiki> | ||
<p class="pvme-source-line pvme-source-detail"><nowiki> • The % damage taken through a defensive affected by disintegrate is calculated as follows</nowiki></p> | |||
<nowiki> | <nowiki> | ||
</nowiki><p><nowiki> ⬩ </nowiki><code><nowiki>= floor(Defensive_value * (Disintegrate_stacks * 0.07 + Base_piercing) + (100 - Defensive_value))/100</nowiki></code><nowiki></nowiki></p> | </nowiki> | ||
<p class="pvme-source-line pvme-source-detail"><nowiki> ⬩ </nowiki><code><nowiki>= floor(Defensive_value * (Disintegrate_stacks * 0.07 + Base_piercing) + (100 - Defensive_value))/100</nowiki></code><nowiki></nowiki></p> | |||
<nowiki> | <nowiki> | ||
</nowiki><p><nowiki> • Given the way some defensives are calculated through this effect, this results in a buff and debuff on certain aspects of them:</nowiki></p> | </nowiki> | ||
<p class="pvme-source-line pvme-source-detail"><nowiki> • Given the way some defensives are calculated through this effect, this results in a buff and debuff on certain aspects of them:</nowiki></p> | |||
<nowiki> | <nowiki> | ||
</nowiki><p><nowiki> ⬩ Reflect </nowiki> | </nowiki> | ||
<p class="pvme-source-line pvme-source-detail"><nowiki> ⬩ Reflect </nowiki><pvme-image src="https://cdn.discordapp.com/emojis/535541258786177064.png?v=1" alt="reflect" title="reflect" kind="icon" /><nowiki> damage </nowiki><strong><nowiki>increases</nowiki></strong><nowiki> as more damage taken results in more damage reflected</nowiki></p> | |||
<nowiki> | <nowiki> | ||
</nowiki><p><nowiki> ⬩ Resonance </nowiki> | </nowiki> | ||
<p class="pvme-source-line pvme-source-detail"><nowiki> ⬩ Resonance </nowiki><pvme-image src="https://cdn.discordapp.com/emojis/535541258844635148.png?v=1" alt="res" title="res" kind="icon" /><nowiki> healing </nowiki><strong><nowiki>decreases</nowiki></strong><nowiki> since disintegrate results in less damage blocked</nowiki></p> | |||
<nowiki> | <nowiki> | ||
</nowiki><p><nowiki></nowiki></p> | </nowiki> | ||
<p class="pvme-source-line pvme-source-spacer"><nowiki></nowiki></p> | |||
<nowiki> | <nowiki> | ||
</nowiki><h2 id="hex-chaos-traps"><ins><nowiki>Hex: Chaos Traps</nowiki></ins></h2> | </nowiki> | ||
</div> | |||
<div class="pvme-source-section"> | |||
<h2 id="hex-chaos-traps"><ins><nowiki>Hex: Chaos Traps</nowiki></ins></h2> | |||
<nowiki> | <nowiki> | ||
</nowiki><p><nowiki>Once the Chaos Traps rune </nowiki> | </nowiki> | ||
<p class="pvme-source-line"><nowiki>Once the Chaos Traps rune </nowiki><pvme-image src="https://cdn.discordapp.com/emojis/994206002658431016.png?v=1" alt="chaostrapsrune" title="chaostrapsrune" kind="icon" /><nowiki> is active from pad 5, traps will spawn in </nowiki><strong><ins><nowiki>set</nowiki></ins></strong><nowiki> locations. The locations on the map below are possible locations where the traps may spawn</nowiki></p> | |||
<nowiki> | <nowiki> | ||
</nowiki><p><nowiki>⬥ Note that </nowiki><strong><nowiki>traps respawn on every pad each time a new pad is charged</nowiki></strong></p> | </nowiki> | ||
<p class="pvme-source-line"><nowiki>⬥ Note that </nowiki><strong><nowiki>traps respawn on every pad each time a new pad is charged</nowiki></strong></p> | |||
<nowiki> | <nowiki> | ||
</nowiki><p><nowiki>⬥ To avoid being stunned and taking heavy damage, you can:</nowiki></p> | </nowiki> | ||
<p class="pvme-source-line"><nowiki>⬥ To avoid being stunned and taking heavy damage, you can:</nowiki></p> | |||
<nowiki> | <nowiki> | ||
</nowiki><p><nowiki> • Step off each pad right as it finishes charging (new traps spawn with a slight delay)</nowiki></p> | </nowiki> | ||
<p class="pvme-source-line pvme-source-detail"><nowiki> • Step off each pad right as it finishes charging (new traps spawn with a slight delay)</nowiki></p> | |||
<nowiki> | <nowiki> | ||
</nowiki><p><nowiki> • Pick up the buff </nowiki> | </nowiki> | ||
<p class="pvme-source-line pvme-source-detail"><nowiki> • Pick up the buff </nowiki><pvme-image src="https://cdn.discordapp.com/emojis/1006128082266107954.png?v=1" alt="swordofedictsedict" title="swordofedictsedict" kind="icon" /><nowiki> near the sword before charging a new pad</nowiki></p> | |||
<nowiki> | <nowiki> | ||
</nowiki><p><nowiki> • </nowiki> | </nowiki> | ||
<p class="pvme-source-line pvme-source-detail"><nowiki> • </nowiki><pvme-image src="https://cdn.discordapp.com/emojis/535541306475151390.png?v=1" alt="anti" title="anti" kind="icon" /><nowiki> + </nowiki><pvme-image src="https://cdn.discordapp.com/emojis/544195487926845462.png?v=1" alt="deflectmage" title="deflectmage" kind="icon" /><nowiki> + </nowiki><pvme-image src="https://cdn.discordapp.com/emojis/513190158728953857.png?v=1" alt="devo" title="devo" kind="icon" /><nowiki> / </nowiki><pvme-image src="https://cdn.discordapp.com/emojis/535541258786177064.png?v=1" alt="reflect" title="reflect" kind="icon" /><nowiki> / </nowiki><pvme-image src="https://cdn.discordapp.com/emojis/535541258844635148.png?v=1" alt="res" title="res" kind="icon" /><nowiki> to step on a new pad without the </nowiki><pvme-image src="https://cdn.discordapp.com/emojis/1006128082266107954.png?v=1" alt="swordofedictsedict" title="swordofedictsedict" kind="icon" /><nowiki> buff</nowiki></p> | |||
<nowiki> | <nowiki> | ||
</nowiki><p> | </nowiki> | ||
<p class="pvme-source-line"><pvme-image src="https://img.pvme.io/images/6dVF9SM48q.png" alt="" title="" kind="media" /><nowiki> | |||
</nowiki></p> | </nowiki></p> | ||
<nowiki> | <nowiki> | ||
</nowiki><h2 id="phase-7"><ins><nowiki>Phase 7</nowiki></ins></h2> | </nowiki> | ||
</div> | |||
<div class="pvme-source-section"> | |||
<h2 id="phase-7"><ins><nowiki>Phase 7</nowiki></ins></h2> | |||
<nowiki> | <nowiki> | ||
</nowiki><p> | </nowiki> | ||
<p class="pvme-source-line"><pvme-image src="https://img.pvme.io/images/WavFFAD1rN.png" alt="" title="" kind="media" /><nowiki> | |||
At 100% enrage, phase 7 is introduced. Zamorak will enter Infernus and force the player in along with them.</nowiki></p> | At 100% enrage, phase 7 is introduced. Zamorak will enter Infernus and force the player in along with them.</nowiki></p> | ||
<nowiki> | <nowiki> | ||
</nowiki><p><nowiki>⬥ When the phase starts:</nowiki></p> | </nowiki> | ||
<p class="pvme-source-line"><nowiki>⬥ When the phase starts:</nowiki></p> | |||
<nowiki> | <nowiki> | ||
</nowiki><p><nowiki> • The pad order from phases 1-6 is reversed</nowiki></p> | </nowiki> | ||
<p class="pvme-source-line pvme-source-detail"><nowiki> • The pad order from phases 1-6 is reversed</nowiki></p> | |||
<nowiki> | <nowiki> | ||
</nowiki><p><nowiki> • Zamorak starts immune to damage</nowiki></p> | </nowiki> | ||
<p class="pvme-source-line pvme-source-detail"><nowiki> • Zamorak starts immune to damage</nowiki></p> | |||
<nowiki> | <nowiki> | ||
</nowiki><p><nowiki> • A Chaos Demon will spawn which should be killed</nowiki></p> | </nowiki> | ||
<p class="pvme-source-line pvme-source-detail"><nowiki> • A Chaos Demon will spawn which should be killed</nowiki></p> | |||
<nowiki> | <nowiki> | ||
</nowiki><p><nowiki> • Zamorak sends 2 </nowiki> | </nowiki> | ||
<p class="pvme-source-line pvme-source-detail"><nowiki> • Zamorak sends 2 </nowiki><pvme-image src="https://cdn.discordapp.com/emojis/689504724159823906.png?v=1" alt="Magic" title="Magic" kind="icon" /><nowiki> hits to all players</nowiki></p> | |||
<nowiki> | <nowiki> | ||
</nowiki><h3 id="rune-calls"><nowiki>Rune Calls</nowiki></h3> | </nowiki> | ||
<div class="pvme-source-mechanic"> | |||
<h3 id="rune-calls"><nowiki>Rune Calls</nowiki></h3> | |||
<nowiki> | <nowiki> | ||
</nowiki><p><nowiki>⬥ An amount of runes (2 in solo, otherwise equal to team size in group) will appear before Zamorak and stay there temporarily, </nowiki><strong><nowiki>the order in which they appear is the order they must be defeated in</nowiki></strong></p> | </nowiki> | ||
<p class="pvme-source-line"><nowiki>⬥ An amount of runes (2 in solo, otherwise equal to team size in group) will appear before Zamorak and stay there temporarily, </nowiki><strong><nowiki>the order in which they appear is the order they must be defeated in</nowiki></strong></p> | |||
<nowiki> | <nowiki> | ||
</nowiki><p><nowiki>⬥ At the same time Zamorak will begin charging a </nowiki><strong><nowiki>new red HP bar, referred to as the chaos bar</nowiki></strong><nowiki>, that determines the damage of upcoming mechanics</nowiki></p> | </nowiki> | ||
<p class="pvme-source-line"><nowiki>⬥ At the same time Zamorak will begin charging a </nowiki><strong><nowiki>new red HP bar, referred to as the chaos bar</nowiki></strong><nowiki>, that determines the damage of upcoming mechanics</nowiki></p> | |||
<nowiki> | <nowiki> | ||
</nowiki><p><nowiki> • </nowiki> | </nowiki> | ||
<p class="pvme-source-line pvme-source-detail"><nowiki> • </nowiki><pvme-image src="https://cdn.discordapp.com/emojis/994206048334393385.png?v=1" alt="smiterune" title="smiterune" kind="icon" /><nowiki> may be shown twice</nowiki></p> | |||
<nowiki> | <nowiki> | ||
</nowiki><p><nowiki> • Killing a rune will delay Zamorak from charging for 9 ticks (4 ticks at 1600%+ enrage)</nowiki></p> | </nowiki> | ||
<p class="pvme-source-line pvme-source-detail"><nowiki> • Killing a rune will delay Zamorak from charging for 9 ticks (4 ticks at 1600%+ enrage)</nowiki></p> | |||
<nowiki> | <nowiki> | ||
</nowiki><p><nowiki> • Killing a rune out of order will deal heavy damage to all players</nowiki></p> | </nowiki> | ||
<p class="pvme-source-line pvme-source-detail"><nowiki> • Killing a rune out of order will deal heavy damage to all players</nowiki></p> | |||
<nowiki> | <nowiki> | ||
</nowiki><p><nowiki> • Runes uber heal after they are defeated, be careful not to kill it twice.</nowiki></p> | </nowiki> | ||
<p class="pvme-source-line pvme-source-detail"><nowiki> • Runes uber heal after they are defeated, be careful not to kill it twice.</nowiki></p> | |||
<nowiki> | <nowiki> | ||
</nowiki><p><nowiki> • The rate of charge increases with enrage and caps at 8850%</nowiki></p> | </nowiki> | ||
<p class="pvme-source-line pvme-source-detail"><nowiki> • The rate of charge increases with enrage and caps at 8850%</nowiki></p> | |||
<nowiki> | <nowiki> | ||
</nowiki><p><nowiki></nowiki></p> | </nowiki> | ||
<p class="pvme-source-line pvme-source-spacer"><nowiki></nowiki></p> | |||
<nowiki> | <nowiki> | ||
</nowiki><p><nowiki>⬥ After the last rune is defeated Zamorak stops charging, becomes damageable, and uses in this order:</nowiki></p> | </nowiki> | ||
<p class="pvme-source-line"><nowiki>⬥ After the last rune is defeated Zamorak stops charging, becomes damageable, and uses in this order:</nowiki></p> | |||
<nowiki> | <nowiki> | ||
</nowiki><p><nowiki> • [1] A single moderate </nowiki> | </nowiki> | ||
<p class="pvme-source-line pvme-source-detail"><nowiki> • [1] A single moderate </nowiki><pvme-image src="https://cdn.discordapp.com/emojis/1096130867279171706.png?v=1" alt="melee" title="melee" kind="icon" /><nowiki> hit</nowiki></p> | |||
<nowiki> | <nowiki> | ||
</nowiki><p><nowiki> • [2] A large chaos damage hit</nowiki></p> | </nowiki> | ||
<p class="pvme-source-line pvme-source-detail"><nowiki> • [2] A large chaos damage hit</nowiki></p> | |||
<nowiki> | <nowiki> | ||
</nowiki><p><nowiki> ⬩ Soft typeless damage that is </nowiki><strong><nowiki>equivalent to the chaos bar</nowiki></strong><nowiki> that charges while killing runes</nowiki></p> | </nowiki> | ||
<p class="pvme-source-line pvme-source-detail"><nowiki> ⬩ Soft typeless damage that is </nowiki><strong><nowiki>equivalent to the chaos bar</nowiki></strong><nowiki> that charges while killing runes</nowiki></p> | |||
<nowiki> | <nowiki> | ||
</nowiki><p><nowiki> ⬩ Make sure your team is spread out as it does damage in a small area around each player</nowiki></p> | </nowiki> | ||
<p class="pvme-source-line pvme-source-detail"><nowiki> ⬩ Make sure your team is spread out as it does damage in a small area around each player</nowiki></p> | |||
<nowiki> | <nowiki> | ||
</nowiki><p><nowiki> ⬩ Has a base </nowiki><strong><nowiki>defence piercing</nowiki></strong><nowiki> of 50%</nowiki></p> | </nowiki> | ||
<p class="pvme-source-line pvme-source-detail"><nowiki> ⬩ Has a base </nowiki><strong><nowiki>defence piercing</nowiki></strong><nowiki> of 50%</nowiki></p> | |||
<nowiki> | <nowiki> | ||
</nowiki><p><nowiki> • [3] 4 additional small chaos damage hits</nowiki></p> | </nowiki> | ||
<p class="pvme-source-line pvme-source-detail"><nowiki> • [3] 4 additional small chaos damage hits</nowiki></p> | |||
<nowiki> | <nowiki> | ||
</nowiki><p><nowiki> ⬩ Deals damage based on a portion of the chaos bar and the amount of time it was allowed to charge for</nowiki></p> | </nowiki> | ||
<p class="pvme-source-line pvme-source-detail"><nowiki> ⬩ Deals damage based on a portion of the chaos bar and the amount of time it was allowed to charge for</nowiki></p> | |||
<nowiki> | <nowiki> | ||
</nowiki><p><nowiki> ⬩ Does not have base defence piercing but is </nowiki><strong><nowiki>affected by Twinshot</nowiki></strong></p> | </nowiki> | ||
<p class="pvme-source-line pvme-source-detail"><nowiki> ⬩ Does not have base defence piercing but is </nowiki><strong><nowiki>affected by Twinshot</nowiki></strong></p> | |||
<nowiki> | <nowiki> | ||
</nowiki><p><nowiki></nowiki></p> | </nowiki> | ||
<p class="pvme-source-line pvme-source-spacer"><nowiki></nowiki></p> | |||
<nowiki> | <nowiki> | ||
</nowiki><p><nowiki>⬥ If Zamorak is not defeated before becoming immune on the 4th small chaos hit:</nowiki></p> | </nowiki> | ||
<p class="pvme-source-line"><nowiki>⬥ If Zamorak is not defeated before becoming immune on the 4th small chaos hit:</nowiki></p> | |||
<nowiki> | <nowiki> | ||
</nowiki><p><nowiki> • [4] Another Chaos Demon spawns</nowiki></p> | </nowiki> | ||
<p class="pvme-source-line pvme-source-detail"><nowiki> • [4] Another Chaos Demon spawns</nowiki></p> | |||
<nowiki> | <nowiki> | ||
</nowiki><p><nowiki> • [5] Another moderate </nowiki> | </nowiki> | ||
<p class="pvme-source-line pvme-source-detail"><nowiki> • [5] Another moderate </nowiki><pvme-image src="https://cdn.discordapp.com/emojis/1096130867279171706.png?v=1" alt="melee" title="melee" kind="icon" /><nowiki> hit</nowiki></p> | |||
<nowiki> | <nowiki> | ||
</nowiki><p><nowiki> • [6] Another large chaos damage hit</nowiki></p> | </nowiki> | ||
<p class="pvme-source-line pvme-source-detail"><nowiki> • [6] Another large chaos damage hit</nowiki></p> | |||
<nowiki> | <nowiki> | ||
</nowiki><p><nowiki> • [7] Runes are called</nowiki></p> | </nowiki> | ||
<p class="pvme-source-line pvme-source-detail"><nowiki> • [7] Runes are called</nowiki></p> | |||
<nowiki> | <nowiki> | ||
</nowiki><p><nowiki> • Resets to [1] once last rune is defeated</nowiki></p> | </nowiki> | ||
<p class="pvme-source-line pvme-source-detail"><nowiki> • Resets to [1] once last rune is defeated</nowiki></p> | |||
<nowiki> | <nowiki> | ||
</nowiki><p><nowiki></nowiki></p> | </nowiki> | ||
<p class="pvme-source-line pvme-source-spacer"><nowiki></nowiki></p> | |||
<nowiki> | <nowiki> | ||
</nowiki><p><nowiki>⬥ Zamorak will have 100,000 to 250,000 health </nowiki> | </nowiki> | ||
<p class="pvme-source-line"><nowiki>⬥ Zamorak will have 100,000 to 250,000 health </nowiki><pvme-image src="https://cdn.discordapp.com/emojis/689509250887712902.png?v=1" alt="constitution" title="constitution" kind="icon" /><nowiki> per player during phase 7, capping at 1000% enrage</nowiki></p> | |||
<nowiki> | <nowiki> | ||
</nowiki><p><nowiki>⬥ The Chaos Demon is the same as during the </nowiki><em><nowiki>Infernal Tomb</nowiki></em><nowiki> mechanic and will have 18,750 to 70,000 health </nowiki> | </nowiki> | ||
<p class="pvme-source-line"><nowiki>⬥ The Chaos Demon is the same as during the </nowiki><em><nowiki>Infernal Tomb</nowiki></em><nowiki> mechanic and will have 18,750 to 70,000 health </nowiki><pvme-image src="https://cdn.discordapp.com/emojis/689509250887712902.png?v=1" alt="constitution" title="constitution" kind="icon" /><nowiki>, capping at 1470% enrage</nowiki></p> | |||
<nowiki> | <nowiki> | ||
</nowiki><p><nowiki>⬥ At 1000% enrage the </nowiki><strong><nowiki>chaos bar</nowiki></strong><nowiki> charge no longer resets between cycles, meaning the chaos damage will likely become unmanageable in a second cycle</nowiki></p> | </nowiki> | ||
<p class="pvme-source-line"><nowiki>⬥ At 1000% enrage the </nowiki><strong><nowiki>chaos bar</nowiki></strong><nowiki> charge no longer resets between cycles, meaning the chaos damage will likely become unmanageable in a second cycle</nowiki></p> | |||
<nowiki> | <nowiki> | ||
</nowiki><p><nowiki> • It's generally expected for Zamorak to be low enough at this point to defeat before the large chaos hit reaches the player, </nowiki> | </nowiki> | ||
<p class="pvme-source-line pvme-source-detail"><nowiki> • It's generally expected for Zamorak to be low enough at this point to defeat before the large chaos hit reaches the player, </nowiki><pvme-image src="https://cdn.discordapp.com/emojis/513190159462825984.png?v=1" alt="rod" title="rod" kind="icon" /><nowiki> can also be used to buy more time</nowiki></p> | |||
<nowiki> | <nowiki> | ||
</nowiki><p><nowiki></nowiki></p> | </nowiki> | ||
<p class="pvme-source-line pvme-source-spacer"><nowiki></nowiki></p> | |||
<nowiki> | <nowiki> | ||
</nowiki><p><nowiki>⬥ Each small chaos damage hit is calculated as follows:</nowiki></p> | </nowiki> | ||
<p class="pvme-source-line"><nowiki>⬥ Each small chaos damage hit is calculated as follows:</nowiki></p> | |||
<nowiki> | <nowiki> | ||
</nowiki><p><nowiki> • </nowiki><code><nowiki>= floor(Iteration * Chaos_bar/100)</nowiki></code><nowiki> where </nowiki><code><nowiki>Iteration</nowiki></code><nowiki> refers to how many times the Charge value has increased (this gets delayed when killing a rune)</nowiki></p> | </nowiki> | ||
<p class="pvme-source-line pvme-source-detail"><nowiki> • </nowiki><code><nowiki>= floor(Iteration * Chaos_bar/100)</nowiki></code><nowiki> where </nowiki><code><nowiki>Iteration</nowiki></code><nowiki> refers to how many times the Charge value has increased (this gets delayed when killing a rune)</nowiki></p> | |||
<nowiki> | <nowiki> | ||
</nowiki><p><nowiki></nowiki></p> | </nowiki> | ||
<p class="pvme-source-line pvme-source-spacer"><nowiki></nowiki></p> | |||
<nowiki> | <nowiki> | ||
</nowiki><p><strong><nowiki>Final phase (Solo </nowiki> | </nowiki> | ||
<p class="pvme-source-line"><strong><nowiki>Final phase (Solo </nowiki><pvme-image src="https://cdn.discordapp.com/emojis/689504724159823906.png?v=1" alt="Magic" title="Magic" kind="icon" /><nowiki> 440%)</nowiki></strong></p> | |||
<nowiki> | <nowiki> | ||
</nowiki> | </nowiki> | ||
<pvme-video src="https://img.pvme.io/images/gQrldqS.mp4" controls="1" loop="1" muted="1" type="video/mp4" /> | |||
<nowiki> | <nowiki> | ||
</nowiki>< | </nowiki> | ||
<p class="pvme-source-line pvme-source-spacer"><nowiki></nowiki></p> | |||
<nowiki> | <nowiki> | ||
</nowiki>< | </nowiki> | ||
</div> | |||
<div class="pvme-source-mechanic"> | |||
<h3 id="phase-7-general-strategy"><nowiki>Phase 7 General Strategy</nowiki></h3> | |||
<nowiki> | <nowiki> | ||
</nowiki><p | </nowiki> | ||
<p class="pvme-source-line pvme-source-spacer"><nowiki></nowiki></p> | |||
<nowiki> | <nowiki> | ||
</nowiki><p><nowiki> | </nowiki> | ||
<p class="pvme-source-line"><strong><nowiki>After entering Infernus:</nowiki></strong></p> | |||
<nowiki> | <nowiki> | ||
</nowiki><p><nowiki>⬥ | </nowiki> | ||
<p class="pvme-source-line"><nowiki>⬥ Team kills the Chaos Demon</nowiki></p> | |||
<nowiki> | <nowiki> | ||
</nowiki><p><nowiki>⬥ | </nowiki> | ||
<p class="pvme-source-line"><nowiki>⬥ Before Zamorak calls runes, team gets ready to ult </nowiki><pvme-image src="https://cdn.discordapp.com/emojis/535532854004678657.png?v=1" alt="zerk" title="zerk" kind="icon" /><nowiki> </nowiki><pvme-image src="https://cdn.discordapp.com/emojis/994644352871714836.png?v=1" alt="gsunshine" title="gsunshine" kind="icon" /><nowiki> </nowiki><pvme-image src="https://cdn.discordapp.com/emojis/994644354536837121.png?v=1" alt="gdeathsswift" title="gdeathsswift" kind="icon" /><nowiki> </nowiki><pvme-image src="https://cdn.discordapp.com/emojis/1159434908486357072.png?v=1" alt="livingdeath" title="livingdeath" kind="icon" /><nowiki>**</nowiki></p> | |||
<nowiki> | <nowiki> | ||
</nowiki><p><nowiki>⬥ Team | </nowiki> | ||
<p class="pvme-source-line"><nowiki>⬥ Team kills runes as soon as they appear, </nowiki><strong><nowiki>being careful not to kill them twice unintentionally</nowiki></strong></p> | |||
<nowiki> | <nowiki> | ||
</nowiki><p | </nowiki> | ||
<p class="pvme-source-line"><nowiki>⬥ Team gets on Zamorak immediately after killing last rune</nowiki></p> | |||
<nowiki> | <nowiki> | ||
</nowiki><p><nowiki> • | </nowiki> | ||
<p class="pvme-source-line pvme-source-detail"><nowiki> • You will want to </nowiki><pvme-image src="https://cdn.discordapp.com/emojis/544195488447201300.png?v=1" alt="DeflectMelee" title="DeflectMelee" kind="icon" /><nowiki> and </nowiki><pvme-image src="https://cdn.discordapp.com/emojis/513190158728953857.png?v=1" alt="devo" title="devo" kind="icon" /><nowiki> the melee hit</nowiki></p> | |||
<nowiki> | <nowiki> | ||
</nowiki><p><nowiki> | </nowiki> | ||
<p class="pvme-source-line pvme-source-detail"><nowiki> • Use </nowiki><pvme-image src="https://cdn.discordapp.com/emojis/654618235097972737.png?v=1" alt="powerburstofvitality" title="powerburstofvitality" kind="icon" /><nowiki> + </nowiki><pvme-image src="https://cdn.discordapp.com/emojis/535614336207552523.png?v=1" alt="disrupt" title="disrupt" kind="icon" /><nowiki> + </nowiki><pvme-image src="https://cdn.discordapp.com/emojis/535541258786177064.png?v=1" alt="reflect" title="reflect" kind="icon" /><nowiki> on the large bomb, less defensives will be required with lower (<10k) charge</nowiki></p> | |||
<nowiki> | <nowiki> | ||
</nowiki><p><nowiki>⬥ | </nowiki> | ||
<p class="pvme-source-line"><nowiki>⬥ Repeat cycle if necessary</nowiki></p> | |||
<nowiki> | <nowiki> | ||
</nowiki><p><nowiki> | </nowiki> | ||
<p class="pvme-source-line"><nowiki>⬥ When 0 cycling a riskier approach is taken to deal out as much damage as possible</nowiki></p> | |||
<nowiki> | <nowiki> | ||
</nowiki><p><nowiki> • | </nowiki> | ||
<p class="pvme-source-line pvme-source-detail"><nowiki> • You will want to </nowiki><pvme-image src="https://cdn.discordapp.com/emojis/544195488447201300.png?v=1" alt="deflectmelee" title="deflectmelee" kind="icon" /><nowiki> and </nowiki><pvme-image src="https://cdn.discordapp.com/emojis/535614336207552523.png?v=1" alt="disrupt" title="disrupt" kind="icon" /><nowiki> the melee hit</nowiki></p> | |||
<nowiki> | <nowiki> | ||
</nowiki><p><nowiki> | </nowiki> | ||
<p class="pvme-source-line pvme-source-detail"><nowiki> • Use </nowiki><pvme-image src="https://cdn.discordapp.com/emojis/513190159462825984.png?v=1" alt="rod" title="rod" kind="icon" /><nowiki> on the large bomb and finish Zamorak</nowiki></p> | |||
<nowiki> | <nowiki> | ||
</nowiki><p | </nowiki> | ||
<p class="pvme-source-line pvme-source-spacer"><nowiki></nowiki></p> | |||
<nowiki> | <nowiki> | ||
</nowiki><p | </nowiki> | ||
<p class="pvme-source-line"><em><nowiki>Notes:</nowiki></em></p> | |||
<nowiki> | <nowiki> | ||
</nowiki><p><nowiki>⬥ </nowiki><em><nowiki> | </nowiki> | ||
<p class="pvme-source-line"><nowiki>⬥ </nowiki><em><nowiki>0 cycling means killing Zamorak before small bombs hit, risking death if not</nowiki></em></p> | |||
<nowiki> | <nowiki> | ||
</nowiki><p><nowiki> | </nowiki> | ||
<p class="pvme-source-line"><nowiki>⬥ </nowiki><em><nowiki>See enrage and style-specific Zamorak guides for full working rotations</nowiki></em></p> | |||
<nowiki> | <nowiki> | ||
</nowiki>< | </nowiki> | ||
<p class="pvme-source-line pvme-source-spacer"><nowiki></nowiki></p> | |||
<nowiki> | <nowiki> | ||
</nowiki><div><nowiki> | </nowiki> | ||
</div> | |||
</div> | |||
<div class="pvme-source-section"> | |||
<h2 id="phase-7-troubleshooting"><ins><nowiki>Phase 7 Troubleshooting</nowiki></ins></h2> | |||
<nowiki> | |||
</nowiki> | |||
<div><nowiki> | |||
</nowiki><div><nowiki> | </nowiki><div><nowiki> | ||
</nowiki><div><nowiki> | </nowiki><div><nowiki> | ||
| Line 723: | Line 1,004: | ||
</nowiki><div><nowiki> | </nowiki><div><nowiki> | ||
</nowiki><div></div> | </nowiki><div style="background-color: rgb(0, 153, 255)"></div><nowiki> | ||
<nowiki> | |||
</nowiki><div><nowiki> | </nowiki><div><nowiki> | ||
</nowiki><div><nowiki> | </nowiki><div><nowiki> | ||
| Line 732: | Line 1,012: | ||
</nowiki><div><div><div><u><nowiki>Taking too much damage?</nowiki></u><nowiki> | </nowiki><div><div><div><u><nowiki>Taking too much damage?</nowiki></u><nowiki> | ||
Note: refer to !p7skulls in </nowiki> | Note: refer to !p7skulls in </nowiki><span><nowiki>#bot-commands</nowiki></span><nowiki> if struggling with </nowiki><pvme-image src="https://cdn.discordapp.com/emojis/1159434663903899728.png?v=1" alt="deathskulls" title="deathskulls" kind="icon" /><nowiki> bouncing to runes | ||
</nowiki></div> | </nowiki></div><div class="pvme-source-preserve-lines"><nowiki>⬥ </nowiki><strong><nowiki>Edict Order</nowiki></strong><nowiki> (see !edicts for recommendations) | ||
<div | |||
• A late edict 4 leads to less effective defensives. | • A late edict 4 leads to less effective defensives. | ||
• An early edict 6 leads to lesser healing food. | • An early edict 6 leads to lesser healing food. | ||
| Line 742: | Line 1,021: | ||
⬥ </nowiki><strong><nowiki>Defensive Usage</nowiki></strong><nowiki> | ⬥ </nowiki><strong><nowiki>Defensive Usage</nowiki></strong><nowiki> | ||
• Pre-</nowiki> | • Pre-</nowiki><pvme-image src="https://cdn.discordapp.com/emojis/513190158728953857.png?v=1" alt="devo" title="devo" kind="icon" /><nowiki> and </nowiki><pvme-image src="https://cdn.discordapp.com/emojis/544195488447201300.png?v=1" alt="DeflectMelee" title="DeflectMelee" kind="icon" /><nowiki> the initial </nowiki><pvme-image src="https://cdn.discordapp.com/emojis/1096130867279171706.png?v=1" alt="melee" title="melee" kind="icon" /><nowiki> hit? | ||
• </nowiki> | • </nowiki><pvme-image src="https://cdn.discordapp.com/emojis/535614336207552523.png?v=1" alt="disrupt" title="disrupt" kind="icon" /><nowiki> + </nowiki><pvme-image src="https://cdn.discordapp.com/emojis/535541258786177064.png?v=1" alt="reflect" title="reflect" kind="icon" /><nowiki> and </nowiki><pvme-image src="https://cdn.discordapp.com/emojis/654618235097972737.png?v=1" alt="powerburstofvitality" title="powerburstofvitality" kind="icon" /><nowiki> the Large Smoke? | ||
• Full hp when using </nowiki> | • Full hp when using </nowiki><pvme-image src="https://cdn.discordapp.com/emojis/654618235097972737.png?v=1" alt="powerburstofvitality" title="powerburstofvitality" kind="icon" /><nowiki>? | ||
</nowiki></div> | </nowiki></div></div><div><div><u><nowiki>Not dealing enough damage to one-cycle?</nowiki></u><nowiki> | ||
</div> | </nowiki></div><div class="pvme-source-preserve-lines"><nowiki>⬥ Damage Checklist | ||
<div><div><u><nowiki>Not dealing enough damage to one-cycle?</nowiki></u><nowiki> | • Delaying </nowiki><pvme-image src="https://cdn.discordapp.com/emojis/1179505745654448208.png?v=1" alt="omnipowerigneous" title="omnipowerigneous" kind="icon" /><nowiki> / </nowiki><pvme-image src="https://cdn.discordapp.com/emojis/1159435029592686642.png?v=1" alt="volleyofsouls" title="volleyofsouls" kind="icon" /><nowiki> / </nowiki><pvme-image src="https://cdn.discordapp.com/emojis/959089455640215633.png?v=1" alt="overpowerigneous" title="overpowerigneous" kind="icon" /><nowiki> / </nowiki><pvme-image src="https://cdn.discordapp.com/emojis/626466665848242186.png?v=1" alt="sgb" title="sgb" kind="icon" /><nowiki> </nowiki><pvme-image src="https://cdn.discordapp.com/emojis/1257438999794946099.png?v=1" alt="eofspec" title="eofspec" kind="icon" /><nowiki> until after the Large Smoke? | ||
</nowiki></div> | |||
<div | |||
• Delaying </nowiki> | |||
• This is to benefit from edict 6 effect (low HP damage bonus) | • This is to benefit from edict 6 effect (low HP damage bonus) | ||
• Stacking 7+ </nowiki> | • Stacking 7+ </nowiki><pvme-image src="https://cdn.discordapp.com/emojis/536256663641128971.png?v=1" alt="StormShards" title="StormShards" kind="icon" /><nowiki> during p1-6 and using </nowiki><pvme-image src="https://cdn.discordapp.com/emojis/536256673904328704.png?v=1" alt="Shatter" title="Shatter" kind="icon" /><nowiki>? | ||
• Using </nowiki> | • Using </nowiki><pvme-image src="https://cdn.discordapp.com/emojis/535533810004262912.png?v=1" alt="surge" title="surge" kind="icon" /><nowiki> / </nowiki><pvme-image src="https://cdn.discordapp.com/emojis/1049378668197195808.png?v=1" alt="dive" title="dive" kind="icon" /><nowiki> to reach Zamorak after final Rune death? | ||
⬥ Preparing for a Second Cycle | ⬥ Preparing for a Second Cycle | ||
• </nowiki> | • </nowiki><pvme-image src="https://cdn.discordapp.com/emojis/535541258844635148.png?v=1" alt="res" title="res" kind="icon" /><nowiki> the 2nd melee hit, </nowiki><pvme-image src="https://cdn.discordapp.com/emojis/535541278264393729.png?v=1" alt="debil" title="debil" kind="icon" /><nowiki> + </nowiki><pvme-image src="https://cdn.discordapp.com/emojis/537341954392850442.png?v=1" alt="sd" title="sd" kind="icon" /><nowiki> | ||
OR | OR | ||
• </nowiki> | • </nowiki><pvme-image src="https://cdn.discordapp.com/emojis/535541278264393729.png?v=1" alt="debil" title="debil" kind="icon" /><nowiki> + </nowiki><pvme-image src="https://cdn.discordapp.com/emojis/787904334377648130.png?v=1" alt="divert" title="divert" kind="icon" /><nowiki> the 2nd melee hit, </nowiki><pvme-image src="https://cdn.discordapp.com/emojis/535541258538582017.png?v=1" alt="immort" title="immort" kind="icon" /><nowiki> | ||
</nowiki></div> | </nowiki></div></div></div><nowiki> | ||
</ | </nowiki></div><nowiki> | ||
</div> | |||
<nowiki> | </nowiki></div><nowiki> | ||
</nowiki></div> | |||
</nowiki></div></div></div></div></div></div></div></div></div></div></div></div> | |||
<nowiki> | <nowiki> | ||
</nowiki></ | </nowiki> | ||
<p class="pvme-source-line pvme-source-spacer"><nowiki></nowiki></p> | |||
<nowiki> | <nowiki> | ||
</nowiki> | |||
</div> | </div> | ||
<div class="pvme-source-section"> | |||
<h2 id="enrage-based-mechanics"><ins><nowiki>Enrage-Based Mechanics</nowiki></ins></h2> | |||
<nowiki> | <nowiki> | ||
</nowiki> | |||
</nowiki><p><nowiki> | <p class="pvme-source-line"><nowiki>Zamorak's damage and HP scales with enrage, and additional mechanics are introduced at specific enrage thresholds:</nowiki></p> | ||
<nowiki> | <nowiki> | ||
</nowiki>< | </nowiki> | ||
<p class="pvme-source-line pvme-source-spacer"><nowiki></nowiki></p> | |||
<nowiki> | <nowiki> | ||
</nowiki><p><nowiki> | </nowiki> | ||
<p class="pvme-source-line"><nowiki>⬥ </nowiki><strong><nowiki>100%</nowiki></strong><nowiki> Phase 7 is introduced</nowiki></p> | |||
<nowiki> | <nowiki> | ||
</nowiki><p><nowiki> | </nowiki> | ||
<p class="pvme-source-line"><nowiki>⬥ </nowiki><strong><nowiki>500%</nowiki></strong><nowiki> During </nowiki><em><nowiki>Infernal Tomb</nowiki></em><nowiki>, all players must be on their rune at the same time to exit Infernus</nowiki></p> | |||
<nowiki> | <nowiki> | ||
</nowiki><p><nowiki>⬥ </nowiki><strong><nowiki> | </nowiki> | ||
<p class="pvme-source-line"><nowiki>⬥ </nowiki><strong><nowiki>500%</nowiki></strong><nowiki> During </nowiki><em><nowiki>Channelers</nowiki></em><nowiki>, Chaos Witch Channeler spawns with 50% adrenaline and the first ability is Asphyxiate </nowiki><pvme-image src="https://cdn.discordapp.com/emojis/535533833072672778.png?v=1" alt="asphyx" title="asphyx" kind="icon" /></p> | |||
<nowiki> | <nowiki> | ||
</nowiki><p><nowiki>⬥ </nowiki><strong><nowiki> | </nowiki> | ||
<p class="pvme-source-line"><nowiki>⬥ </nowiki><strong><nowiki>750%</nowiki></strong><nowiki> During </nowiki><em><nowiki>Infernal Tomb</nowiki></em><nowiki>, demons will move faster towards the portal</nowiki></p> | |||
<nowiki> | <nowiki> | ||
</nowiki><p><nowiki>⬥ </nowiki><strong><nowiki> | </nowiki> | ||
<p class="pvme-source-line"><nowiki>⬥ </nowiki><strong><nowiki>900%</nowiki></strong><nowiki> During </nowiki><em><nowiki>Channelers</nowiki></em><nowiki>, </nowiki><strong><nowiki>grey HP</nowiki></strong><nowiki> healing ramp-up no longer resets between phases</nowiki></p> | |||
<nowiki> | <nowiki> | ||
</nowiki><p><nowiki>⬥ </nowiki><strong><nowiki> | </nowiki> | ||
<p class="pvme-source-line"><nowiki>⬥ </nowiki><strong><nowiki>1000%</nowiki></strong><nowiki> During </nowiki><em><nowiki>Channelers</nowiki></em><nowiki>, Chaos Witch Channeler spawns with 100% adrenaline and their first ability is Omnipower </nowiki><pvme-image src="https://cdn.discordapp.com/emojis/535533809664262179.png?v=1" alt="omni" title="omni" kind="icon" /></p> | |||
<nowiki> | <nowiki> | ||
</nowiki><p><nowiki>⬥ </nowiki><strong><nowiki> | </nowiki> | ||
<p class="pvme-source-line"><nowiki>⬥ </nowiki><strong><nowiki>1000%</nowiki></strong><nowiki> On phase 7, red bar charge is no longer reset between cycle(s)</nowiki></p> | |||
<nowiki> | <nowiki> | ||
</nowiki><p><nowiki>⬥ </nowiki><strong><nowiki>1000%</nowiki></strong><nowiki> | </nowiki> | ||
<p class="pvme-source-line"><nowiki>⬥ </nowiki><strong><nowiki>1000%</nowiki></strong><nowiki> On phase 7, Zamorak's life points cap at 250,000 per player</nowiki></p> | |||
<nowiki> | <nowiki> | ||
</nowiki><p><nowiki>⬥ </nowiki><strong><nowiki> | </nowiki> | ||
<p class="pvme-source-line"><nowiki>⬥ </nowiki><strong><nowiki>1470%</nowiki></strong><nowiki> The life points of chaos demons cap at 70,000 while on Infernus</nowiki></p> | |||
<nowiki> | <nowiki> | ||
</nowiki><p><nowiki>⬥ </nowiki><strong><nowiki> | </nowiki> | ||
<p class="pvme-source-line"><nowiki>⬥ </nowiki><strong><nowiki>1500%</nowiki></strong><nowiki> During the Adrenaline Cage attack, the targeted player will have their Devotion </nowiki><pvme-image src="https://cdn.discordapp.com/emojis/513190158728953857.png?v=1" alt="devo" title="devo" kind="icon" /><nowiki> deactivated</nowiki></p> | |||
<nowiki> | <nowiki> | ||
</nowiki><p><nowiki>⬥ </nowiki><strong><nowiki> | </nowiki> | ||
<p class="pvme-source-line"><nowiki>⬥ </nowiki><strong><nowiki>1600%</nowiki></strong><nowiki> Zamorak's stagger after killing a rune on Phase 7 reduced from 10 to 5 ticks</nowiki></p> | |||
<nowiki> | <nowiki> | ||
</nowiki><p><nowiki>⬥ </nowiki><strong><nowiki> | </nowiki> | ||
<p class="pvme-source-line"><nowiki>⬥ </nowiki><strong><nowiki>1740%</nowiki></strong><nowiki> For phases 1-6, Zamorak's starting life points cap at 1,600,000 per player</nowiki></p> | |||
<nowiki> | <nowiki> | ||
</nowiki><p><nowiki>⬥ </nowiki><strong><nowiki> | </nowiki> | ||
<p class="pvme-source-line"><nowiki>⬥ </nowiki><strong><nowiki>3500%</nowiki></strong><nowiki> On phase 7, the life points the runes revive with are capped at 60,000</nowiki></p> | |||
<nowiki> | <nowiki> | ||
</nowiki><p><nowiki> | </nowiki> | ||
<p class="pvme-source-line pvme-source-spacer"><nowiki></nowiki></p> | |||
<nowiki> | <nowiki> | ||
</nowiki>< | </nowiki> | ||
</div> | |||
<div class="pvme-source-section"> | |||
<h2 id="helpful-tips"><ins><nowiki>Helpful Tips</nowiki></ins></h2> | |||
<nowiki> | <nowiki> | ||
</nowiki><p><nowiki> | </nowiki> | ||
<p class="pvme-source-line"><nowiki>⬥ The </nowiki><strong><nowiki>grey HP</nowiki></strong><nowiki> soft cap can't increase on the ticks Zamorak takes damage, meaning DoT abilities such as </nowiki><pvme-image src="https://cdn.discordapp.com/emojis/1478063107908702482.png?v=1" alt="combust" title="combust" kind="icon" /><nowiki> / </nowiki><pvme-image src="https://cdn.discordapp.com/emojis/1478062910113714297.png?v=1" alt="dismember" title="dismember" kind="icon" /><nowiki> / </nowiki><pvme-image src="https://cdn.discordapp.com/emojis/1159433682403201044.png?v=1" alt="bloat" title="bloat" kind="icon" /><nowiki> can be used before entering Infernus </nowiki><pvme-image src="https://cdn.discordapp.com/emojis/1073955377537876089.png?v=1" alt="realmmovement" title="realmmovement" kind="icon" /><nowiki> to prevent meaningful amounts of healing</nowiki></p> | |||
<nowiki> | <nowiki> | ||
</nowiki>< | </nowiki> | ||
<p class="pvme-source-line"><nowiki>⬥ As Infernal Tomb starts, you can </nowiki><ins><nowiki>on tick</nowiki></ins><nowiki> stun Zamorak by using </nowiki><pvme-image src="https://cdn.discordapp.com/emojis/535541258240786434.png?v=1" alt="freedom" title="freedom" kind="icon" /><nowiki> / </nowiki><pvme-image src="https://cdn.discordapp.com/emojis/535541306475151390.png?v=1" alt="anti" title="anti" kind="icon" /><nowiki> as he assigns runes and using a stun as your character is lifted. </nowiki>[https://img.pvme.io/images/URj54bk2bF.mp4 <nowiki>Example clip here.</nowiki>]</p> | |||
<nowiki> | <nowiki> | ||
</nowiki><p><nowiki> | </nowiki> | ||
<p class="pvme-source-line pvme-source-detail"><nowiki> • This will greatly reduce the damage dealt to players</nowiki></p> | |||
<nowiki> | <nowiki> | ||
</nowiki><p><nowiki> | </nowiki> | ||
<p class="pvme-source-line pvme-source-detail"><nowiki> • You can double stun by stalling one and releasing it with another, this counts as two stuns and lets you cover one missed stun</nowiki></p> | |||
<nowiki> | <nowiki> | ||
</nowiki><p><nowiki> | </nowiki> | ||
<p class="pvme-source-line"><nowiki>⬥ You can stack </nowiki><pvme-image src="https://cdn.discordapp.com/emojis/536256663641128971.png?v=1" alt="stormshards" title="stormshards" kind="icon" /><nowiki> to use with </nowiki><pvme-image src="https://cdn.discordapp.com/emojis/536256673904328704.png?v=1" alt="Shatter" title="Shatter" kind="icon" /><nowiki> during phase 7</nowiki></p> | |||
<nowiki> | <nowiki> | ||
</nowiki><p><nowiki> | </nowiki> | ||
<p class="pvme-source-line"><nowiki>⬥ At high enrages the base can use </nowiki><pvme-image src="https://cdn.discordapp.com/emojis/567727986409734145.png?v=1" alt="enfeeble" title="enfeeble" kind="icon" /><nowiki> to reduce the damage dealt by autos</nowiki></p> | |||
<nowiki> | <nowiki> | ||
</nowiki><p><nowiki> | </nowiki> | ||
<p class="pvme-source-line pvme-source-detail"><nowiki> • </nowiki><pvme-image src="https://cdn.discordapp.com/emojis/1137809209782698024.png?v=1" alt="darkness" title="darkness" kind="icon" /><nowiki> also reduces a lot of damage since Zamorak uses a lot of autos</nowiki></p> | |||
<nowiki> | <nowiki> | ||
</nowiki><p><nowiki>⬥ | </nowiki> | ||
<p class="pvme-source-line"><nowiki>⬥ Ring of Death </nowiki><pvme-image src="https://cdn.discordapp.com/emojis/513190159462825984.png?v=1" alt="rod" title="rod" kind="icon" /><nowiki> effect clears upon entering phase 7</nowiki></p> | |||
<nowiki> | <nowiki> | ||
</nowiki><p><nowiki> | </nowiki> | ||
<p class="pvme-source-line"><nowiki>⬥ Many debuffs such as </nowiki><pvme-image src="https://cdn.discordapp.com/emojis/1404885709034229922.png?v=1" alt="flameboundrival" title="flameboundrival" kind="icon" /><nowiki> or </nowiki><pvme-image src="https://cdn.discordapp.com/emojis/856635090641879050.png?v=1" alt="smokecloud" title="smokecloud" kind="icon" /><nowiki> carry over into phase 7</nowiki></p> | |||
<nowiki> | <nowiki> | ||
</nowiki><p><nowiki>⬥ | </nowiki> | ||
<p class="pvme-source-line"><nowiki>⬥ You may </nowiki><pvme-image src="https://cdn.discordapp.com/emojis/543478434509357098.png?v=1" alt="Cept" title="Cept" kind="icon" /><nowiki> other players and </nowiki><pvme-image src="https://cdn.discordapp.com/emojis/535541258538582017.png?v=1" alt="immort" title="immort" kind="icon" /><nowiki> if multiple players will take a fatal attack at the same time</nowiki></p> | |||
<nowiki> | <nowiki> | ||
</nowiki><p | </nowiki> | ||
<p class="pvme-source-line pvme-source-spacer"><nowiki></nowiki></p> | |||
<nowiki> | <nowiki> | ||
</nowiki>< | </nowiki> | ||
<pvme-video src="https://img.pvme.io/images/URj54bk2bF.mp4" controls="1" loop="1" muted="1" type="video/mp4" /> | |||
<nowiki> | <nowiki> | ||
</nowiki>< | |||
</nowiki> | |||
</div> | |||
<div class="pvme-source-section"> | |||
<h2 id="resources"><ins><nowiki>Resources</nowiki></ins></h2> | |||
<nowiki> | <nowiki> | ||
</ | </nowiki> | ||
< | <div class="pvme-source-mechanic"> | ||
<h3 id="zamorak-calculator"><nowiki>Zamorak Calculator</nowiki></h3> | |||
<nowiki> | <nowiki> | ||
</nowiki><div><nowiki> | </nowiki> | ||
<div><nowiki> | |||
</nowiki><div><nowiki> | </nowiki><div><nowiki> | ||
</nowiki><div><nowiki> | </nowiki><div><nowiki> | ||
| Line 862: | Line 1,168: | ||
</nowiki><div><nowiki> | </nowiki><div><nowiki> | ||
</nowiki><div></div> | </nowiki><div style="background-color: rgb(0, 153, 255)"></div><nowiki> | ||
<nowiki> | |||
</nowiki><div><nowiki> | </nowiki><div><nowiki> | ||
</nowiki><div><nowiki> | </nowiki><div><nowiki> | ||
| Line 871: | Line 1,176: | ||
</nowiki><div><div><div><u><nowiki>Zamorak Calculator</nowiki></u><nowiki> | </nowiki><div><div><div><u><nowiki>Zamorak Calculator</nowiki></u><nowiki> | ||
</nowiki></div> | </nowiki></div><div class="pvme-source-preserve-lines">[https://docs.google.com/spreadsheets/d/1sGWWJbL_h96AhsSVmxIgejGuuUsc8DJSVcXMx2BHmxU/edit?usp=sharing <nowiki>Link to Zamorak Calculator sheet</nowiki>]<nowiki> | ||
<div | </nowiki></div></div></div><nowiki> | ||
</nowiki></div> | </nowiki></div><nowiki> | ||
</div> | |||
</div> | |||
<nowiki> | |||
</nowiki></div> | |||
<nowiki> | |||
</nowiki></div> | </nowiki></div><nowiki> | ||
<nowiki> | |||
</nowiki></div> | </nowiki></div></div></div></div></div></div></div></div></div></div></div></div> | ||
</div> | |||
</div> | |||
</div> | |||
</div> | |||
</div> | |||
</div> | |||
</div> | |||
</div> | |||
</div> | |||
</div> | |||
</div> | |||
<nowiki> | <nowiki> | ||
</nowiki><p><nowiki>This sheet provides calculations for multiple mechanics at the Zamorak boss, including damage received and HP scaling of NPCs</nowiki></p> | </nowiki> | ||
<p class="pvme-source-line"><nowiki>This sheet provides calculations for multiple mechanics at the Zamorak boss, including damage received and HP scaling of NPCs</nowiki></p> | |||
<nowiki> | <nowiki> | ||
</nowiki><p><nowiki></nowiki></p> | </nowiki> | ||
<p class="pvme-source-line pvme-source-spacer"><nowiki></nowiki></p> | |||
<nowiki> | <nowiki> | ||
</nowiki><h3 id="alt1-helper"><nowiki>Alt1 Helper</nowiki></h3> | </nowiki> | ||
</div> | |||
<div class="pvme-source-mechanic"> | |||
<h3 id="alt1-helper"><nowiki>Alt1 Helper</nowiki></h3> | |||
<nowiki> | <nowiki> | ||
</nowiki><div><nowiki> | </nowiki> | ||
<div><nowiki> | |||
</nowiki><div><nowiki> | </nowiki><div><nowiki> | ||
</nowiki><div><nowiki> | </nowiki><div><nowiki> | ||
| Line 916: | Line 1,211: | ||
</nowiki><div><nowiki> | </nowiki><div><nowiki> | ||
</nowiki><div></div> | </nowiki><div style="background-color: rgb(0, 153, 255)"></div><nowiki> | ||
<nowiki> | |||
</nowiki><div><nowiki> | </nowiki><div><nowiki> | ||
</nowiki><div><nowiki> | </nowiki><div><nowiki> | ||
| Line 923: | Line 1,217: | ||
</nowiki><div | </nowiki><div class="pvme-source-preserve-lines"><em><strong><nowiki>Disclaimer:</nowiki></strong><nowiki> Alt1 is a third party tool, and while generally safe to use, is still recommended to be installed and used at your own risk.</nowiki></em><nowiki> | ||
</nowiki></div> | </nowiki></div><nowiki> | ||
<nowiki> | |||
</nowiki><div><div><div><u><nowiki>Attack Rotation Helper</nowiki></u><nowiki> | </nowiki><div><div><div><u><nowiki>Attack Rotation Helper</nowiki></u><nowiki> | ||
</nowiki></div> | </nowiki></div><div class="pvme-source-preserve-lines">[https://runeapps.org/forums/viewtopic.php?id=1463 <nowiki>Link to Alt1 forum page</nowiki>]<nowiki> | ||
<div | |||
| | ||
</nowiki></div> | </nowiki></div></div></div><nowiki> | ||
</div> | </nowiki></div><nowiki> | ||
</div> | |||
<nowiki> | |||
</nowiki></div> | |||
<nowiki> | |||
</nowiki></div> | </nowiki></div><nowiki> | ||
<nowiki> | |||
</nowiki></div> | </nowiki></div></div></div></div></div></div></div></div></div></div></div></div> | ||
</div> | |||
</div> | |||
</div> | |||
</div> | |||
</div> | |||
</div> | |||
</div> | |||
</div> | |||
</div> | |||
</div> | |||
</div> | |||
<nowiki> | <nowiki> | ||
</nowiki><p><nowiki>The app tracks the special attack order at the Zamorak boss. The special attack highlighted in </nowiki><strong><nowiki>green</nowiki></strong><nowiki> is the upcoming attack.</nowiki></p> | </nowiki> | ||
<p class="pvme-source-line"><nowiki>The app tracks the special attack order at the Zamorak boss. The special attack highlighted in </nowiki><strong><nowiki>green</nowiki></strong><nowiki> is the upcoming attack.</nowiki></p> | |||
<nowiki> | <nowiki> | ||
</nowiki><p> | </nowiki> | ||
<p class="pvme-source-line"><pvme-image src="https://img.pvme.io/images/9WMk2ZJ.png" alt="" title="" kind="media" /><nowiki> | |||
</nowiki></p> | </nowiki></p> | ||
<nowiki> | <nowiki> | ||
</nowiki><h2 id="example-kills"><ins><nowiki>Example Kills</nowiki></ins></h2> | </nowiki> | ||
</div> | |||
</div> | |||
<div class="pvme-source-section"> | |||
<h2 id="example-kills"><ins><nowiki>Example Kills</nowiki></ins></h2> | |||
<nowiki> | <nowiki> | ||
</nowiki><div><nowiki> | </nowiki> | ||
<div><nowiki> | |||
</nowiki><div><nowiki> | </nowiki><div><nowiki> | ||
</nowiki><div><nowiki> | </nowiki><div><nowiki> | ||
| Line 974: | Line 1,258: | ||
</nowiki><div><nowiki> | </nowiki><div><nowiki> | ||
</nowiki><div></div> | </nowiki><div style="background-color: rgb(0, 153, 255)"></div><nowiki> | ||
<nowiki> | |||
</nowiki><div><nowiki> | </nowiki><div><nowiki> | ||
</nowiki><div><nowiki> | </nowiki><div><nowiki> | ||
</nowiki><div><nowiki> | </nowiki><div><nowiki> | ||
</nowiki><div | </nowiki><div><u><nowiki>Example Kills</nowiki></u><nowiki> | ||
</nowiki></div> | </nowiki></div><nowiki> | ||
<nowiki> | |||
</nowiki><div><div><div><u><nowiki>Hybrid</nowiki></u><nowiki> | </nowiki><div><div><div><u><nowiki>Hybrid</nowiki></u><nowiki> | ||
</nowiki></div> | </nowiki></div><div class="pvme-source-preserve-lines"><nowiki>⬥ </nowiki>[https://youtu.be/npA_CXUzjzQ <nowiki>2000%</nowiki>]<nowiki> | ||
<div | |||
⬥ </nowiki>[https://www.youtube.com/watch?v=8ORNO6WSJs0 <nowiki>2000%</nowiki>]<nowiki> | ⬥ </nowiki>[https://www.youtube.com/watch?v=8ORNO6WSJs0 <nowiki>2000%</nowiki>]<nowiki> | ||
</nowiki></div> | </nowiki></div></div><div><div><u><nowiki>Ranged</nowiki></u><nowiki> | ||
</div> | </nowiki></div><div class="pvme-source-preserve-lines"><nowiki>⬥ </nowiki>[https://youtu.be/aRhBU7ZkTB0 <nowiki>100% Solo</nowiki>]<nowiki> | ||
<div><div><u><nowiki>Ranged</nowiki></u><nowiki> | |||
</nowiki></div> | |||
<div | |||
⬥ </nowiki>[https://www.youtube.com/watch?v=EUxi1QcuUug <nowiki>500% Solo</nowiki>]<nowiki> | ⬥ </nowiki>[https://www.youtube.com/watch?v=EUxi1QcuUug <nowiki>500% Solo</nowiki>]<nowiki> | ||
⬥ </nowiki>[https://www.youtube.com/watch?v=zTBR3x_ITLM <nowiki>500% Solo</nowiki>]<nowiki> | ⬥ </nowiki>[https://www.youtube.com/watch?v=zTBR3x_ITLM <nowiki>500% Solo</nowiki>]<nowiki> | ||
</nowiki></div> | </nowiki></div></div><div><div><u><nowiki>Melee</nowiki></u><nowiki> | ||
</div> | </nowiki></div><div class="pvme-source-preserve-lines"><nowiki>⬥ </nowiki>[https://youtu.be/6i81jkhwFQo <nowiki>100% Solo</nowiki>]<nowiki> | ||
<div><div><u><nowiki>Melee</nowiki></u><nowiki> | |||
</nowiki></div> | |||
<div | |||
⬥ </nowiki>[https://www.youtube.com/watch?v=I3lIeHAVOvQ <nowiki>500% Solo</nowiki>]<nowiki> | ⬥ </nowiki>[https://www.youtube.com/watch?v=I3lIeHAVOvQ <nowiki>500% Solo</nowiki>]<nowiki> | ||
</nowiki></div> | </nowiki></div></div><div><div><u><nowiki>Magic</nowiki></u><nowiki> | ||
</div> | </nowiki></div><div class="pvme-source-preserve-lines"><nowiki>⬥ </nowiki>[https://youtu.be/S3mfKI1VTpY <nowiki>100% Solo</nowiki>]<nowiki> | ||
<div><div><u><nowiki>Magic</nowiki></u><nowiki> | |||
</nowiki></div> | |||
<div | |||
⬥ </nowiki>[https://www.youtube.com/watch?v=hrnV-cyL0qE <nowiki>500% Solo</nowiki>]<nowiki> | ⬥ </nowiki>[https://www.youtube.com/watch?v=hrnV-cyL0qE <nowiki>500% Solo</nowiki>]<nowiki> | ||
</nowiki></div> | </nowiki></div></div><div><div><u><nowiki>Necromancy</nowiki></u><nowiki> | ||
</div> | </nowiki></div><div class="pvme-source-preserve-lines"><nowiki>⬥ </nowiki>[https://www.youtube.com/watch?v=X9CCjANlEiU <nowiki>100% Solo</nowiki>]<nowiki> | ||
<div><div><u><nowiki>Necromancy</nowiki></u><nowiki> | |||
</nowiki></div> | |||
<div | |||
⬥ </nowiki>[https://www.youtube.com/watch?v=EGSQeK6lGBs <nowiki>1000% Solo</nowiki>]<nowiki> | ⬥ </nowiki>[https://www.youtube.com/watch?v=EGSQeK6lGBs <nowiki>1000% Solo</nowiki>]<nowiki> | ||
</nowiki></div> | </nowiki></div></div><div><div><nowiki> | ||
</div> | </nowiki></div><div class="pvme-source-preserve-lines"><nowiki> | ||
<div><div><nowiki> | </nowiki></div></div></div><nowiki> | ||
</nowiki></div> | </nowiki></div><nowiki> | ||
<div | |||
</nowiki></div> | |||
</div> | |||
</div> | |||
<nowiki> | |||
</nowiki></div> | |||
<nowiki> | |||
</nowiki></div> | </nowiki></div><nowiki> | ||
<nowiki> | |||
</nowiki></div> | </nowiki></div></div></div></div></div></div></div></div></div></div></div></div> | ||
</div> | |||
</div> | |||
</div> | |||
</div> | |||
</div> | |||
</div> | |||
</div> | |||
</div> | |||
</div> | |||
</div> | |||
</div> | |||
<nowiki> | <nowiki> | ||
</nowiki><p><nowiki></nowiki></p> | </nowiki> | ||
<p class="pvme-source-line pvme-source-spacer"><nowiki></nowiki></p> | |||
<nowiki> | <nowiki> | ||
</nowiki> | </nowiki> | ||
</div> | |||
</div> | |||
<div class="pvme-source-attribution">[https://pvme.io/pvme-guides/rs3-full-boss-guides/zamorak/zamorak/ PvME source] · PvME contributors · [https://creativecommons.org/licenses/by-nc-sa/4.0/ CC BY-NC-SA 4.0]. | |||
</div> | |||
Latest revision as of 02:38, 16 November 2026
Zamorak, Lord of Chaos
Introduction
Zamorak, Lord of Chaos is the fifth and final instalment in the Elder God Wars dungeon. This guide will primarily focus on the final boss encounter. For help clearing the dungeon, refer to #unknown-channel. If you would like a more simple version of the guide for your first few kills, refer to #unknown-channel.
Presets and Relics
⬥ Hybrid
⬥ Melee

⬥ Ranged
⬥ Magic


 Zuk cape for your chosen style
⬥
 Disruption Shield unlocked
⬥
 Toolbelt Infernal Puzzle Box unlocked.
⬥
 Passive Ring of Vigour unlocked
⬥

 Darkness/Temporal Anomaly active
⬥
 Thermal spa HP boost active
Recommended Upgrades
These items should be part of your preset if available and will aid in being able to follow the rotations and strategies in our Zamorak guides
⬥  Melee
•  Ek-ZekKil and
 Leng swords or highest available tier of dual wields
•  EoF with
 Dragon claws or
 Varanus's Mercy
•  Vestments of havoc equipment
⬥  Ranged
•  Bow of the Last Guardian,
 Seren godbow, or
 Gloomfire bow
•  Quiver with

 Ful/Wen arrows and
 Deathspore arrows
•  EoF with Gloomfire bow, Seren godbow,
 Eldritch crossbow, and
 Dark bow
⬥  Magic
•  Fractured Staff of Armadyl and
 Erethdor's grimoire
•  with Legatus's Emberstaff
 , or
 Iban's staff
•  Tumeken's resplendence equipment
• 

 City of Senntisten spells unlocked
⬥  Necromancy
• 
 Rasial weapons or highest available tier of necromancy weapons
•  EoF with
 Death guard
•  First Necromancer equipment
Note: The quest Twilight of the Gods will grant 10% reduced damage taken against Zamorak
Fight Overview
Zamorak has 6 phases that are progressed by depleting his health bar and charging the 6 edicts, or pads, located around the arena. During each phase he will cycle through 3 health bar colours, each with their own effects that dictate the progression of the fight:
 ⬥ Grey HP: The health bar Zamorak starts with and regains between each phase
• Zamorak will have accelerated 4-tick attack speed and deal 50% more damage, but won't use special attacks
• Cannot be fully depleted through damage and will constantly regenerate itself at an increasing rate
• Starts at a soft cap that can regenerate itself up to a hard cap of double the starting value
⬩ The soft cap will increase with uninterrupted healing at the current cap
⬩ A healing tick can only restore up to the cap if current grey HP is lower than it
⬩ Damage is calculated before healing on the same tick, even a tiny amount of damage can prevent the cap from increasing
⬩ DoT effects like  /
 /
 are very effective at preventing the soft cap from increasing
• At 900% enrage, the regeneration increase will carry over between grey HP phases
• Upon activating a pad, all remaining grey HP will be converted into red HP
• An increased grey HP soft cap, or hard cap, never carries over between grey HP phases and always resets to the initial soft cap
 ⬥ Red HP: The health bar Zamorak gains upon the player activating a pad
• Zamorak will have accelerated 4-tick attack speed and deal 50% more damage, and will do his next special attack every 11 auto attacks
⬩ The first mechanic in red HP will carry over attacks from the previous green HP phase, see the Special Attack Order section for more information
• Must be depleted by dealing damage and will be followed by green HP
 ⬥ Green HP: Zamorak's main health bar, and is split into 6 sections representing each phase
• Zamorak will have 5-tick attack rate and deal normal damage, and will do his next special attack every 5 auto attacks
⬩ The first mechanic in green HP on each phase will happen after 1 auto attack
• Upon depletion of each section, Zamorak will regain Grey HP and start the Channelers mechanic
Overall, the progression of the first 6 phases can be summarised as:
Grey HP > charge pad > deplete red HP > deplete green HP section > Channelers + grey HP > repeat
⬥ Zamorak's green HP scales between 300,000 and 1,600,000  per player, capping at 1740% enrage
• Phases 1-5 each take up 16% of the total green HP bar, while phase 6 takes up 20%
⬥ At 100%+ enrage, Zamorak will gain an additional 7th phase that will be explained in its own section
Special Attacks
⬥ Channelers
• Automatically triggered upon phasing Zamorak from green HP into grey HP
• A message will appear saying Zamorak begins to draw power and energy from something within Infernus. , this will spawn a Chaos Witch Channeler in Infernus
• Players must enter Infernus with the extra action button  and defeat the witch before being able to charge the next pad
• The witch has 33,000 health + 132 for every 10 enrage increase
• It is advised to  /
 before
 towards the witch since it is able to stun
• At 500%, Chaos Witch Channeler spawns with 50% adrenaline and their first ability is 
• At 1000%+, Chaos Witch Channeler spawns with 100% adrenaline and their first ability is 
⬥ Flames of Zamorak
• Zamorak will yell This world will burn. and slam into the ground, dealing 2 melee hits and spawning a line of black smoke between himself and a player
• The melee slam deals more damage the closer the player is to Zamorak, and more smoke will be spawned the further the player is
• Picking up the smoke by walking over it will start a timer over the player that deals typeless damage at the end
⬩ The damage increases and gains additional defence piercing the more smoke that is picked up
⬩ If the smoke is left on the ground, Zamorak will gain stacks reducing his damage taken
⬩ See Hex: Twinshot further down for additional timing notes
• To deal with this, be close to the boss to ensure that minimum smoke will spawn,  , use defensives
 if low HP, and use
 /
 on the timed damage
• Entering Infernus with the timer running will detonate the damage immediately with increased defence piercing
• In group, players standing on the northeast side of Zamorak are higher priority to be targeted for the smoke
Flames of Zamorak example using +
⬥ Adrenaline Cage
• Zamorak will say Chaos, unfettered! then temporarily drops overhead prayers and spawns a cage on the bases' location to bombard with 5 magic attacks
• If no player is standing on the cage location, all players will take heavy typeless damage, have their adrenaline drained, and suffer a heavy adrenaline gain debuff
• Remain still,  and use /
 +

• At 1500%+ the player taking the hits will have disabled
⬩ +  from another player will still work
⬥ Chaos Blast
• Zamorak will curl up and begin charging his attack shouting I will tear you asunder!
• During this time Zamorak may be stunned enough (equal to team size) and will require a damage check right after, which will then force him to release the attack
⬩ If Zamorak is not stunned the attack will be released after 18 seconds
• He will yell Feel the rage of a god. and send a red projectile that deals damage based on how long he was allowed to charge
⬩ The attack has a base defence piercing of 40%
• Use a combination of defensives / / / , at higher enrages you may opt to simply not stun and  instead
⬥ Infernal Tomb
• Zamorak says Step into the dark... meet your death., assigns a rune over each players' head, and transports them to Infernus where chaos demons (amount equal to team size) are marching towards a portal to the main arena
⬩ Each Chaos Demon has 15,000 - 70,000 health , capping at 1470% enrage
⬩ Chaos Demons have an internal Freedom timer of 40 ticks, this decreases to 20 ticks when above 500% enrage
⬩ Use abilities such as  /
 to keep the demon(s) in place and kill them
• Players must go to the same corresponding rune they received overhead to exit Infernus
⬩ Going to the wrong rune will deal heavy damage to all players
• As players are sent into Infernus at the beginning of the mechanic, Zamorak will start charging his Chaos Blast mechanic, with only the stun portion required to force him to release the attack
⬩ It is highly suggested to pre-stun Zamorak to keep this damage manageable without
⬩ Example clip of proper stun timing here.
⬥ Rune of Destruction
• Zamorak will say You're already dead. and lay a massive red rune around him with a disc-shaped gap
• Black sludge will spawn SSW (South South-West) of the rune and rotate clockwise or counterclockwise sometimes changing direction and stuns those who get hit by it twice
• The red areas deal constant typeless damage to those standing in it
• The player cannot teleport to Infernus for the duration of the attack
• The rune can be divided in 12 pineapple pizza slices as showed in the diagram, the black sludge occupies 2 and always moves in steps of 1 slice
⬩ The black sludge will either spawn in 12-11 moving clockwise or in 1-2 moving counterclockwise
⬩ The black sludge will move around the ring, changing position every 2 ticks, 18 times
⬩ The black sludge can randomly change the direction it is moving towards up to 2 times

• Using the image below, you can position yourself in optimal spots depending on the spawn point of the black sludge
⬩ This will buy more time to react to the sludges' movement, allowing you to stay in your damage-boosting ultimates
⬩ If you are unsure, starting SSW, or between 12 and 1 in the diagram, will assure that you won't be hit twice and stunned on the first rotation

Special Attack Order
The following diagram outlines the pattern of special attacks used by  and how they vary based on when you transition between phases:

⬥ The special attack order updates to a new phase when red HP is depleted. Special attacks that occur during red HP will still use the previous attack order from green HP
⬥ Zamorak's first special attack in red HP will carry over auto attacks from the previous green HP phase
• E.g. if Zamorak uses Adrenaline Cage in phase 3 followed by 2 autoattacks before phasing into grey HP, after the next pad is charged Zamorak will use 3 autoattacks followed by Chaos Blast, then resume using special attacks in 11-autoattack intervals
• Phase 1 red HP doesn't have a previous green HP so the first special attack will simply happen after 5 autoattacks
⬥ Zamorak's first special attack in green HP will always happen after 1 autoattack before he resumes using special attacks in 5-autoattack intervals
Common Orders
The following diagram outlines common special attack orders that players follow for a more consistent fight:

⬥ Order 1 (~9:00 - 12:00 kill times)

• Recommended for:
⬩ 4000% enrage with
⬥ Order 2 (~8:00 - 11:00 kill times)

• Recommended for:
⬩ 2000% enrage with
⬥ Order 3 (~7:00 - 10:00 kill times)

• Recommended for:
⬩ 2000%+ enrage in non BiS
⬥ Order 4 (~5:00 - 7:00 kill times)
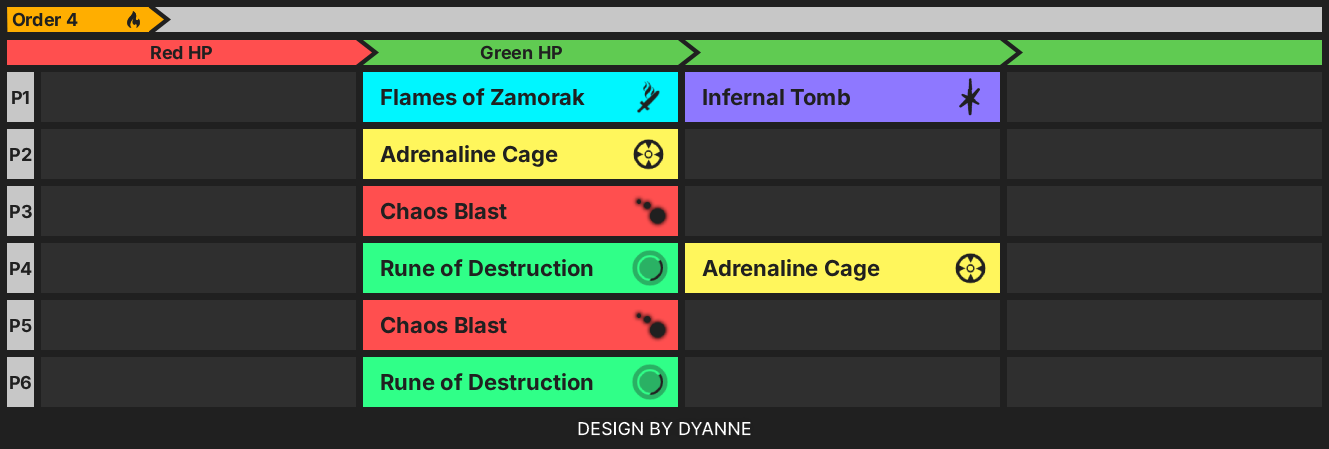
• Recommended for:
⬩ 4000% enrage
⬩ 2000% enrage with
⬥ Order 5 (~4:00 - 6:00 kill times)

• Recommended for:
⬩ 900%+ enrage in non BiS
⬥ Order 6 (~3:00 - 5:00 kill times)

• Recommended for:
⬩ 2000% enrage
⬩ 500%+ enrage in non BiS
⬥ Estimated kill times assume phase 7 is one cycled, two cycling adds roughly 1 minute
⬥ Some strategies such as meta 500% enrage assume all mechanics are skipped and are not mentioned
⬥ Non BiS assumes being in stage 2 of the #upgrade-order, results may vary
Hexes and Edicts
⬥ Charge Pads
• The arena has 6 pads that you can stand on to charge.
• When it is fully charged, Zamorak will stop attacking for a while and your adrenaline bar will be refilled. After this, you will gain an Edict while Zamorak gains a Hex depending on the pad charged.
• You will become unable to charge pads during the Channelers mechanic. To continue charging the next pad, you must enter Infernus and kill the witch present.
⬥ Hexes and Edicts
• Every time a pad is charged, all players and Zamorak will gain a stack of currently active stacking edicts and hexes, respectively
• This makes it such that earlier pad effects become stronger as the fight progresses
⬩ Note that pads 3 and 5 don't have stacking effects
⬩ E.g. if you activate pads 2 → 4 → 1 → 3 → 6 → 5, once 5 is activated rune 2 will have 6 stacks, rune 4 will have 5 stacks, rune 1 will have 4 stacks, and rune 6 will have 2 stacks
 • During phase 7, all stacking edicts and hexes have their stack amounts reversed
⬩ E.g. Using the pad order in the above example, phase 7 will act as if the pad order were 5 → 6 → 3 → 1 → 4 → 2
 ⬥ A calculator has been made to gauge the effects of each activated Edict & Hex: https://runescape.wiki/w/Calculator:Combat/Rune_pads


Hex: Twinshot
Twinshot from pad 1 and Disintegrate from pad 4 will result in the largest increases in incoming damage, especially when they are ramped up in later phases
⬥ Twinshot deals a second hit 1 tick after all of Zamorak's autoattacks, equal to 10% of the possible max hit per stack, which allows for less  uptime and creates special hit timings to be wary of once it's active
• During grey HP and red HP, Zamorak will have an accelerated 4-tick attack rate, meaning  will have to be active 1/2 of the time with twinshot active
• During the Flames of Zamorak mechanic, if the black smoke is picked up immediately, the timed damage will occur on the same tick as a twinshot hit during grey HP and red HP
⬩ This will make it impossible to / the timed damage unless is also used
⬩ Note that entering Infernus or phasing Zamorak between red HP/grey HP and green HP, causing his attack speed to change, while the timer is running can cause the damage to line up with an attack regardless of twinshot being active or not
Hex: Disintegrate
⬥ Disintegrate from pad 4 grants Zamorak 7% defence piercing per stack on his attacks, stacking with existing defence piercing values such as Chaos Blast: 40% and Flames of Zamorak Smoke damage: 1% per stack
• This only affects the following defensives:
⬩ Disruption shield
⬩ Barricade 
⬩ Resonance
⬩ Divert
⬩ Reflect
⬩ Debilitate 
⬩ Shield dome 
• The % damage taken through a defensive affected by disintegrate is calculated as follows
⬩ = floor(Defensive_value * (Disintegrate_stacks * 0.07 + Base_piercing) + (100 - Defensive_value))/100
• Given the way some defensives are calculated through this effect, this results in a buff and debuff on certain aspects of them:
⬩ Reflect damage increases as more damage taken results in more damage reflected
⬩ Resonance healing decreases since disintegrate results in less damage blocked
Hex: Chaos Traps
Once the Chaos Traps rune is active from pad 5, traps will spawn in set locations. The locations on the map below are possible locations where the traps may spawn
⬥ Note that traps respawn on every pad each time a new pad is charged
⬥ To avoid being stunned and taking heavy damage, you can:
• Step off each pad right as it finishes charging (new traps spawn with a slight delay)
• Pick up the buff  near the sword before charging a new pad
• + + / / to step on a new pad without the buff

Phase 7
 At 100% enrage, phase 7 is introduced. Zamorak will enter Infernus and force the player in along with them.
⬥ When the phase starts:
• The pad order from phases 1-6 is reversed
• Zamorak starts immune to damage
• A Chaos Demon will spawn which should be killed
• Zamorak sends 2 hits to all players
Rune Calls
⬥ An amount of runes (2 in solo, otherwise equal to team size in group) will appear before Zamorak and stay there temporarily, the order in which they appear is the order they must be defeated in
⬥ At the same time Zamorak will begin charging a new red HP bar, referred to as the chaos bar, that determines the damage of upcoming mechanics
• may be shown twice
• Killing a rune will delay Zamorak from charging for 9 ticks (4 ticks at 1600%+ enrage)
• Killing a rune out of order will deal heavy damage to all players
• Runes uber heal after they are defeated, be careful not to kill it twice.
• The rate of charge increases with enrage and caps at 8850%
⬥ After the last rune is defeated Zamorak stops charging, becomes damageable, and uses in this order:
• [1] A single moderate hit
• [2] A large chaos damage hit
⬩ Soft typeless damage that is equivalent to the chaos bar that charges while killing runes
⬩ Make sure your team is spread out as it does damage in a small area around each player
⬩ Has a base defence piercing of 50%
• [3] 4 additional small chaos damage hits
⬩ Deals damage based on a portion of the chaos bar and the amount of time it was allowed to charge for
⬩ Does not have base defence piercing but is affected by Twinshot
⬥ If Zamorak is not defeated before becoming immune on the 4th small chaos hit:
• [4] Another Chaos Demon spawns
• [5] Another moderate hit
• [6] Another large chaos damage hit
• [7] Runes are called
• Resets to [1] once last rune is defeated
⬥ Zamorak will have 100,000 to 250,000 health per player during phase 7, capping at 1000% enrage
⬥ The Chaos Demon is the same as during the Infernal Tomb mechanic and will have 18,750 to 70,000 health , capping at 1470% enrage
⬥ At 1000% enrage the chaos bar charge no longer resets between cycles, meaning the chaos damage will likely become unmanageable in a second cycle
• It's generally expected for Zamorak to be low enough at this point to defeat before the large chaos hit reaches the player,  can also be used to buy more time
⬥ Each small chaos damage hit is calculated as follows:
• = floor(Iteration * Chaos_bar/100) where Iteration refers to how many times the Charge value has increased (this gets delayed when killing a rune)
Final phase (Solo 440%)
Phase 7 General Strategy
After entering Infernus:
⬥ Team kills the Chaos Demon
⬥ Before Zamorak calls runes, team gets ready to ult 


 **
⬥ Team kills runes as soon as they appear, being careful not to kill them twice unintentionally
⬥ Team gets on Zamorak immediately after killing last rune
• You will want to and the melee hit
• Use + + on the large bomb, less defensives will be required with lower (<10k) charge
⬥ Repeat cycle if necessary
⬥ When 0 cycling a riskier approach is taken to deal out as much damage as possible
• You will want to and the melee hit
• Use on the large bomb and finish Zamorak
Notes:
⬥ 0 cycling means killing Zamorak before small bombs hit, risking death if not
⬥ See enrage and style-specific Zamorak guides for full working rotations
Phase 7 Troubleshooting
 bouncing to runes
and the initial hit?
• + and the Large Smoke?
• Full hp when using ?
 /
 /
 /
 until after the Large Smoke?
• This is to benefit from edict 6 effect (low HP damage bonus)
• Stacking 7+
 during p1-6 and using
 ?
• Using /
 to reach Zamorak after final Rune death?
⬥ Preparing for a Second Cycle
• the 2nd melee hit, +
OR
• + the 2nd melee hit,
Enrage-Based Mechanics
Zamorak's damage and HP scales with enrage, and additional mechanics are introduced at specific enrage thresholds:
⬥ 100% Phase 7 is introduced
⬥ 500% During Infernal Tomb, all players must be on their rune at the same time to exit Infernus
⬥ 500% During Channelers, Chaos Witch Channeler spawns with 50% adrenaline and the first ability is Asphyxiate
⬥ 750% During Infernal Tomb, demons will move faster towards the portal
⬥ 900% During Channelers, grey HP healing ramp-up no longer resets between phases
⬥ 1000% During Channelers, Chaos Witch Channeler spawns with 100% adrenaline and their first ability is Omnipower
⬥ 1000% On phase 7, red bar charge is no longer reset between cycle(s)
⬥ 1000% On phase 7, Zamorak's life points cap at 250,000 per player
⬥ 1470% The life points of chaos demons cap at 70,000 while on Infernus
⬥ 1500% During the Adrenaline Cage attack, the targeted player will have their Devotion deactivated
⬥ 1600% Zamorak's stagger after killing a rune on Phase 7 reduced from 10 to 5 ticks
⬥ 1740% For phases 1-6, Zamorak's starting life points cap at 1,600,000 per player
⬥ 3500% On phase 7, the life points the runes revive with are capped at 60,000
Helpful Tips
⬥ The grey HP soft cap can't increase on the ticks Zamorak takes damage, meaning DoT abilities such as / / can be used before entering Infernus to prevent meaningful amounts of healing
⬥ As Infernal Tomb starts, you can on tick stun Zamorak by using / as he assigns runes and using a stun as your character is lifted. Example clip here.
• This will greatly reduce the damage dealt to players
• You can double stun by stalling one and releasing it with another, this counts as two stuns and lets you cover one missed stun
⬥ You can stack to use with during phase 7
⬥ At high enrages the base can use  to reduce the damage dealt by autos
• also reduces a lot of damage since Zamorak uses a lot of autos
⬥ Ring of Death effect clears upon entering phase 7
⬥ Many debuffs such as  or
 carry over into phase 7
⬥ You may other players and if multiple players will take a fatal attack at the same time
Resources
Zamorak Calculator
This sheet provides calculations for multiple mechanics at the Zamorak boss, including damage received and HP scaling of NPCs
Alt1 Helper
The app tracks the special attack order at the Zamorak boss. The special attack highlighted in green is the upcoming attack.
