Melee Raksha Guide
AI-assisted additive formatting; current PvME source words, order and media preserved |
Update source attribution; preserve PvME guide content |
||
| Line 235: | Line 235: | ||
</div> | </div> | ||
<div class="pvme-source-attribution">[https://pvme.io/pvme-guides/rs3-full-boss-guides/raksha/melee/ PvME source] · PvME contributors · [https://creativecommons.org/licenses/by-nc-sa/4.0/ CC BY-NC-SA 4.0] | <div class="pvme-source-attribution">[https://pvme.io/pvme-guides/rs3-full-boss-guides/raksha/melee/ PvME source] · PvME contributors · [https://creativecommons.org/licenses/by-nc-sa/4.0/ CC BY-NC-SA 4.0]. | ||
</div> | </div> | ||
Latest revision as of 02:37, 16 November 2026
Melee Raksha Guide

Introduction
This is an advanced guide which assumes a strong underlying knowledge of all mechanics and information presented in #raksha-basic.
Method 1
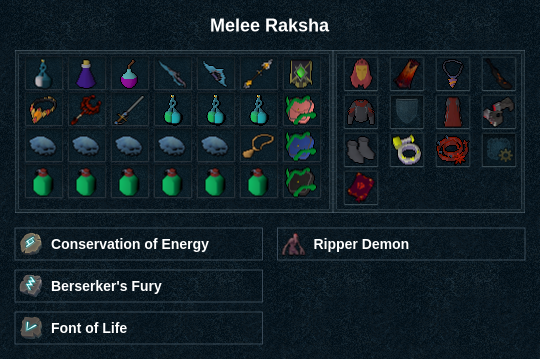
Notes:
⬥ Do not use  as it may interfere with
 /

Pre-fight
War's Retreat
→ 

Instance
 → (4t)
 +
 → (4t)
Phase 1
 +
 →
 →
 →
 →
 →

Phase 2
 → + →
 →
 →


Phase 3
→ →  →
 + +
 → →
Phase 4
 → + →
 →

 → →
 → →
 → s → → → → → → + → →
 →
Note: On slower P4 entry, you may need to skip , in which case do the following after
→ → → → → + →  → →
Method 2
This method is slightly more consistent, but requires pre-building on a dummy 
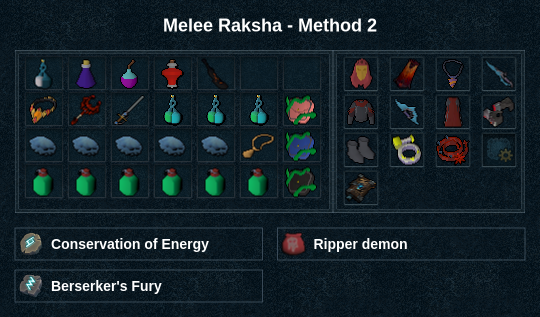
Pre-fight
War's Retreat
+ → s
Instance
→ r → → → to boss → → →  to melee distance → s

Phase 1
(tc)  + + r + → →
 → →
Phase 2
→ → → →
Phase 3
→ →  → →
Phase 4
 → → → → → → →
 → → → → → → → → →