Low Effort Helwyr Hard Mode
imported>PvME corpus import Attributed pinned PvME snapshot 074a9438f79d10fba75735791be0030734db8b5e; CC BY-NC-SA 4.0 |
AI-assisted additive formatting; current PvME source words, order and media preserved |
||
| Line 1: | Line 1: | ||
__NOTOC__ | |||
<div class="pvme-exact-guide"> | |||
< | <h1 id="low-effort-helwyr-hard-mode" class="pvme-source-title"><nowiki>Low Effort Helwyr Hard Mode</nowiki></h1> | ||
< | |||
<nowiki> | <nowiki> | ||
</nowiki><p>< | </nowiki> | ||
<p class="pvme-source-line"><pvme-image src="https://img.pvme.io/images/F2iSmgl0OR.png" alt="" title="" kind="media" /></p> | |||
<nowiki> | <nowiki> | ||
</nowiki><p><nowiki> | </nowiki> | ||
<p class="pvme-source-line pvme-source-spacer"><nowiki></nowiki></p> | |||
<nowiki> | <nowiki> | ||
</nowiki></ | </nowiki> | ||
<div class="pvme-source-section"> | |||
<h2 id="disclaimer_1"><ins><nowiki>Disclaimer</nowiki></ins></h2> | |||
<nowiki> | <nowiki> | ||
</nowiki><p><nowiki> | </nowiki> | ||
<p class="pvme-source-line"><nowiki>⬥ </nowiki><strong><nowiki>IF YOU CANNOT GET A METHOD TO WORK </nowiki><ins><nowiki>DO NOT</nowiki></ins><nowiki> MESSAGE THE CREATOR(S)</nowiki></strong></p> | |||
<nowiki> | <nowiki> | ||
</nowiki>< | </nowiki> | ||
<p class="pvme-source-line pvme-source-detail"><nowiki> • It is </nowiki><strong><nowiki>more than likely </nowiki><ins><nowiki>user error</nowiki></ins><nowiki> or </nowiki><ins><nowiki>cutting corners</nowiki></ins></strong><nowiki>, use </nowiki><span><nowiki>#pvm-help</nowiki></span><nowiki> if you cannot get it to work</nowiki></p> | |||
<nowiki> | <nowiki> | ||
</nowiki><p><nowiki></nowiki></p> | </nowiki> | ||
<p class="pvme-source-line pvme-source-spacer"><nowiki></nowiki></p> | |||
<nowiki> | <nowiki> | ||
</nowiki><h2 id=" | </nowiki> | ||
</div> | |||
<div class="pvme-source-section"> | |||
<h2 id="magic-low-effort-method-35-kph"><ins><nowiki>Magic Low Effort Method (~35 kph)</nowiki></ins></h2> | |||
<nowiki> | <nowiki> | ||
</nowiki> | </nowiki> | ||
< | |||
< | <div class="pvme-source-mechanic"> | ||
<h3 id="positioning"><nowiki>Positioning</nowiki></h3> | |||
<nowiki> | <nowiki> | ||
</nowiki><p | </nowiki> | ||
<p class="pvme-source-line"><pvme-image src="https://img.pvme.io/images/nQtbmH129c.png" alt="" title="" kind="media" /><nowiki> | |||
⬥ Always start on center Mushroom, use Bladed dive to one of the shown tiles (mushrooms directly North, East, South or West) if starting tile gets mushroom. Ensure you are stood directly on top of the mushroom caps of the BD tiles to avoid overlap in Mushroom Barrage.</nowiki></p> | ⬥ Always start on center Mushroom, use Bladed dive to one of the shown tiles (mushrooms directly North, East, South or West) if starting tile gets mushroom. Ensure you are stood directly on top of the mushroom caps of the BD tiles to avoid overlap in Mushroom Barrage.</nowiki></p> | ||
<nowiki> | <nowiki> | ||
</nowiki><p><nowiki></nowiki></p> | </nowiki> | ||
<p class="pvme-source-line pvme-source-spacer"><nowiki></nowiki></p> | |||
<nowiki> | <nowiki> | ||
</nowiki><div><nowiki> | </nowiki> | ||
<div><nowiki> | |||
</nowiki><div><nowiki> | </nowiki><div><nowiki> | ||
</nowiki><div><nowiki> | </nowiki><div><nowiki> | ||
| Line 45: | Line 54: | ||
</nowiki><div><nowiki> | </nowiki><div><nowiki> | ||
</nowiki><div></div> | </nowiki><div style="background-color: rgb(0, 153, 255)"></div><nowiki> | ||
<nowiki> | |||
</nowiki><div><nowiki> | </nowiki><div><nowiki> | ||
</nowiki><div><nowiki> | </nowiki><div><nowiki> | ||
</nowiki><div><nowiki> | </nowiki><div><nowiki> | ||
</nowiki><div | </nowiki><div><u><nowiki>Mandatory Requirements</nowiki></u><nowiki> | ||
</nowiki></div> | </nowiki></div><nowiki> | ||
<nowiki> | </nowiki><div class="pvme-source-preserve-lines"><nowiki>⬥ The following </nowiki><strong><nowiki>ARE REQUIRED</nowiki></strong><nowiki> for this method to work: | ||
</nowiki><div | |||
• </nowiki><strong><nowiki>Cutting corners will result in failure</nowiki></strong><nowiki> | • </nowiki><strong><nowiki>Cutting corners will result in failure</nowiki></strong><nowiki> | ||
• A more extensive list can be found in </nowiki> | • A more extensive list can be found in </nowiki><span><nowiki>#unknown-channel</nowiki></span><nowiki> | ||
</nowiki></div> | </nowiki></div><nowiki> | ||
<nowiki> | |||
</nowiki><div><div><div><u><nowiki>Items</nowiki></u><nowiki> | </nowiki><div><div><div><u><nowiki>Items</nowiki></u><nowiki> | ||
</nowiki></div> | </nowiki></div><div class="pvme-source-preserve-lines"><nowiki>⬥ </nowiki>[https://runescape.wiki/w/Igneous_Kal-Mej <nowiki>Igneous Kal-Mej</nowiki>]<nowiki> </nowiki><pvme-image src="https://cdn.discordapp.com/emojis/1153772938252787793.png?v=1" alt="igneouskalmej" title="igneouskalmej" kind="icon" /><nowiki> | ||
<div | ⬥ </nowiki>[https://runescape.wiki/w/Scripture_of_Amascut <nowiki>Scripture of Amascut</nowiki>]<nowiki> </nowiki><pvme-image src="https://cdn.discordapp.com/emojis/1266417822188437569.png?v=1" alt="scriptureofamascut" title="scriptureofamascut" kind="icon" /><nowiki> | ||
⬥ </nowiki>[https://runescape.wiki/w/Scripture_of_Amascut <nowiki>Scripture of Amascut</nowiki>]<nowiki> </nowiki> | ⬥ </nowiki>[https://runescape.wiki/w/Enhanced_Excalibur <nowiki>Enhanced excalibur</nowiki>]<nowiki> </nowiki><pvme-image src="https://cdn.discordapp.com/emojis/513200949016264727.png?v=1" alt="enhancedexcalibur" title="enhancedexcalibur" kind="icon" /><nowiki> | ||
⬥ </nowiki>[https://runescape.wiki/w/Enhanced_Excalibur <nowiki>Enhanced excalibur</nowiki>]<nowiki> </nowiki> | ⬥ </nowiki>[https://runescape.wiki/w/Weapon_poison%2B%2B%2B#(4) <nowiki>Weapon Poison +++</nowiki>]<nowiki> </nowiki><pvme-image src="https://cdn.discordapp.com/emojis/689525476158472288.png?v=1" alt="weppoison" title="weppoison" kind="icon" /><nowiki> | ||
⬥ </nowiki>[https://runescape.wiki/w/Weapon_poison%2B%2B%2B#(4) <nowiki>Weapon Poison +++</nowiki>]<nowiki> </nowiki> | ⬥ </nowiki>[https://runescape.wiki/w/Kwuarm_incense_sticks <nowiki>Kwuarm incense sticks</nowiki>]<nowiki> </nowiki><pvme-image src="https://cdn.discordapp.com/emojis/565726489341984779.png?v=1" alt="kwuarmsticks" title="kwuarmsticks" kind="icon" /><nowiki> | ||
⬥ </nowiki>[https://runescape.wiki/w/Kwuarm_incense_sticks <nowiki>Kwuarm incense sticks</nowiki>]<nowiki> </nowiki> | ⬥ </nowiki>[https://runescape.wiki/w/Ring_of_death <nowiki>Ring of Death</nowiki>]<nowiki> </nowiki><pvme-image src="https://cdn.discordapp.com/emojis/513190159462825984.png?v=1" alt="rod" title="rod" kind="icon" /><nowiki> | ||
⬥ </nowiki>[https://runescape.wiki/w/Ring_of_death <nowiki>Ring of Death</nowiki>]<nowiki> </nowiki> | ⬥ </nowiki>[https://runescape.wiki/w/Powder_of_Penance <nowiki>Powder of Penance</nowiki>]<nowiki> </nowiki><pvme-image src="https://cdn.discordapp.com/emojis/928221126360969226.png?v=1" alt="powderofpenance" title="powderofpenance" kind="icon" /><nowiki> | ||
⬥ </nowiki>[https://runescape.wiki/w/Powder_of_Penance <nowiki>Powder of Penance</nowiki>]<nowiki> </nowiki> | </nowiki></div></div><div><div><u><nowiki>Abilities</nowiki></u><nowiki> | ||
</nowiki></div> | </nowiki></div><div class="pvme-source-preserve-lines"><nowiki>⬥ </nowiki>[https://runescape.wiki/w/Animate_Dead <nowiki>Animate Dead</nowiki>]<nowiki> </nowiki><pvme-image src="https://cdn.discordapp.com/emojis/856635090453135382.png?v=1" alt="animatedead" title="animatedead" kind="icon" /><nowiki> | ||
</div> | ⬥ </nowiki>[https://runescape.wiki/w/Emerald_Aurora <nowiki>Emerald Aurora</nowiki>]<nowiki> </nowiki><pvme-image src="https://cdn.discordapp.com/emojis/914077639784935424.png?v=1" alt="emeraldaurora" title="emeraldaurora" kind="icon" /><nowiki> | ||
<div><div><u><nowiki>Abilities</nowiki></u><nowiki> | </nowiki></div></div><div><div><u><nowiki>Other</nowiki></u><nowiki> | ||
</nowiki></div> | </nowiki></div><div class="pvme-source-preserve-lines"><nowiki>⬥ Thermal Bath and Bonfire HP boost | ||
<div | |||
⬥ </nowiki>[https://runescape.wiki/w/Emerald_Aurora <nowiki>Emerald Aurora</nowiki>]<nowiki> </nowiki> | |||
</nowiki></div> | |||
</div> | |||
<div><div><u><nowiki>Other</nowiki></u><nowiki> | |||
</nowiki></div> | |||
<div | |||
• Wearing HP boosting armour when you get your bonfire boost will increase the amount of bonus health received from the bonfire | • Wearing HP boosting armour when you get your bonfire boost will increase the amount of bonus health received from the bonfire | ||
⬥ </nowiki>[https://runescape.wiki/w/Vampyrism <nowiki>Vampyrism</nowiki>]<nowiki> </nowiki> | ⬥ </nowiki>[https://runescape.wiki/w/Vampyrism <nowiki>Vampyrism</nowiki>]<nowiki> </nowiki><pvme-image src="https://cdn.discordapp.com/emojis/643505653079343144.png?v=1" alt="vampaura" title="vampaura" kind="icon" /><nowiki> | ||
⬥ </nowiki>[https://runescape.wiki/w/Hellhound_(familiar) <nowiki>Hellhound familiar</nowiki>]<nowiki> </nowiki> | ⬥ </nowiki>[https://runescape.wiki/w/Hellhound_(familiar) <nowiki>Hellhound familiar</nowiki>]<nowiki> </nowiki><pvme-image src="https://cdn.discordapp.com/emojis/921410226475925514.png?v=1" alt="hellhoundpouch" title="hellhoundpouch" kind="icon" /><nowiki> | ||
</nowiki></div> | </nowiki></div></div></div><nowiki> | ||
</ | </nowiki></div><nowiki> | ||
</div> | |||
<nowiki> | </nowiki></div><nowiki> | ||
</nowiki></div> | |||
</nowiki></div></div></div></div></div></div></div></div></div></div></div></div> | |||
<nowiki> | <nowiki> | ||
</nowiki></ | </nowiki> | ||
<p class="pvme-source-line pvme-source-spacer"><nowiki></nowiki></p> | |||
<nowiki> | <nowiki> | ||
</nowiki> | |||
</div> | </div> | ||
</div> | </div> | ||
<div class="pvme-source-section" data-gear="true"> | |||
<h2 id="presets-and-relics"><ins><nowiki>Presets and Relics</nowiki></ins></h2> | |||
<nowiki> | <nowiki> | ||
</nowiki> | |||
</nowiki>< | <p class="pvme-source-line"><nowiki>⬥ </nowiki>[https://presets.pvme.io/?id=UCC8bbJXtWooe1Pdoydc <nowiki>Magic</nowiki>]<nowiki> </nowiki><pvme-image src="https://cdn.discordapp.com/emojis/689504724159823906.png?v=1" alt="magic" title="magic" kind="icon" /><nowiki> | ||
</nowiki><pvme-image src="https://firebasestorage.googleapis.com/v0/b/preset-images/o/images%2FUCC8bbJXtWooe1Pdoydc.png?alt=media" alt="" title="" kind="media" /></p> | |||
<nowiki> | <nowiki> | ||
</nowiki>< | </nowiki> | ||
<p class="pvme-source-line pvme-source-spacer"><nowiki></nowiki></p> | |||
<nowiki> | <nowiki> | ||
</nowiki>< | </nowiki> | ||
<div class="pvme-source-mechanic"> | |||
<h3 id="action-bar"><nowiki>Action Bar</nowiki></h3> | |||
<nowiki> | <nowiki> | ||
</nowiki><p | </nowiki> | ||
<p class="pvme-source-line"><pvme-image src="https://img.pvme.io/images/mUj3Lg902a.png" alt="" title="" kind="media" /><nowiki> | |||
</nowiki></p> | </nowiki></p> | ||
<nowiki> | <nowiki> | ||
</nowiki><h2 id="necromancy-low-effort-methods-45-50-kph"><ins><nowiki>Necromancy Low Effort Methods (45-50 kph)</nowiki></ins></h2> | </nowiki> | ||
</div> | |||
</div> | |||
<div class="pvme-source-section"> | |||
<h2 id="necromancy-low-effort-methods-45-50-kph"><ins><nowiki>Necromancy Low Effort Methods (45-50 kph)</nowiki></ins></h2> | |||
<nowiki> | <nowiki> | ||
</nowiki><h3 id="positioning_1"><nowiki>Positioning</nowiki></h3> | </nowiki> | ||
<div class="pvme-source-mechanic"> | |||
<h3 id="positioning_1"><nowiki>Positioning</nowiki></h3> | |||
<nowiki> | <nowiki> | ||
</nowiki><p> | </nowiki> | ||
<p class="pvme-source-line"><pvme-image src="https://img.pvme.io/images/wU3zbtwBmj.png" alt="" title="" kind="media" /><nowiki> | |||
⬥ </nowiki><strong><ins><nowiki>Pink "Other" Tiles</nowiki></ins><nowiki> - Mushroom buds that you should only stand directly on top of are marked pink above.</nowiki></strong><nowiki> This is because some adjacent tiles have an increased chance of death due to the possibility of getting hit by multiple Mushroom Barrage attacks at once.</nowiki></p> | ⬥ </nowiki><strong><ins><nowiki>Pink "Other" Tiles</nowiki></ins><nowiki> - Mushroom buds that you should only stand directly on top of are marked pink above.</nowiki></strong><nowiki> This is because some adjacent tiles have an increased chance of death due to the possibility of getting hit by multiple Mushroom Barrage attacks at once.</nowiki></p> | ||
<nowiki> | <nowiki> | ||
</nowiki><p><nowiki>⬥ Position yourself on the tile shown above (the adjacent tile north of the mushroom bud) and avoid gas clouds when they spawn by moving to any safe tile if necessary. Once you are safe from the first set of gas clouds you do not need to move again for the rest of the fight.</nowiki></p> | </nowiki> | ||
<p class="pvme-source-line"><nowiki>⬥ Position yourself on the tile shown above (the adjacent tile north of the mushroom bud) and avoid gas clouds when they spawn by moving to any safe tile if necessary. Once you are safe from the first set of gas clouds you do not need to move again for the rest of the fight.</nowiki></p> | |||
<nowiki> | <nowiki> | ||
</nowiki><p><nowiki>⬥ A quick and easy way to remember which tile is safe is to never stand 2 tiles from mushroom buds, but on top of or directly adjacent to mushroom buds as they are normally safe.</nowiki></p> | </nowiki> | ||
<p class="pvme-source-line"><nowiki>⬥ A quick and easy way to remember which tile is safe is to never stand 2 tiles from mushroom buds, but on top of or directly adjacent to mushroom buds as they are normally safe.</nowiki></p> | |||
<nowiki> | <nowiki> | ||
</nowiki><p><nowiki></nowiki></p> | </nowiki> | ||
<p class="pvme-source-line pvme-source-spacer"><nowiki></nowiki></p> | |||
<nowiki> | <nowiki> | ||
</nowiki><div><nowiki> | </nowiki> | ||
<div><nowiki> | |||
</nowiki><div><nowiki> | </nowiki><div><nowiki> | ||
</nowiki><div><nowiki> | </nowiki><div><nowiki> | ||
| Line 146: | Line 154: | ||
</nowiki><div><nowiki> | </nowiki><div><nowiki> | ||
</nowiki><div></div> | </nowiki><div style="background-color: rgb(0, 153, 255)"></div><nowiki> | ||
<nowiki> | |||
</nowiki><div><nowiki> | </nowiki><div><nowiki> | ||
</nowiki><div><nowiki> | </nowiki><div><nowiki> | ||
</nowiki><div><nowiki> | </nowiki><div><nowiki> | ||
</nowiki><div | </nowiki><div><u><nowiki>Mandatory Requirements</nowiki></u><nowiki> | ||
</nowiki></div> | </nowiki></div><nowiki> | ||
<nowiki> | </nowiki><div class="pvme-source-preserve-lines"><nowiki>⬥ The following </nowiki><strong><nowiki>ARE REQUIRED</nowiki></strong><nowiki> for this method to work: | ||
</nowiki><div | |||
• </nowiki><strong><nowiki>Cutting corners will result in failure</nowiki></strong><nowiki> | • </nowiki><strong><nowiki>Cutting corners will result in failure</nowiki></strong><nowiki> | ||
• A more extensive list can be found in </nowiki> | • A more extensive list can be found in </nowiki><span><nowiki>#unknown-channel</nowiki></span><nowiki> | ||
</nowiki></div> | </nowiki></div><nowiki> | ||
<nowiki> | |||
</nowiki><div><div><div><u><nowiki>Items</nowiki></u><nowiki> | </nowiki><div><div><div><u><nowiki>Items</nowiki></u><nowiki> | ||
</nowiki></div> | </nowiki></div><div class="pvme-source-preserve-lines"><nowiki>⬥ </nowiki>[https://runescape.wiki/w/Adrenaline_renewal_potion#(4) <nowiki>Adrenaline Renewal</nowiki>]<nowiki> </nowiki><pvme-image src="https://cdn.discordapp.com/emojis/736298121704767538.png?v=1" alt="adrenrenewal" title="adrenrenewal" kind="icon" /><nowiki> | ||
<div | ⬥ </nowiki>[https://runescape.wiki/w/Igneous_Kal-Mor <nowiki>Igneous Kal-Mor</nowiki>]<nowiki> </nowiki><pvme-image src="https://cdn.discordapp.com/emojis/1139200072438005851.png?v=1" alt="igneouskalmor" title="igneouskalmor" kind="icon" /><nowiki> | ||
⬥ </nowiki>[https://runescape.wiki/w/Igneous_Kal-Mor <nowiki>Igneous Kal-Mor</nowiki>]<nowiki> </nowiki> | ⬥ </nowiki>[https://runescape.wiki/w/Scripture_of_Jas <nowiki>Scripture of Jas</nowiki>]<nowiki> </nowiki><pvme-image src="https://cdn.discordapp.com/emojis/869284342839513108.png?v=1" alt="scriptureofjas" title="scriptureofjas" kind="icon" /><nowiki> | ||
⬥ </nowiki>[https://runescape.wiki/w/Scripture_of_Jas <nowiki>Scripture of Jas</nowiki>]<nowiki> </nowiki> | ⬥ </nowiki>[https://runescape.wiki/w/Enhanced_Excalibur <nowiki>Enhanced excalibur</nowiki>]<nowiki> </nowiki><pvme-image src="https://cdn.discordapp.com/emojis/513200949016264727.png?v=1" alt="enhancedexcalibur" title="enhancedexcalibur" kind="icon" /><nowiki> | ||
⬥ </nowiki>[https://runescape.wiki/w/Enhanced_Excalibur <nowiki>Enhanced excalibur</nowiki>]<nowiki> </nowiki> | ⬥ </nowiki>[https://runescape.wiki/w/Cinderbane_gloves <nowiki>Cinderbane gloves</nowiki>]<nowiki> </nowiki><pvme-image src="https://cdn.discordapp.com/emojis/513190158355660812.png?v=1" alt="cinderbanes" title="cinderbanes" kind="icon" /><nowiki> | ||
⬥ </nowiki>[https://runescape.wiki/w/Cinderbane_gloves <nowiki>Cinderbane gloves</nowiki>]<nowiki> </nowiki> | ⬥ </nowiki>[https://runescape.wiki/w/Weapon_poison%2B%2B%2B#(4) <nowiki>Weapon Poison +++</nowiki>]<nowiki> </nowiki><pvme-image src="https://cdn.discordapp.com/emojis/689525476158472288.png?v=1" alt="weppoison" title="weppoison" kind="icon" /><nowiki> | ||
⬥ </nowiki>[https://runescape.wiki/w/Weapon_poison%2B%2B%2B#(4) <nowiki>Weapon Poison +++</nowiki>]<nowiki> </nowiki> | ⬥ </nowiki>[https://runescape.wiki/w/Kwuarm_incense_sticks <nowiki>Kwuarm incense sticks</nowiki>]<nowiki> </nowiki><pvme-image src="https://cdn.discordapp.com/emojis/565726489341984779.png?v=1" alt="kwuarmsticks" title="kwuarmsticks" kind="icon" /><nowiki> | ||
⬥ </nowiki>[https://runescape.wiki/w/Kwuarm_incense_sticks <nowiki>Kwuarm incense sticks</nowiki>]<nowiki> </nowiki> | ⬥ </nowiki>[https://runescape.wiki/w/Ring_of_death <nowiki>Ring of Death</nowiki>]<nowiki> </nowiki><pvme-image src="https://cdn.discordapp.com/emojis/513190159462825984.png?v=1" alt="rod" title="rod" kind="icon" /><nowiki> | ||
⬥ </nowiki>[https://runescape.wiki/w/Ring_of_death <nowiki>Ring of Death</nowiki>]<nowiki> </nowiki> | </nowiki></div></div><div><div><u><nowiki>Abilities</nowiki></u><nowiki> | ||
</nowiki></div> | </nowiki></div><div class="pvme-source-preserve-lines"><nowiki>⬥ </nowiki>[https://runescape.wiki/w/Darkness <nowiki>Darkness</nowiki>]<nowiki> </nowiki><pvme-image src="https://cdn.discordapp.com/emojis/1137809209782698024.png?v=1" alt="darkness" title="darkness" kind="icon" /><nowiki> | ||
</div> | ⬥ </nowiki>[https://runescape.wiki/w/Invoke_Death <nowiki>Invoke Death</nowiki>]<nowiki> </nowiki><pvme-image src="https://cdn.discordapp.com/emojis/1137809121983336548.png?v=1" alt="invokedeath" title="invokedeath" kind="icon" /><nowiki> | ||
<div><div><u><nowiki>Abilities</nowiki></u><nowiki> | ⬥ </nowiki>[https://runescape.wiki/w/Conjure_Undead_Army <nowiki>Conjure Undead Army</nowiki>]<nowiki> </nowiki><pvme-image src="https://cdn.discordapp.com/emojis/1166094935066423348.png?v=1" alt="conjurearmy" title="conjurearmy" kind="icon" /><nowiki> | ||
</nowiki></div> | </nowiki></div></div><div><div><u><nowiki>Other</nowiki></u><nowiki> | ||
<div | </nowiki></div><div class="pvme-source-preserve-lines"><nowiki>⬥ Thermal Bath and Bonfire HP boost | ||
⬥ </nowiki>[https://runescape.wiki/w/Invoke_Death <nowiki>Invoke Death</nowiki>]<nowiki> </nowiki> | |||
⬥ </nowiki>[https://runescape.wiki/w/Conjure_Undead_Army <nowiki>Conjure Undead Army</nowiki>]<nowiki> </nowiki> | |||
</nowiki></div> | |||
</div> | |||
<div><div><u><nowiki>Other</nowiki></u><nowiki> | |||
</nowiki></div> | |||
<div | |||
• Wearing HP boosting armour when you get your bonfire boost will increase the amount of bonus health received from the bonfire | • Wearing HP boosting armour when you get your bonfire boost will increase the amount of bonus health received from the bonfire | ||
⬥ </nowiki>[https://runescape.wiki/w/Mahjarrat_aura <nowiki>Mahjarrat aura</nowiki>]<nowiki> </nowiki> | ⬥ </nowiki>[https://runescape.wiki/w/Mahjarrat_aura <nowiki>Mahjarrat aura</nowiki>]<nowiki> </nowiki><pvme-image src="https://cdn.discordapp.com/emojis/643148943856762890.png?v=1" alt="mahj" title="mahj" kind="icon" /><nowiki> or </nowiki>[https://runescape.wiki/w/Dark_magic_aura <nowiki>Dark Magic aura</nowiki>]<nowiki> </nowiki><pvme-image src="https://cdn.discordapp.com/emojis/643505652571963417.png?v=1" alt="darkmagic" title="darkmagic" kind="icon" /><nowiki> | ||
⬥ </nowiki>[https://runescape.wiki/w/Death_Ward <nowiki>Death Ward Relic</nowiki>]<nowiki> </nowiki> | ⬥ </nowiki>[https://runescape.wiki/w/Death_Ward <nowiki>Death Ward Relic</nowiki>]<nowiki> </nowiki><pvme-image src="https://cdn.discordapp.com/emojis/697808774068699286.png?v=1" alt="deathward" title="deathward" kind="icon" /><nowiki> | ||
⬥ </nowiki>[https://runescape.wiki/w/Hellhound_(familiar) <nowiki>Hellhound familiar</nowiki>]<nowiki> </nowiki> | ⬥ </nowiki>[https://runescape.wiki/w/Hellhound_(familiar) <nowiki>Hellhound familiar</nowiki>]<nowiki> </nowiki><pvme-image src="https://cdn.discordapp.com/emojis/921410226475925514.png?v=1" alt="hellhoundpouch" title="hellhoundpouch" kind="icon" /><nowiki> | ||
</nowiki></div> | </nowiki></div></div></div><nowiki> | ||
</ | </nowiki></div><nowiki> | ||
</div> | |||
<nowiki> | </nowiki></div><nowiki> | ||
</nowiki></div> | |||
</nowiki></div></div></div></div></div></div></div></div></div></div></div></div> | |||
<nowiki> | <nowiki> | ||
</nowiki></ | </nowiki> | ||
<p class="pvme-source-line pvme-source-spacer"><nowiki></nowiki></p> | |||
<nowiki> | <nowiki> | ||
</nowiki> | |||
</div> | </div> | ||
</div> | </div> | ||
<div class="pvme-source-section" data-gear="true"> | |||
<h2 id="presets-and-relics_1"><ins><nowiki>Presets and Relics</nowiki></ins></h2> | |||
<nowiki> | <nowiki> | ||
</nowiki> | |||
</nowiki>< | <p class="pvme-source-line"><nowiki>⬥ </nowiki>[https://presets.pvme.io/?id=3PAH9i5rPpLCl6gBMoE8 <nowiki>Necromancy Deathwarden</nowiki>]<nowiki> </nowiki><pvme-image src="https://cdn.discordapp.com/emojis/1148995625896120460.png?v=1" alt="necromancy" title="necromancy" kind="icon" /></p> | ||
<nowiki> | <nowiki> | ||
</nowiki>< | </nowiki> | ||
<p class="pvme-source-line"><nowiki>⬥ </nowiki>[https://presets.pvme.io/?id=cx1x3YPD4fAzMZy8qAHm <nowiki>Necromancy TFN</nowiki>]<nowiki> </nowiki><pvme-image src="https://cdn.discordapp.com/emojis/1148995625896120460.png?v=1" alt="necromancy" title="necromancy" kind="icon" /><nowiki> | |||
</nowiki><pvme-image src="https://firebasestorage.googleapis.com/v0/b/preset-images/o/images%2Fcx1x3YPD4fAzMZy8qAHm.png?alt=media" alt="" title="" kind="media" /></p> | |||
<nowiki> | <nowiki> | ||
</nowiki><p><nowiki>⬥ </nowiki> | </nowiki> | ||
<p class="pvme-source-line"><nowiki>⬥ You can save your preset with the excalibur </nowiki><pvme-image src="https://cdn.discordapp.com/emojis/513200949016264727.png?v=1" alt="enhancedexcalibur" title="enhancedexcalibur" kind="icon" /><nowiki> equipped to automatically dismiss your conjures when banking.</nowiki></p> | |||
<nowiki> | <nowiki> | ||
</nowiki><p><nowiki>⬥ | </nowiki> | ||
<p class="pvme-source-line"><nowiki>⬥ Using the deathwarden setup you are likely to encounter the Mushroom Barrage mechanic. Be aware that Mushroom Barrage explosions will still damage you after Helwyr has died if the spawn animation has begun.</nowiki></p> | |||
<nowiki> | <nowiki> | ||
</nowiki><p><nowiki>⬥ | </nowiki> | ||
<p class="pvme-source-line"><nowiki>⬥ Avoid going south of the starting tile with the deathwarden setup. This will allow you to automatically dodge one of the early mushroom barrage attacks and increase survivability.</nowiki></p> | |||
<nowiki> | <nowiki> | ||
</nowiki><p><nowiki> | </nowiki> | ||
<p class="pvme-source-line pvme-source-spacer"><nowiki></nowiki></p> | |||
<nowiki> | <nowiki> | ||
</nowiki>< | </nowiki> | ||
<div class="pvme-source-mechanic"> | |||
<h3 id="action-bar_1"><nowiki>Action Bar</nowiki></h3> | |||
<nowiki> | <nowiki> | ||
</nowiki><p>< | </nowiki> | ||
<p class="pvme-source-line"><pvme-image src="https://img.pvme.io/images/4zYgyH2bLd.png" alt="" title="" kind="media" /></p> | |||
<nowiki> | <nowiki> | ||
</nowiki><h3 id=" | </nowiki> | ||
</div> | |||
<div class="pvme-source-mechanic"> | |||
<h3 id="the-fight"><nowiki>The fight</nowiki></h3> | |||
<nowiki> | <nowiki> | ||
</nowiki><p> | </nowiki> | ||
<p class="pvme-source-line"><nowiki>⬥ This method requires teleporting to War's Retreat after every kill to replenish prayer, adrenaline, familiar and player health, and reset cooldowns.</nowiki></p> | |||
<nowiki> | <nowiki> | ||
</nowiki>< | </nowiki> | ||
<p class="pvme-source-line pvme-source-sequence"><nowiki>⬥ Cross the barrier to enter the boss room → </nowiki><pvme-image src="https://cdn.discordapp.com/emojis/1166094935066423348.png?v=1" alt="conjurearmy" title="conjurearmy" kind="icon" /><nowiki> → </nowiki><pvme-image src="https://cdn.discordapp.com/emojis/1137809121983336548.png?v=1" alt="invokedeath" title="invokedeath" kind="icon" /><nowiki> → </nowiki><pvme-image src="https://cdn.discordapp.com/emojis/1159434409913634816.png?v=1" alt="commandghost" title="commandghost" kind="icon" /><nowiki> → (tc) </nowiki><pvme-image src="https://cdn.discordapp.com/emojis/1159434908486357072.png?v=1" alt="livingdeath" title="livingdeath" kind="icon" /><nowiki> → </nowiki><pvme-image src="https://cdn.discordapp.com/emojis/655341074235129858.png?v=1" alt="vulnbomb" title="vulnbomb" kind="icon" /><nowiki> + </nowiki><pvme-image src="https://cdn.discordapp.com/emojis/736298121704767538.png?v=1" alt="adrenrenewal" title="adrenrenewal" kind="icon" /><nowiki> + Activate </nowiki><pvme-image src="https://cdn.discordapp.com/emojis/513200949016264727.png?v=1" alt="enhancedexcalibur" title="enhancedexcalibur" kind="icon" /></p> | |||
<nowiki> | <nowiki> | ||
</nowiki><p><nowiki>⬥ | </nowiki> | ||
<p class="pvme-source-line"><nowiki>⬥ Turning Auto-Retaliate </nowiki><pvme-image src="https://cdn.discordapp.com/emojis/1084799717726228530.png?v=1" alt="autoretaliate" title="autoretaliate" kind="icon" /><nowiki> on is recommended. If you have Auto-Retaliate </nowiki><pvme-image src="https://cdn.discordapp.com/emojis/1084799717726228530.png?v=1" alt="autoretaliate" title="autoretaliate" kind="icon" /><nowiki> off you will need to manually use soul sap at the beginning to start revolution.</nowiki></p> | |||
<nowiki> | <nowiki> | ||
</nowiki><p><nowiki>⬥ | </nowiki> | ||
<p class="pvme-source-line"><nowiki>⬥ It is not recommended to click on Helwyr to begin attacking due to the delay compared to target cycle. There is a small window to kill the boss before you are overwhelmed by the Mushroom Barrage.</nowiki></p> | |||
<nowiki> | <nowiki> | ||
</nowiki>< | </nowiki> | ||
</div> | |||
<div class="pvme-source-mechanic"> | |||
<h3 id="example-kills"><nowiki>Example Kills</nowiki></h3> | |||
<nowiki> | <nowiki> | ||
</nowiki><p><nowiki>⬥ | </nowiki> | ||
<p class="pvme-source-line"><nowiki>⬥ </nowiki>[https://www.youtube.com/watch?v=1enrEzEffvQ <nowiki>Magic Example</nowiki>]<nowiki> </nowiki><pvme-image src="https://cdn.discordapp.com/emojis/689504724159823906.png?v=1" alt="magic" title="magic" kind="icon" /></p> | |||
<nowiki> | <nowiki> | ||
</nowiki>< | </nowiki> | ||
<p class="pvme-source-line"><nowiki>⬥ </nowiki>[https://youtu.be/HvMh6PpLRvc <nowiki>Necromancy Example</nowiki>]<nowiki> </nowiki><pvme-image src="https://cdn.discordapp.com/emojis/1148995625896120460.png?v=1" alt="necromancy" title="necromancy" kind="icon" /></p> | |||
<nowiki> | <nowiki> | ||
</nowiki><p | </nowiki> | ||
<p class="pvme-source-line"><nowiki>Content Provided by: @ladygoogoogaga</nowiki></p> | |||
<nowiki> | <nowiki> | ||
</nowiki><p | </nowiki> | ||
<p class="pvme-source-line"><nowiki>Formatting Maintained by: @ladygoogoogaga</nowiki></p> | |||
<nowiki> | <nowiki> | ||
</nowiki> | </nowiki> | ||
</div> | |||
</div> | |||
</div> | |||
<div class="pvme-source-attribution">[https://pvme.io/pvme-guides/afk/low-effort-helwyr-hardmode/ PvME source] · PvME contributors · [https://creativecommons.org/licenses/by-nc-sa/4.0/ CC BY-NC-SA 4.0]. AI-assisted formatting; source wording retained. | |||
</div> | |||
Revision as of 00:45, 16 November 2026
Low Effort Helwyr Hard Mode

Disclaimer
⬥ IF YOU CANNOT GET A METHOD TO WORK DO NOT MESSAGE THE CREATOR(S)
• It is more than likely user error or cutting corners, use #pvm-help if you cannot get it to work
Magic Low Effort Method (~35 kph)
Positioning
 ⬥ Always start on center Mushroom, use Bladed dive to one of the shown tiles (mushrooms directly North, East, South or West) if starting tile gets mushroom. Ensure you are stood directly on top of the mushroom caps of the BD tiles to avoid overlap in Mushroom Barrage.
 ⬥
 ⬥
 ⬥
 ⬥
 ⬥

 ⬥

 ⬥ Hellhound familiar


Necromancy Low Effort Methods (45-50 kph)
Positioning
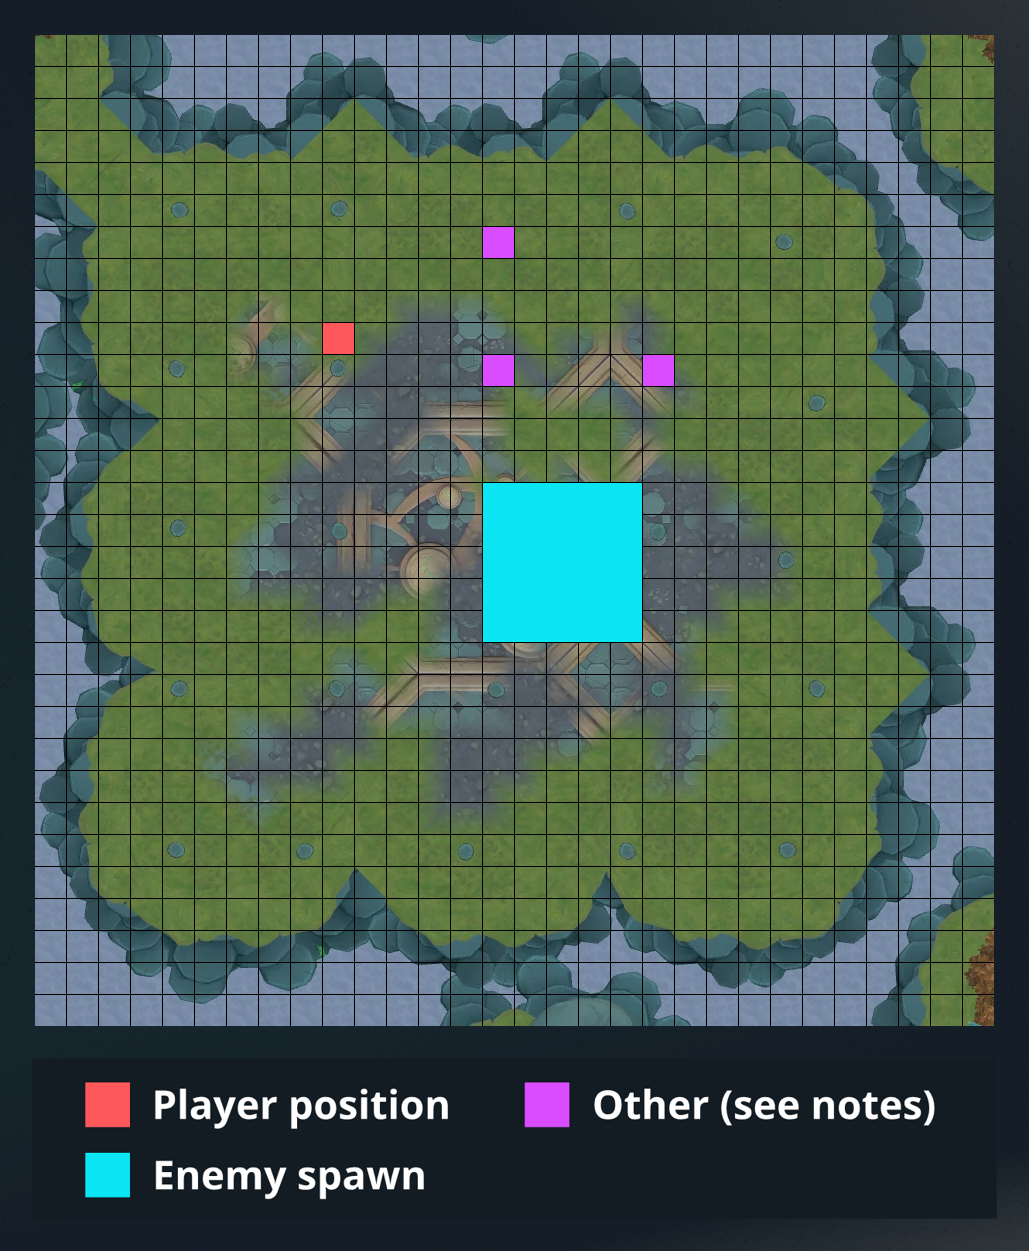 ⬥ Pink "Other" Tiles - Mushroom buds that you should only stand directly on top of are marked pink above. This is because some adjacent tiles have an increased chance of death due to the possibility of getting hit by multiple Mushroom Barrage attacks at once.
⬥ Position yourself on the tile shown above (the adjacent tile north of the mushroom bud) and avoid gas clouds when they spawn by moving to any safe tile if necessary. Once you are safe from the first set of gas clouds you do not need to move again for the rest of the fight.
⬥ A quick and easy way to remember which tile is safe is to never stand 2 tiles from mushroom buds, but on top of or directly adjacent to mushroom buds as they are normally safe.
 ⬥
 ⬥
 ⬥
 ⬥
 or Dark Magic aura
 ⬥ Death Ward Relic
 ⬥ Hellhound familiar
Presets and Relics


⬥ You can save your preset with the excalibur  equipped to automatically dismiss your conjures when banking.
⬥ Using the deathwarden setup you are likely to encounter the Mushroom Barrage mechanic. Be aware that Mushroom Barrage explosions will still damage you after Helwyr has died if the spawn animation has begun.
⬥ Avoid going south of the starting tile with the deathwarden setup. This will allow you to automatically dodge one of the early mushroom barrage attacks and increase survivability.
Action Bar

The fight
⬥ This method requires teleporting to War's Retreat after every kill to replenish prayer, adrenaline, familiar and player health, and reset cooldowns.
⬥ Cross the barrier to enter the boss room →  →
 →
 → (tc)
 →
 +
 + Activate
⬥ Turning Auto-Retaliate  on is recommended. If you have Auto-Retaliate off you will need to manually use soul sap at the beginning to start revolution.
⬥ It is not recommended to click on Helwyr to begin attacking due to the delay compared to target cycle. There is a small window to kill the boss before you are overwhelmed by the Mushroom Barrage.
Example Kills
Content Provided by: @ladygoogoogaga
Formatting Maintained by: @ladygoogoogaga