Duo BM
imported>PvME corpus import Attributed pinned PvME snapshot 074a9438f79d10fba75735791be0030734db8b5e; CC BY-NC-SA 4.0 |
AI-assisted additive formatting; current PvME source words, order and media preserved |
||
| Line 1: | Line 1: | ||
__NOTOC__ | |||
<div class="pvme-exact-guide"> | |||
< | <h1 id="duo-bm" class="pvme-source-title"><nowiki>Duo BM</nowiki></h1> | ||
< | |||
<nowiki> | <nowiki> | ||
</nowiki><p>< | </nowiki> | ||
<p class="pvme-source-line"><pvme-image src="https://img.pvme.io/images/YrMqspEn6R.png" alt="" title="" kind="media" /></p> | |||
<nowiki> | <nowiki> | ||
</nowiki>< | </nowiki> | ||
<div class="pvme-source-mechanic"> | |||
<h3 id="introduction"><nowiki>Introduction</nowiki></h3> | |||
<nowiki> | <nowiki> | ||
</nowiki></ | </nowiki> | ||
<p class="pvme-source-line pvme-source-spacer"><nowiki></nowiki></p> | |||
<nowiki> | <nowiki> | ||
</nowiki><p><nowiki> | </nowiki> | ||
<p class="pvme-source-line"><nowiki>This guide assumes that you already have an understanding of mechanics of the fight - </nowiki><span><nowiki>#beastmaster-basic</nowiki></span></p> | |||
<nowiki> | <nowiki> | ||
</nowiki>< | </nowiki> | ||
<p class="pvme-source-line pvme-source-spacer"><nowiki></nowiki></p> | |||
<nowiki> | <nowiki> | ||
</nowiki><h3 id=" | </nowiki> | ||
</div> | |||
<div class="pvme-source-mechanic"> | |||
<h3 id="the-strategies"><nowiki>The Strategies</nowiki></h3> | |||
<nowiki> | <nowiki> | ||
</nowiki><p><nowiki> | </nowiki> | ||
<p class="pvme-source-line"><nowiki>⬥ There are two main strategies to duo BM:</nowiki></p> | |||
<nowiki> | <nowiki> | ||
</nowiki><p><nowiki> | </nowiki> | ||
<p class="pvme-source-line pvme-source-detail"><nowiki> • </nowiki><strong><nowiki>AoE stack strategy</nowiki></strong><nowiki> - stacking and tanking everything at once, dealing damage with AoEs</nowiki></p> | |||
<nowiki> | <nowiki> | ||
</nowiki><p><nowiki> | </nowiki> | ||
<p class="pvme-source-line pvme-source-detail"><nowiki> • </nowiki><strong><nowiki>Entangle strategy</nowiki></strong><nowiki> - uses entangle to get the 2nd pet stuck, reducing damage taken</nowiki></p> | |||
<nowiki> | <nowiki> | ||
</nowiki>< | </nowiki> | ||
<p class="pvme-source-line pvme-source-spacer"><nowiki></nowiki></p> | |||
<nowiki> | <nowiki> | ||
</nowiki>< | </nowiki> | ||
</div> | |||
<div class="pvme-source-mechanic"> | |||
<h3 id="general-notes"><nowiki>General Notes</nowiki></h3> | |||
<nowiki> | <nowiki> | ||
</nowiki><p><nowiki> | </nowiki> | ||
<p class="pvme-source-line"><nowiki>⬥ It will be significantly easier if the base tank uses </nowiki><pvme-image src="https://cdn.discordapp.com/emojis/841419289319964763.png?v=1" alt="staffoflight" title="staffoflight" kind="icon" /><nowiki> </nowiki><pvme-image src="https://cdn.discordapp.com/emojis/1257438999794946099.png?v=1" alt="eofspec" title="eofspec" kind="icon" /><nowiki> , especially if they are tanking pets at the same time for the AoE strategy.</nowiki></p> | |||
<nowiki> | <nowiki> | ||
</nowiki><p><nowiki> | </nowiki> | ||
<p class="pvme-source-line"><nowiki>⬥ Cryptbloom </nowiki><pvme-image src="https://cdn.discordapp.com/emojis/1334336168363561041.png?v=1" alt="cryptbloomtop" title="cryptbloomtop" kind="icon" /><nowiki> with animate dead </nowiki><pvme-image src="https://cdn.discordapp.com/emojis/856635090453135382.png?v=1" alt="animatedead" title="animatedead" kind="icon" /></p> | |||
<nowiki> | <nowiki> | ||
</nowiki>< | </nowiki> | ||
</div> | |||
<div class="pvme-source-section" data-gear="true"> | |||
<h2 id="presets-and-relics"><ins><nowiki>Presets and Relics</nowiki></ins></h2> | |||
<nowiki> | <nowiki> | ||
</nowiki>< | </nowiki> | ||
<p class="pvme-source-line"><nowiki>⬥ </nowiki>[https://presets.pvme.io/?id=0VJPdrObhSrzvPodd6zW <nowiki>Necromancy preset</nowiki>]<nowiki> </nowiki><pvme-image src="https://cdn.discordapp.com/emojis/1148995625896120460.png?v=1" alt="necromancy" title="necromancy" kind="icon" /></p> | |||
<nowiki> | <nowiki> | ||
</nowiki><p><nowiki>⬥ | </nowiki> | ||
<p class="pvme-source-line"><nowiki>⬥ </nowiki>[https://presets.pvme.io/?id=XpeodVMvtcqHuv5jlqj3 <nowiki>Magic preset</nowiki>]<nowiki> </nowiki><pvme-image src="https://cdn.discordapp.com/emojis/689504724159823906.png?v=1" alt="magic" title="magic" kind="icon" /><nowiki> | |||
</nowiki><pvme-image src="https://firebasestorage.googleapis.com/v0/b/preset-images/o/images%2FXpeodVMvtcqHuv5jlqj3.png?alt=media" alt="" title="" kind="media" /></p> | |||
<nowiki> | <nowiki> | ||
</nowiki><p | </nowiki> | ||
<p class="pvme-source-line pvme-source-spacer"><nowiki></nowiki></p> | |||
<nowiki> | <nowiki> | ||
</nowiki><h2 id=" | </nowiki> | ||
</div> | |||
<div class="pvme-source-section"> | |||
<h2 id="aoe-stack-strategy"><ins><nowiki>AoE Stack Strategy</nowiki></ins></h2> | |||
<nowiki> | <nowiki> | ||
</nowiki><p><nowiki>⬥ </nowiki> | </nowiki> | ||
<p class="pvme-source-line"><nowiki>⬥ Stand by the north gong where the 2nd pet spawns, and ideally deal damage to both the pets and BM using AoE attacks</nowiki></p> | |||
<nowiki> | <nowiki> | ||
</nowiki><p | </nowiki> | ||
<p class="pvme-source-line pvme-source-spacer"><nowiki></nowiki></p> | |||
<nowiki> | <nowiki> | ||
</nowiki>< | </nowiki> | ||
<div class="pvme-source-mechanic"> | |||
<h3 id="stacking-phase"><nowiki>Stacking Phase</nowiki></h3> | |||
<nowiki> | <nowiki> | ||
</nowiki>< | </nowiki> | ||
<p class="pvme-source-line"><pvme-image src="https://img.pvme.io/images/axiYyam.png" alt="" title="" kind="media" /></p> | |||
<nowiki> | <nowiki> | ||
</nowiki><p><nowiki>⬥ | </nowiki> | ||
<p class="pvme-source-line"><nowiki>⬥ Stay in melee distance to the pet to only take melee damage whilst stacking the enemies.</nowiki></p> | |||
<nowiki> | <nowiki> | ||
</nowiki><p><nowiki> | </nowiki> | ||
<p class="pvme-source-line"><nowiki>⬥ Walk the pet/BM to stack them for AoEs if necessary.</nowiki></p> | |||
<nowiki> | <nowiki> | ||
</nowiki>< | </nowiki> | ||
<p class="pvme-source-line"><nowiki>⬥ Focus on killing one of the pets, particularly if stacking BM on the pet fails</nowiki></p> | |||
<nowiki> | <nowiki> | ||
</nowiki><p> | </nowiki> | ||
<p class="pvme-source-line"><nowiki>⬥ </nowiki><pvme-image src="https://cdn.discordapp.com/emojis/938475261366784070.png?v=1" alt="prismofrestoration" title="prismofrestoration" kind="icon" /><nowiki> Prisms of restoration may not be able to spawn if surrounded by enemies - place the prism before starting, and extend it during the fight</nowiki></p> | |||
<nowiki> | <nowiki> | ||
</nowiki><p><nowiki> | </nowiki> | ||
<p class="pvme-source-line pvme-source-spacer"><nowiki></nowiki></p> | |||
<nowiki> | <nowiki> | ||
</nowiki><p><nowiki>⬥ | </nowiki> | ||
<p class="pvme-source-line"><nowiki>⬥ The 3rd pet and chargers will spawn once the 2nd pet's health is lowered sufficiently - continue to deal damage with AoEs.</nowiki></p> | |||
<nowiki> | <nowiki> | ||
</nowiki><p><nowiki> | </nowiki> | ||
<p class="pvme-source-line pvme-source-spacer"><nowiki></nowiki></p> | |||
<nowiki> | <nowiki> | ||
</nowiki>< | </nowiki> | ||
</div> | |||
<div class="pvme-source-mechanic"> | |||
<h3 id="one-pet-dead"><nowiki>One Pet Dead</nowiki></h3> | |||
<nowiki> | <nowiki> | ||
</nowiki><p><nowiki> | </nowiki> | ||
<p class="pvme-source-line"><nowiki>⬥ Base tank - run BM to avoid taking too much damage; stacks are only received from melee hits. Using emerald aurora </nowiki><pvme-image src="https://cdn.discordapp.com/emojis/914077639784935424.png?v=1" alt="emeraldaurora" title="emeraldaurora" kind="icon" /><nowiki> for additional damage reduction is helpful.</nowiki></p> | |||
<nowiki> | <nowiki> | ||
</nowiki><p><nowiki>⬥ | </nowiki> | ||
<p class="pvme-source-line"><nowiki>⬥ DPS player - finishes off the remaining pet. provoke </nowiki><pvme-image src="https://cdn.discordapp.com/emojis/535541259465392143.png?v=1" alt="voke" title="voke" kind="icon" /><nowiki> and tank the pet, using </nowiki><pvme-image src="https://cdn.discordapp.com/emojis/535541259465392143.png?v=1" alt="voke" title="voke" kind="icon" /><nowiki> again if it jumps onto the base tank.</nowiki></p> | |||
<nowiki> | <nowiki> | ||
</nowiki><p><nowiki></nowiki></p> | </nowiki> | ||
<p class="pvme-source-line pvme-source-spacer"><nowiki></nowiki></p> | |||
<nowiki> | <nowiki> | ||
</nowiki><h3 id=" | </nowiki> | ||
</div> | |||
<div class="pvme-source-mechanic"> | |||
<h3 id="both-pets-dead"><nowiki>Both Pets Dead</nowiki></h3> | |||
<nowiki> | <nowiki> | ||
</nowiki><p><nowiki>⬥ | </nowiki> | ||
<p class="pvme-source-line"><nowiki>⬥ DPS player helps to kill BM - the DPS player can act as the backup tank, allowing the base tank to do their damage rotation.</nowiki></p> | |||
<nowiki> | <nowiki> | ||
</nowiki><p><nowiki>⬥ | </nowiki> | ||
<p class="pvme-source-line"><nowiki>⬥ Try not to run BM too far from the non-tank player's damage-boosting ultimate.</nowiki></p> | |||
<nowiki> | <nowiki> | ||
</nowiki><p><nowiki></nowiki></p> | </nowiki> | ||
<p class="pvme-source-line pvme-source-spacer"><nowiki></nowiki></p> | |||
<nowiki> | <nowiki> | ||
</nowiki>< | </nowiki> | ||
</div> | |||
</div> | |||
<div class="pvme-source-section"> | |||
<h2 id="entangle-strategy"><ins><nowiki>Entangle Strategy</nowiki></ins></h2> | |||
<nowiki> | <nowiki> | ||
</nowiki><p><nowiki>⬥ | </nowiki> | ||
<p class="pvme-source-line"><nowiki>⬥ Uses entangle </nowiki><pvme-image src="https://cdn.discordapp.com/emojis/567727987274022924.png?v=1" alt="ent" title="ent" kind="icon" /><nowiki> to manipulate the 2nd pet, preventing it from attacking until you are ready to kill it.</nowiki></p> | |||
<nowiki> | <nowiki> | ||
</nowiki><p><nowiki>⬥ | </nowiki> | ||
<p class="pvme-source-line"><nowiki>⬥ This strategy aims to use chargers to block the 2nd pet.</nowiki></p> | |||
<nowiki> | <nowiki> | ||
</nowiki><p><nowiki> | </nowiki> | ||
<p class="pvme-source-line pvme-source-detail"><nowiki> • Therefore, BM must not be in combat until you are ready to have it summon the chargers and 3rd pet.</nowiki></p> | |||
<nowiki> | <nowiki> | ||
</nowiki>< | </nowiki> | ||
<p class="pvme-source-line pvme-source-spacer"><nowiki></nowiki></p> | |||
<nowiki> | <nowiki> | ||
</nowiki>< | </nowiki> | ||
<div class="pvme-source-mechanic"> | |||
<h3 id="pet-2-lure"><nowiki>Pet 2 Lure</nowiki></h3> | |||
<nowiki> | <nowiki> | ||
</nowiki><p>< | </nowiki> | ||
<p class="pvme-source-line"><pvme-image src="https://img.pvme.io/images/pqwlV4r.png" alt="" title="" kind="media" /></p> | |||
<nowiki> | <nowiki> | ||
</nowiki><p><nowiki> | </nowiki> | ||
<p class="pvme-source-line"><em><nowiki>Note: Do </nowiki></em><em><nowiki>not</nowiki></em><em><nowiki> aggro BM</nowiki></em></p> | |||
<nowiki> | <nowiki> | ||
</nowiki><p><nowiki> | </nowiki> | ||
<p class="pvme-source-line"><nowiki>1) Stand at the closest charger cage that is south of the west gong as the fight starts.</nowiki></p> | |||
<nowiki> | <nowiki> | ||
</nowiki>< | </nowiki> | ||
<p class="pvme-source-line pvme-source-sequence"><nowiki>2) Wait for pet to jump to you → cast entangle </nowiki><pvme-image src="https://cdn.discordapp.com/emojis/567727987274022924.png?v=1" alt="ent" title="ent" kind="icon" /><nowiki> on pet.</nowiki></p> | |||
<nowiki> | <nowiki> | ||
</nowiki><p> | </nowiki> | ||
<p class="pvme-source-line"><nowiki>3) Do not attack, move to the southwest corner of the arena and wait for the pet to jump again.</nowiki></p> | |||
<nowiki> | <nowiki> | ||
</nowiki><p>< | </nowiki> | ||
<p class="pvme-source-line"><pvme-image src="https://img.pvme.io/images/cxQhHvK.png" alt="" title="" kind="media" /></p> | |||
<nowiki> | <nowiki> | ||
</nowiki><p><nowiki> | </nowiki> | ||
<p class="pvme-source-line"><nowiki>4) Attack the pet; lower its health to around 25k.</nowiki></p> | |||
<nowiki> | <nowiki> | ||
</nowiki><p | </nowiki> | ||
<p class="pvme-source-line pvme-source-spacer"><nowiki></nowiki></p> | |||
<nowiki> | <nowiki> | ||
</nowiki>< | </nowiki> | ||
</div> | |||
<div class="pvme-source-mechanic"> | |||
<h3 id="pet-is-lowered-getting-it-stuck"><nowiki>Pet is Lowered - Getting it Stuck</nowiki></h3> | |||
<nowiki> | <nowiki> | ||
</nowiki><p> | </nowiki> | ||
<p class="pvme-source-line"><nowiki>1) Run towards the middle to aggro BM, cast reflect </nowiki><pvme-image src="https://cdn.discordapp.com/emojis/535541258786177064.png?v=1" alt="reflect" title="reflect" kind="icon" /><nowiki> whilst doing this</nowiki></p> | |||
<nowiki> | <nowiki> | ||
</nowiki><p><nowiki> | </nowiki> | ||
<p class="pvme-source-line"><nowiki>2) Run back towards the pet - cast entangle </nowiki><pvme-image src="https://cdn.discordapp.com/emojis/567727987274022924.png?v=1" alt="ent" title="ent" kind="icon" /><nowiki> on the pet as BM comes close, and use freedom </nowiki><pvme-image src="https://cdn.discordapp.com/emojis/535541258240786434.png?v=1" alt="freedom" title="freedom" kind="icon" /><nowiki> or anticipate </nowiki><pvme-image src="https://cdn.discordapp.com/emojis/535541306475151390.png?v=1" alt="anti" title="anti" kind="icon" /><nowiki> as you will be stunned by the 3rd pet</nowiki></p> | |||
<nowiki> | <nowiki> | ||
</nowiki><p><nowiki> | </nowiki> | ||
<p class="pvme-source-line"><nowiki>3) Wait for chargers to spawn - just as the chargers start to move, surge </nowiki><pvme-image src="https://cdn.discordapp.com/emojis/535533810004262912.png?v=1" alt="surge" title="surge" kind="icon" /><nowiki> east and go to the southeast corner</nowiki></p> | |||
<nowiki> | <nowiki> | ||
</nowiki>< | </nowiki> | ||
<p class="pvme-source-line"><pvme-image src="https://img.pvme.io/images/6gwUuPF.png" alt="" title="" kind="media" /></p> | |||
<nowiki> | <nowiki> | ||
</nowiki><p><nowiki> | </nowiki> | ||
<p class="pvme-source-line"><nowiki>⬥ If done correctly, the entangle will prevent the pet from moving until the chargers get into position. Once in position, the chargers will block the pet.</nowiki></p> | |||
<nowiki> | <nowiki> | ||
</nowiki><p | </nowiki> | ||
<p class="pvme-source-line pvme-source-spacer"><nowiki></nowiki></p> | |||
<nowiki> | <nowiki> | ||
</nowiki>< | </nowiki> | ||
</div> | |||
<div class="pvme-source-mechanic"> | |||
<h3 id="southeast-corner"><nowiki>Southeast Corner</nowiki></h3> | |||
<nowiki> | <nowiki> | ||
</nowiki><p> | </nowiki> | ||
<p class="pvme-source-line"><nowiki>⬥ Lower the 3rd pet/BM as you see fit.</nowiki></p> | |||
<nowiki> | <nowiki> | ||
</nowiki><p><nowiki>⬥ | </nowiki> | ||
<p class="pvme-source-line"><nowiki>⬥ Base tank - run BM when the 3rd pet dies to avoid taking too much damage; stacks are only received from melee hits. Using emerald aurora </nowiki><pvme-image src="https://cdn.discordapp.com/emojis/914077639784935424.png?v=1" alt="emeraldaurora" title="emeraldaurora" kind="icon" /><nowiki> for additional damage reduction is helpful.</nowiki></p> | |||
<nowiki> | <nowiki> | ||
</nowiki><p><nowiki> | </nowiki> | ||
<p class="pvme-source-line"><nowiki>⬥ DPS player finishes off the pet that is stuck.</nowiki></p> | |||
<nowiki> | <nowiki> | ||
</nowiki>< | </nowiki> | ||
<p class="pvme-source-line pvme-source-spacer"><nowiki></nowiki></p> | |||
<nowiki> | <nowiki> | ||
</nowiki>< | </nowiki> | ||
</div> | |||
<div class="pvme-source-mechanic"> | |||
<h3 id="killing-bm"><nowiki>Killing BM</nowiki></h3> | |||
<nowiki> | <nowiki> | ||
</nowiki><p><nowiki>⬥ | </nowiki> | ||
<p class="pvme-source-line"><nowiki>⬥ DPS player can act as the backup tank, allowing the base tank to do their damage rotation.</nowiki></p> | |||
<nowiki> | <nowiki> | ||
</nowiki><p><nowiki>⬥ | </nowiki> | ||
<p class="pvme-source-line"><nowiki>⬥ Try not to run BM too far from the non-tank player's damage-boosting ultimate.</nowiki></p> | |||
<nowiki> | <nowiki> | ||
</nowiki><p | </nowiki> | ||
<p class="pvme-source-line pvme-source-spacer"><nowiki></nowiki></p> | |||
<nowiki> | <nowiki> | ||
</nowiki> | </nowiki> | ||
</div> | |||
</div> | |||
</div> | |||
<div class="pvme-source-attribution">[https://pvme.io/pvme-guides/rs3-full-boss-guides/beastmaster-durzag/duo-bm/ PvME source] · PvME contributors · [https://creativecommons.org/licenses/by-nc-sa/4.0/ CC BY-NC-SA 4.0]. AI-assisted formatting; source wording retained. | |||
</div> | |||
Revision as of 00:56, 16 November 2026
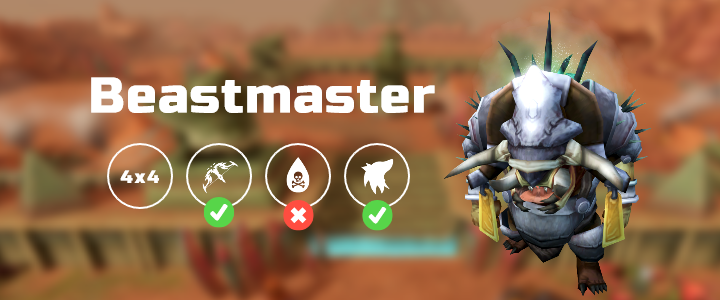
Duo BM
Introduction
This guide assumes that you already have an understanding of mechanics of the fight - #beastmaster-basic
The Strategies
⬥ There are two main strategies to duo BM:
• AoE stack strategy - stacking and tanking everything at once, dealing damage with AoEs
• Entangle strategy - uses entangle to get the 2nd pet stuck, reducing damage taken
General Notes
⬥ It will be significantly easier if the base tank uses 
 , especially if they are tanking pets at the same time for the AoE strategy.
⬥ Cryptbloom  with animate dead



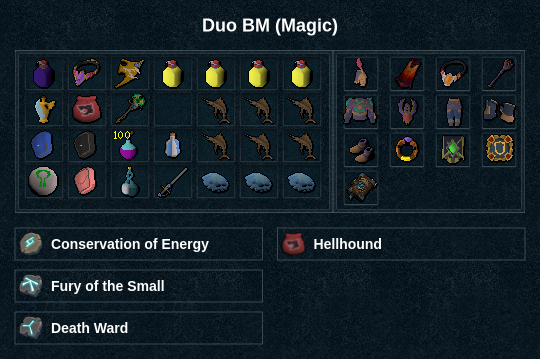
AoE Stack Strategy
⬥ Stand by the north gong where the 2nd pet spawns, and ideally deal damage to both the pets and BM using AoE attacks
Stacking Phase

⬥ Stay in melee distance to the pet to only take melee damage whilst stacking the enemies.
⬥ Walk the pet/BM to stack them for AoEs if necessary.
⬥ Focus on killing one of the pets, particularly if stacking BM on the pet fails
⬥  Prisms of restoration may not be able to spawn if surrounded by enemies - place the prism before starting, and extend it during the fight
⬥ The 3rd pet and chargers will spawn once the 2nd pet's health is lowered sufficiently - continue to deal damage with AoEs.
One Pet Dead
⬥ Base tank - run BM to avoid taking too much damage; stacks are only received from melee hits. Using emerald aurora  for additional damage reduction is helpful.
⬥ DPS player - finishes off the remaining pet. provoke  and tank the pet, using again if it jumps onto the base tank.
Both Pets Dead
⬥ DPS player helps to kill BM - the DPS player can act as the backup tank, allowing the base tank to do their damage rotation.
⬥ Try not to run BM too far from the non-tank player's damage-boosting ultimate.
Entangle Strategy
⬥ Uses entangle  to manipulate the 2nd pet, preventing it from attacking until you are ready to kill it.
⬥ This strategy aims to use chargers to block the 2nd pet.
• Therefore, BM must not be in combat until you are ready to have it summon the chargers and 3rd pet.
Pet 2 Lure

Note: Do not aggro BM
1) Stand at the closest charger cage that is south of the west gong as the fight starts.
2) Wait for pet to jump to you → cast entangle on pet.
3) Do not attack, move to the southwest corner of the arena and wait for the pet to jump again.

4) Attack the pet; lower its health to around 25k.
Pet is Lowered - Getting it Stuck
1) Run towards the middle to aggro BM, cast reflect  whilst doing this
2) Run back towards the pet - cast entangle on the pet as BM comes close, and use freedom  or anticipate
 as you will be stunned by the 3rd pet
3) Wait for chargers to spawn - just as the chargers start to move, surge  east and go to the southeast corner

⬥ If done correctly, the entangle will prevent the pet from moving until the chargers get into position. Once in position, the chargers will block the pet.
Southeast Corner
⬥ Lower the 3rd pet/BM as you see fit.
⬥ Base tank - run BM when the 3rd pet dies to avoid taking too much damage; stacks are only received from melee hits. Using emerald aurora for additional damage reduction is helpful.
⬥ DPS player finishes off the pet that is stuck.
Killing BM
⬥ DPS player can act as the backup tank, allowing the base tank to do their damage rotation.
⬥ Try not to run BM too far from the non-tank player's damage-boosting ultimate.