Amascut 2000 Ranged Melee Dps
Introduction
This is an advanced guide which assumes a strong underlying knowledge of all mechanics and information presented in Amascut Nm Mechanics and Amascut 2000 Mechanics.
Preset Suggestions
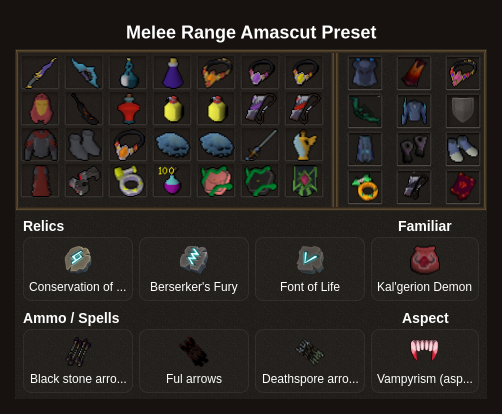
⬥ Range - Melee Preset Example Guide illustration
Rotations
Wars
sdeathsporearrows deadshot or deathsporearrows grico → sezk spec



Phase 1
4pc edracocoif + nightmaregauntlets camp can swap gloves after snipe


rdeathsporearrows deadshot (ezk spec) + grico → deathsswiftness → imbueshadows → ecb eofspec → bolg spec → (blackstonearrow) galeshot → rapid → (fularrow) after 3 hits → deadshot → gloomfirebow eofspec → grico → ecb eofspec → snipe → gloomfirebow eofspec (+ adrenrenewal if 53% after gloomfirebow eofspec) → shadowtend → gloomfirebow eofspec → galeshot → grico → rapid → meteorstrike (+ adrenrenewal if not used yet) → adaptivestrike → berserk → (tc gorillaakh)










Notes:
⬥ If your starts are consistently under 30 seconds from stalling on dummy you can deathsporearrows grico on dummy and sezk spec → rezk spec → deathsporearrows grico on amascuthead


⬥ do snapshot → snapshot → grico after the last gloomfirebow eofspec for more consistent BTK skips
Phase 2 and 3
(tc gorillaakh) + overpower → bloodlust cane → (punish)


(tc imperialwarriorakh) + freedom → barge → bloodlust assault → rend


Faster Variation:
surge + (tc imperialwarriorakh) + chaosroar → varanussmercy → punish


West Chains:
In Middle chain: gfury → overpower

Both Side chains: galeshot → deadshot → bolg spec
East Chains:
Side chains: dive → gfury → overpower

Middle chain: varanussmercy eofspec / bloodlust cane
Middle chain (Solo): sbloodlust cane → rbloodlust cane + pulverise

Modest Crocodile
Out Role: Click + prismofsalvation Statue closer to amascuthead

Out Role: (tc modestcrocodile) + ecb eofspec Lower to 40k → deathsporearrows + piercingshot → grico → piercingshot → (Build to 100%)


In Role: (tc modestcrocodile) + deathsporearrows grico → (tc amascuthead) + piercingshot → rangedbasic → piercingshot → (Build to 100%)

Amascut
Be 3+ perfectequilibrium stacks

deathsporearrows deathsswiftness → imbueshadows + fularrow ecb eofspec → bolg spec → galeshot → rapid → gloomfirebow eofspec → grico → ecb eofspec → dbow eofspec → snapshot → snipe → shadowtend → grico →

meteorstrike → sadaptivestrike Don't let this hit → (divert) → berserk → barge → consecratedkeris overpower → bloodlust gflurry → chaosroar → ezk spec → rend → overpower → bloodlust cane → bloodlust assault → gfury → overpower → (punish → bloodlust gflurry)


Notes:
⬥ If ezk spec wasn't done on P1 do bloodlust gflurry → ezk spec → chaosroar → bloodlust cane
⬥ scarabakh mostly skipped: backhand / bindingshot


⬥ scarabakh not skipped: build to cade

Phase 4
In Role throw scarabakh into portal, Out Role throw scarabakh onto gorillaakh
amascuthead → (if below 73% imbueshadows) → deathsporearrows piercingshot → grico → piercingshot → deathsswiftness → imbueshadows → ecb eofspec while scarabakh spawn → fularrow bolg spec (tc scarabakh) + throw on + (tc gorillaakh)
(tc gorillaakh) + shadowtend → gloomfirebow eofspec → grico to kill scarabakh → inside
Out Role throw 1 scarabakh + inside
(tc imperialwarriorakh) + ecb eofspec → snipe → snapshot → galeshot → grico
Both sides:
Side Chains: deadshot
Middle Chain: In dbow eofspec / out snapshot
Amascut
Out Roles:
utilize deathsporearrows naturalinstinct and divert to dba, if you do rend the ezk spec and chaosroar → cane instead


Everyone:
Start with at least 2 bloodlust stack meteorstrike → sadaptivestrike → berserk → gbarge → overpower → bloodlust gflurry → chaosroar → ezk spec → punish → overpower → (varanussmercy eofspec) → cane

Phase 5
Around the time both solo charges are done and both middle fragments are at 50%, prepare with: meteorstrike → adaptivestrike → berserk
As Tumeken's reform starts, move next to Tumeken and wait till 'GET OUT OF MY WAY' → (tumekenslight spec) → cane → (cane) → overpower → ezk spec → assault → gfury → overpower → punish → improvise

Notes:
⬥ It's important for G1/G2 not to move in front of the boss, until the last interceptor has moved back into charging position, this allows for continuous charging for the fastest phase time and skipping 1 jump.
⬥ All other charging roles need to swap positions with max 1t delay as well for the perfect charge.
⬥ Click middle when charge is 1t off, filled or 1t after filled on the same tick that the green lines appear on the floor.
⬥ Perfect Charge Animation: 150 Charging MethodSource video
Phase 6
Non tumekensfragment:

meteorstrike → deathsporearrows grico → sadaptivestrike → berserk → gbarge → overpower → (tumekensfragment / assault → cane → adaptivestrike) → (tc amascuthead) + deathsporearrows grico → deathsswiftness move behind amascuthead → imbueshadows + fularrow → bolg spec → ecb eofspec → grico → decimation eofspec (+ adrenrenewal) → As her second arm stops moving snipe + powerburstofvitality → dbow eofspec → (dbow eofspec) → ecb eofspec → galeshot → rapid → deadshot → dbow eofspec → snapshot → dbow eofspec → meteorstrike before phase*


tumekensfragment Jump Rotation:
Click tumekensfragment → (tc imperialwarriorakh) + bloodlust cane → (tc imperialwarriorakh) + pulverise → (tc imperialwarriorakh) + overpower → (tc imperialwarriorakh) + chaosroar → assault → Click tumekensfragment → Down
(tc amascuthead) + imbueshadows → deathsporearrows grico → deathsswiftness → decimation eofspec → gloomfirebow eofspec → snapshot → bolg spec → ecb eofspec → galeshot → rapid → deadshot → gloomfirebow eofspec → grico → snapshot (+ adrenrenewal) → gloomfirebow eofspec → meteorstrike before phase
Phase 7
barge → berserk → assault → overpower → gfury → cane → punish → assault (3tick) → overpower → If not Scarabus chaosroar (voke Mid GCD) → ezk spec

Example Kills
⬥ R/M 2k 07:01 and 07:03 Examples

Attribution and source history
Adapted from Amascut 2000 Ranged Melee Dps by PvME contributors. Upstream source history. Licensed CC BY-NC-SA 4.0. Snapshot 074a9438f79d10fba75735791be0030734db8b5e. Formatting adapted for standalone MediaWiki; media and third-party references remain external links.