Kerapac, the Bound - Solo Necromancy
AI-assisted additive formatting; current PvME source words, order and media preserved |
Update source attribution; preserve PvME guide content |
||
| Line 211: | Line 211: | ||
</div> | </div> | ||
<div class="pvme-source-attribution">[https://pvme.io/pvme-guides/rs3-full-boss-guides/kerapac/solo-hard-mode-necromancy/ PvME source] · PvME contributors · [https://creativecommons.org/licenses/by-nc-sa/4.0/ CC BY-NC-SA 4.0] | <div class="pvme-source-attribution">[https://pvme.io/pvme-guides/rs3-full-boss-guides/kerapac/solo-hard-mode-necromancy/ PvME source] · PvME contributors · [https://creativecommons.org/licenses/by-nc-sa/4.0/ CC BY-NC-SA 4.0]. | ||
</div> | </div> | ||
Latest revision as of 02:37, 16 November 2026
Kerapac, the Bound - Solo Necromancy

Introduction
This guide assumes you are already familiar with the basic mechanics of Kerapac which can be seen here #kerapac-hm-basic and own BIS gear in Necromancy.
It is required to have a Nodon dragonkin slayer task  as the genocidal boost does work with Necromancy. You may also use the Premier Artefact
 to have a 10% chance to not decrease the slayer task count with each kill.
Presets and Relics
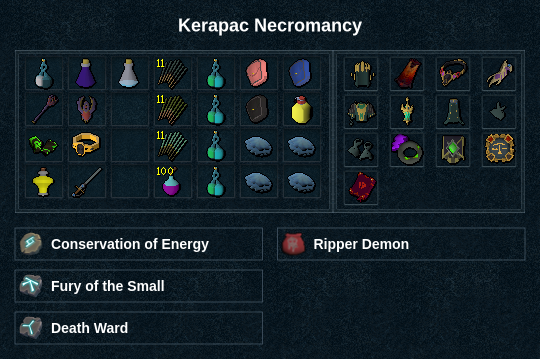
Additional Info
⬥ 3%+  , Nodon dragonkin task required,
 switch
⬥ Drinking  through the kill is required for this method to work, ideally 4-5
⬥ There will be some RNG involved in this strategy due to low  proc rates on
 and
 adrenaline gain during

Pre-fight (Wars Retreat)
Get 4  at wars,
 and 4+

Pre-fight (Boss Arena)
join instance → drop combat →  →
 →
 → wait 1t +
 →
 →
 →

Phase 1
tc +  +
 →
 +
 →
 →
 →
 +

 → → step under +
 →
 → →

 → →
 →
 → → → basics if not phased
Phase 2
+ 1t →  → → → →
 → → → + step under →
 → → → → → → → basics till phased, ensure 4-5 by the start of p3
Phase 3
if you can skip jumps p1 → + 1t → → → → → → → → + step under → → → → → → → →  → unequip
 , re-equip + equip
 + → basics if not phased
Phase 4
Echo 1: → → + enter echo → +  → → → → → → → → walk 2 tiles SE +
 to echo 2
Echo 2: + → basic for 100 adren if needed, otherwise + 1t → + → → → → → → + to echo 3
Echo 3: may need more abilities if does not bounce
→ + → → → + to kerapac
Kerapac: use  +
 +
 to maximise damage
+ equip → → → → → →
Notes
Phase 1
⬥ If you  on you can skip
⬥ see !0tick on how to without losing
⬥ If is available, use it while  immune and get 100 adren for instant .
⬩ On kills with 0 jumps, will not be up. if you have adren from procs you can while is immune for extra damage
Phase 2
⬥ You can opt to ;  after step under for some consistent damage, but it is not required.
⬥ If no adren, end with and → when ends
Phase 3
⬥ Try not to skip jump p3 as you cant if Kerapac is not in attack range