Kerapac — Solo Hard Mode Necromancy

Introduction
This guide assumes you are already familiar with the basic mechanics of Kerapac which can be seen here Kerapac HM Basic and own BIS gear in Necromancy.
It is required to have a Nodon dragonkin slayer task slayer as the genocidal boost does work with Necromancy. You may also use the Premier Artefact premierartefact to have a 10% chance to not decrease the slayer task count with each kill.


Presets and Relics
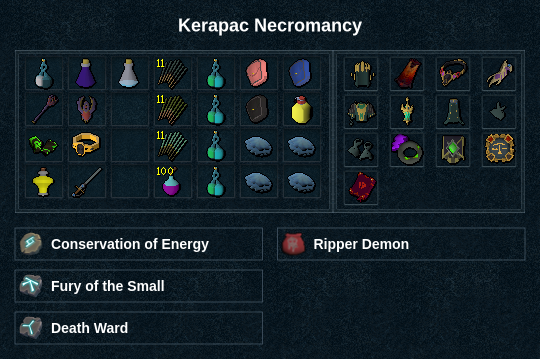
Additional Info
⬥ 3%+ genocidal, Nodon dragonkin task required, flank4 switch


⬥ Drinking spiritualprayer through the kill is required for this method to work, ideally 4-5

⬥ There will be some RNG involved in this strategy due to low scriptureofful proc rates on necromancy and divert adrenaline gain during timewarp




Pre-fight (Wars Retreat)
Get 4 residualsoul at wars, dummy and 4+ necrosis


Pre-fight (Boss Arena)
join instance → drop combat → conjurearmy → lifetransfer → commandghost → wait 1t + surge → invokedeath → splitsoul → commandskeleton







Phase 1
tc + vuln + bloat → deathskulls + adrenrenewal → soulsap → volleyofsouls → ingen + roarofawakening spec → soulsap → step under + omniguard spec → soulstrikeflank → commandskeleton → deathguard90 eofspec → soulsap → deathsparkorsoulreave → touchofdeath → soulsap → deathsparkorsoulreave → basics if not phased








Phase 2
timewarp + 1t → livingdeath → divert → touchofdeath → soulsap → necrobasic → deathskulls → bloat → deathskulls + step under → fingerofdeath → necrobasic → necrobasic → deathskulls → fingerofdeath → necrobasic → touchofdeath → basics till phased, ensure 4-5 residualsoul by the start of p3



Phase 3
lifetransfer if you can skip jumps p1 → timewarp + 1t → livingdeath → divert → touchofdeath → soulsap → necrobasic → deathskulls → bloat → splitsoul + step under → deathskulls → fingerofdeath → touchofdeath → volleyofsouls → commandskeleton → fingerofdeath → soulsap → commandzombie → unequip soulboundlantern, re-equip soulboundlantern + equip firstnecrohandwrap + conjurearmy → basics if not phased



Phase 4
Echo 1: conjurearmy → invokedeath → commandghost + enter echo → bloat + vulnbomb → commandskeleton → soulsap → omniguard spec → deathsparkorsoulreave → soulsap → touchofdeath → deathsparkorsoulreave → walk 2 tiles SE + dive to echo 2


Echo 2: invokedeath + vulnbomb → basic for 100 adren if needed, otherwise timewarp + 1t → livingdeath + adrenrenewal → touchofdeath → deathskulls → bloat → commandskeleton → soulsap → soulsap + dive to echo 3
Echo 3: may need more abilities if deathskulls does not bounce
invokedeath → deathskulls + vulnbomb → invokedeath → soulsap → fingerofdeath + dive to kerapac
Kerapac: use veng + disrupt + rod to maximise splitsoul damage


splitsoul + equip rod → touchofdeath → deathskulls → volleyofsouls → fingerofdeath → fingerofdeath → deathguard90 eofspec
Notes
Phase 1
⬥ If you relentless5 on deathskulls you can skip adrenrenewal

⬥ see !0tick on how to roarofawakening without losing conjurearmy
⬥ If lifetransfer is available, use it while kerapac immune and get 100 adren for instant timewarp.

⬩ On kills with 0 jumps, lifetransfer will not be up. if you have adren from relentless5 procs you can bloat while kerapac is immune for extra damage
Phase 2
⬥ You can opt to flank4; soulstrike after step under for some consistent damage, but it is not required.

⬥ If no divert adren, end timewarp with commandskeleton and deathskulls → bloat when timewarp ends
Phase 3
⬥ Try not to skip jump p3 as you cant conjurearmy if Kerapac is not in attack range
Example Kills
Attribution and source history
Adapted from Solo Hard Mode Necromancy by PvME contributors. Upstream source history. Licensed CC BY-NC-SA 4.0. Snapshot 074a9438f79d10fba75735791be0030734db8b5e. Formatting adapted for standalone MediaWiki; media and third-party references remain external links.