PvME/Telos/Telos Ca
Introduction
This guide assumes a very strong understanding of everything found in Telos Basic, Stuns And Mechanics and P5 Movement And Timing.
Presets and Relics
⬥ Melee Grandmaster Speed Killer melee

⬥ Ranged Grandmaster Speed Killer range Guide illustration

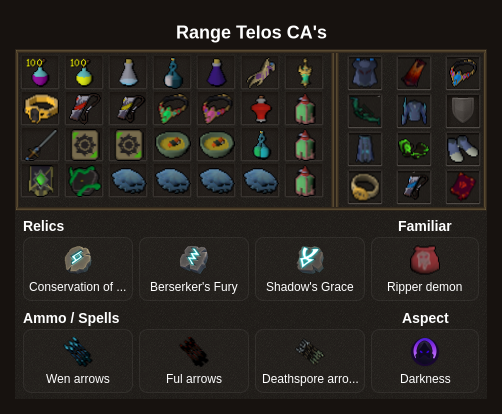
Melee Grandmaster Speed Killer melee
Dragon scimitar and Zaros Godsword EoF's can be swapped out for their physical variants.
Wars
dba spec → sdragonscimitar eofspec


Prebuild
rdragonscimitar eofspec + naturalinstinct → adaptivestrike → meleebasic → meleebasic → pulverise → adaptivestrike → anti → berserk + adrenrenewal → barge → meteorstrike → 1t surge to Telos → slengmh spec






Phase 1
rlengmh spec → assault → overpower → ezk spec + dive to jump spot


Phase 2
barge → gflurry → overpower → cane → rend + dive to jump spot


Phase 3
zgs eofspec → barge → assault → chaosroar → overpower → gfury → punish → rend + dive to jump spot



Phase 4
Rotations here are left in simplified form, with a strong understanding of P4 timing and movement being assumed.
Drop
1t barge → gflurry → cane → adaptivestrike
Font 1
divert → prep → rend → adaptivestrike → anticlearheaded → telos overpower → punish



Font 2
res → devo → reflect → prep → freedom → redgolem barge → telos farcast gflurry → smeteorstrike → dive + rmeteorstrike + adaptivestrike


Font 3
cadeturtling → adaptivestrike → gfury → divert → anticlearheaded → telos sezk spec → rezk spec + punish

Phase 5
Utilise prayer flicking and wearing rod to get through the phase.

berserk + adrenrenewal → barge + disrupt → assault + dive to greenbeam → cane → chaosroar + powerburstofvitality → varanussmercy eofspec → overpower → punish


Ranged Grandmaster Speed Killer ranged
Prebuild
dummy + grico → gdeathsswift → prep → anti → freedom → imbueshadows → grico → bolg spec → piercingshot → galeshot → surge to Telos






Phase 1
sdeadshotigneous → (tc) + rdeadshotigneous + sgb eofspec → dbow eofspec → gricocaroming + dive to jump spot


Phase 2
gloomfirebow eofspec → gricocaroming → gloomfirebow eofspec → dbow eofspec + escape → piercingshot + run to jump spot


Phase 3
piercingshot → gricocaroming → galeshot → snipe → dive to redbeam + sgb eofspec → adrenrenewal + rapid → gricocaroming → piercingshot


Phase 4
Rotations here are left in simplified form, with a strong understanding of P4 timing and movement being assumed. If in doubt, reference Telos Basic for a detailed font-by-font description.
Drop
fularrow deadshotigneous → snapshot


Font 1
divert → anti → piercingshot → imbueshadows → gricocaroming → piercingshot → stickybomb + redgolem → rangedbasic → telos + sgb eofspec → snapshot


Font 2
piercingshot → gricocaroming → reflect → piercingshot → freedom → stickybomb + redgolem → galeshot → telos + deadshotigneous → snapshot
Font 3
deathsporearrows grico + powerburstofvitality → anti → devo → omniguard + soulboundlantern + threadsoffate → telos → invokedeath → soulsap → ingen + volleyofsouls → (equip bolg)







Phase 5
For more information on timing & moving efficiently throughout P5, read: P5 Movement And Timing.
(tc) + vulnbomb + deathsporearrows + gricocaroming → gdeathsswift → cadeturtling → go to greenbeam + ecb eofspec → fularrow + galeshot → gricocaroming + divemobile to redbeam → deadshot → sgb eofspec → snapshot / shadowtend



Note: if redgolem use anti after cadeturtling
Attribution and source history
Adapted from Telos Ca by PvME contributors. Upstream source history. Licensed CC BY-NC-SA 4.0. Snapshot 074a9438f79d10fba75735791be0030734db8b5e. Formatting adapted for standalone MediaWiki; media and third-party references remain external links.